


**What is Angular? **
It is a UI framework built by Google and It is a component based framework for building scalable applications. It helps us build SPA's(Single page applications).
What is SPA?
It is web application that loads a single HTML page where only part of the page gets updated with every click of the mouse. Example - Gmail.
Module?
A Module is a collection of components,services,pipes,directives and so on.
Components
components are the building blocks of the angular application. Components are reusable bits of code that make up your application. example - buttons,cards,navbar and so on.
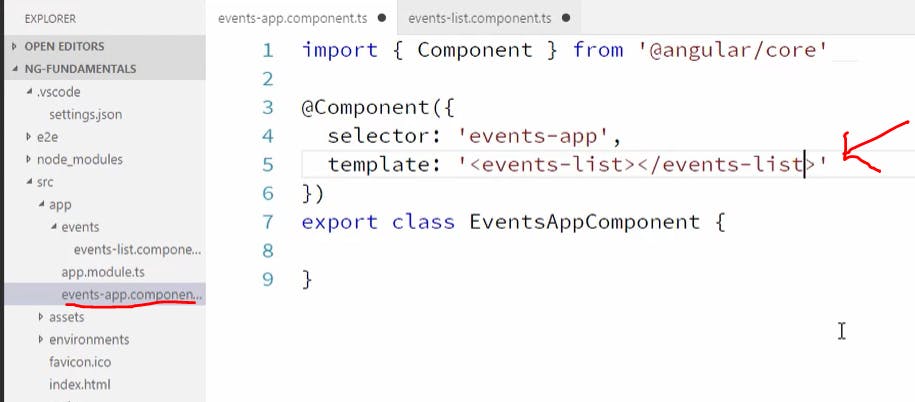
here you can see that we are using events-list component which is under events folder in the events app component. This will display the HTML content of the events-list component.
Communicating between angular components
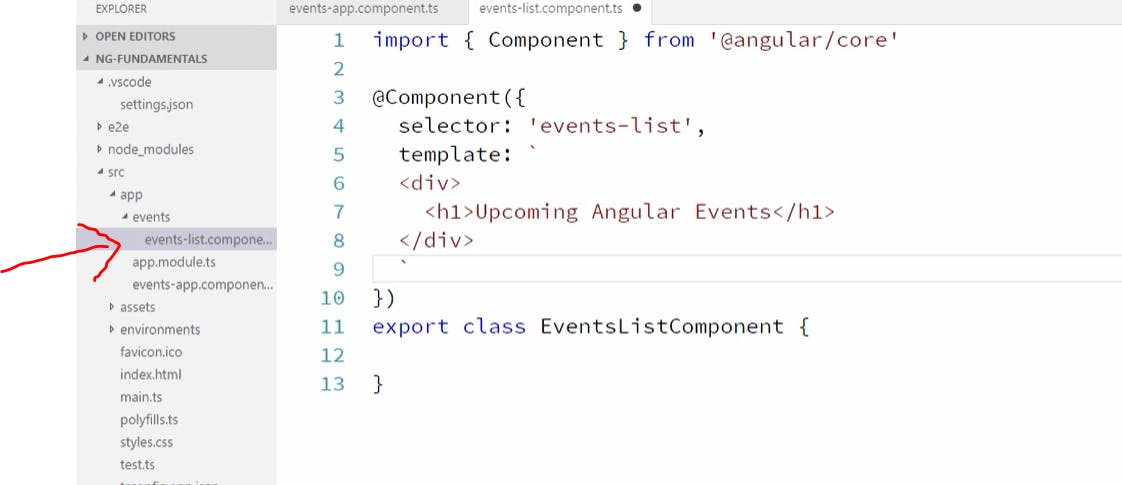
Lets say we want to create a new component. We can do that from the CLI using command " ng g c 'whatever name you want for the component' " or right click on the root module that is the "app" and create a new folder say "events" and then right click on events then create a new file named lets say "events-list"(component). Note here the selectors name
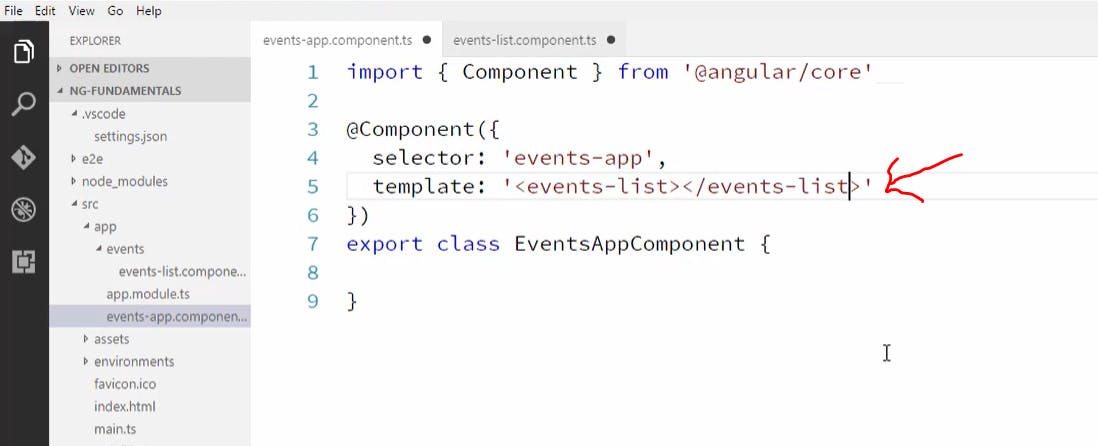
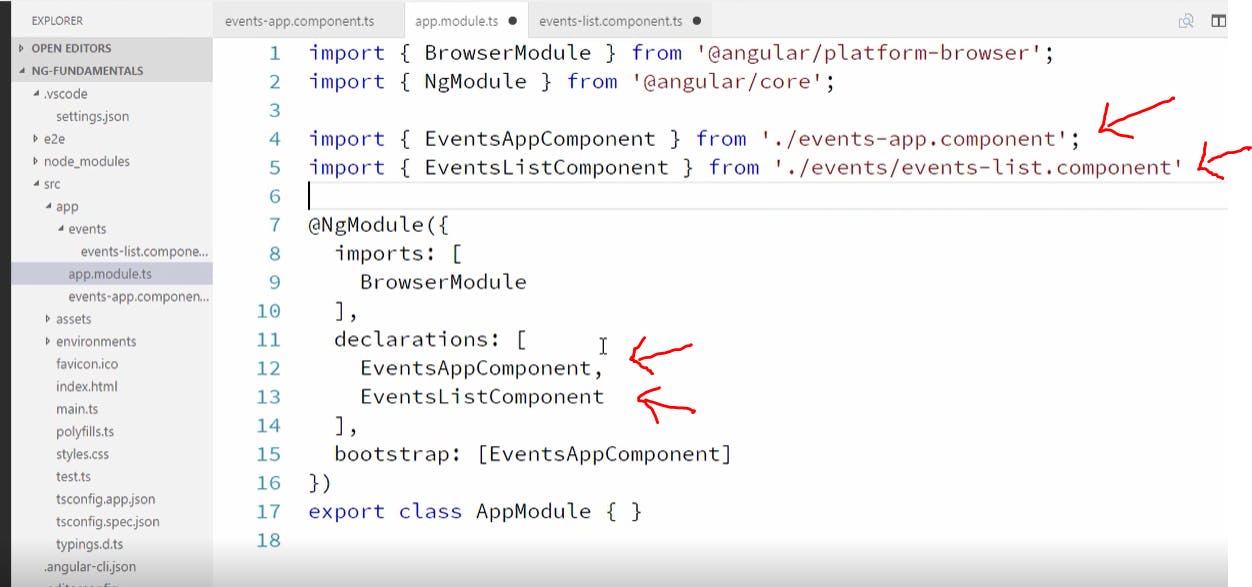
now to use this component in the events-app component we have to wire the events-list component to the events-app component as shown below. Note that to wire the component we are using its selectors name which was mentioned before.
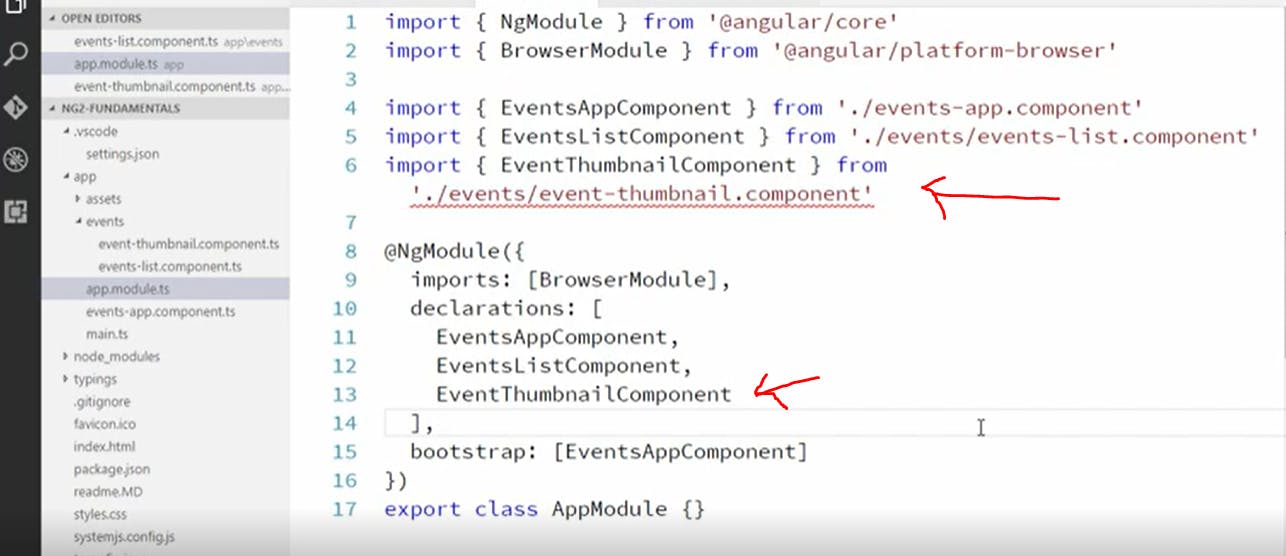
For this to be able to work we also need to register all the components we create in the app-module.ts file or else it will throw an error. This is shown below
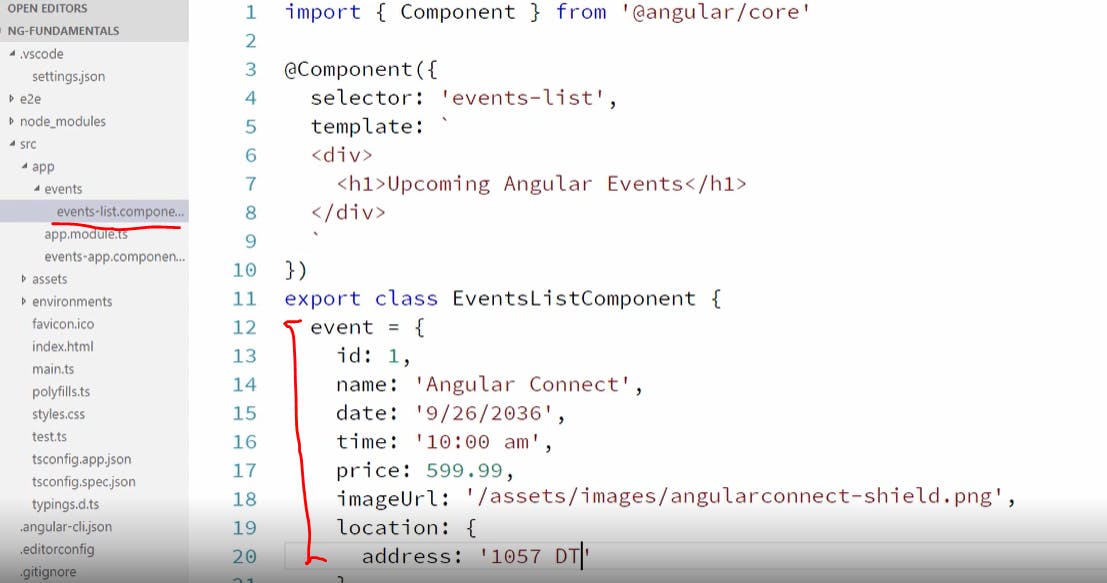
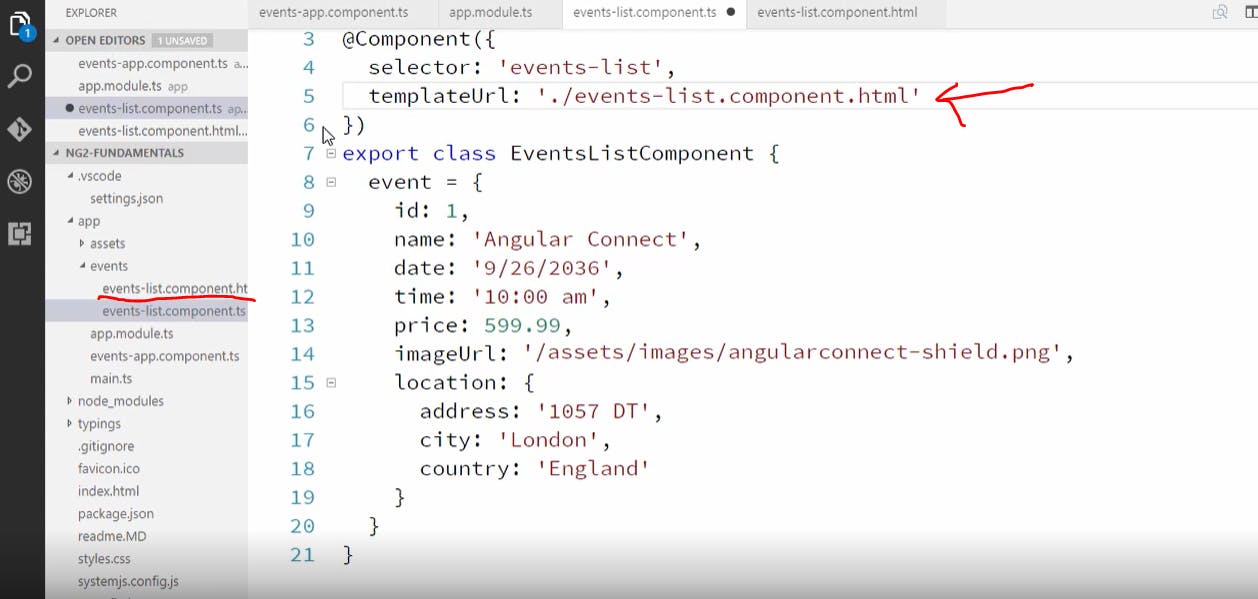
Lets say we want to display an event so we declare an event element in the events-list component with the following attributes shown below
now we use interpolation which is specified within double curly braces to access the objects attributes as shown below
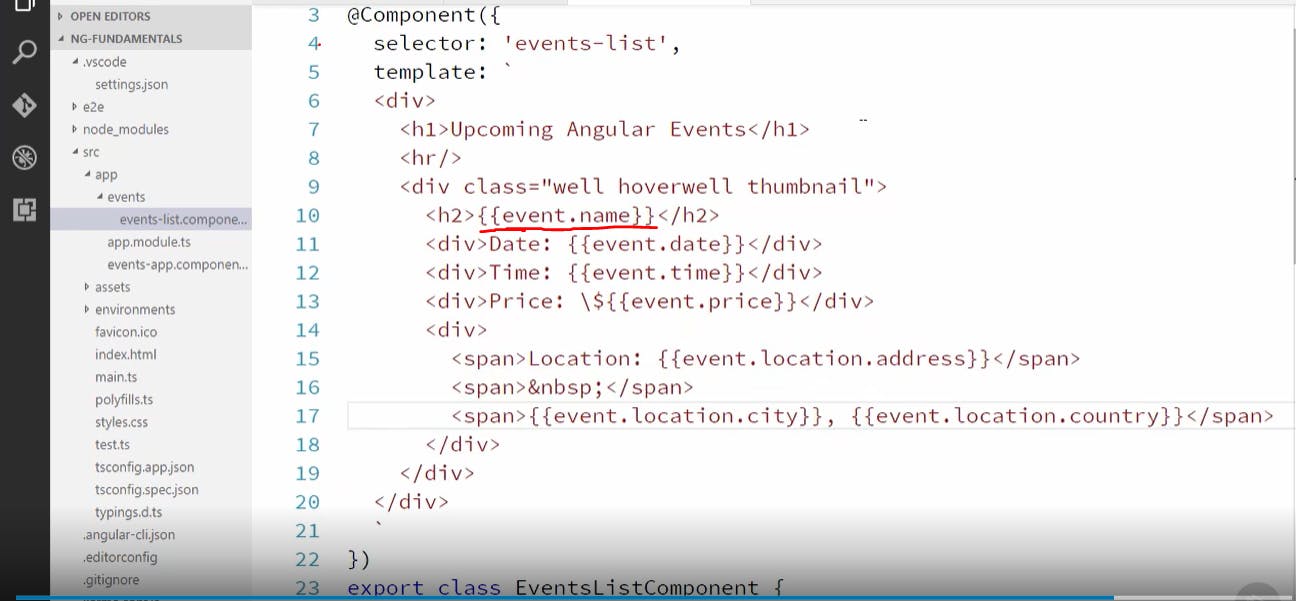
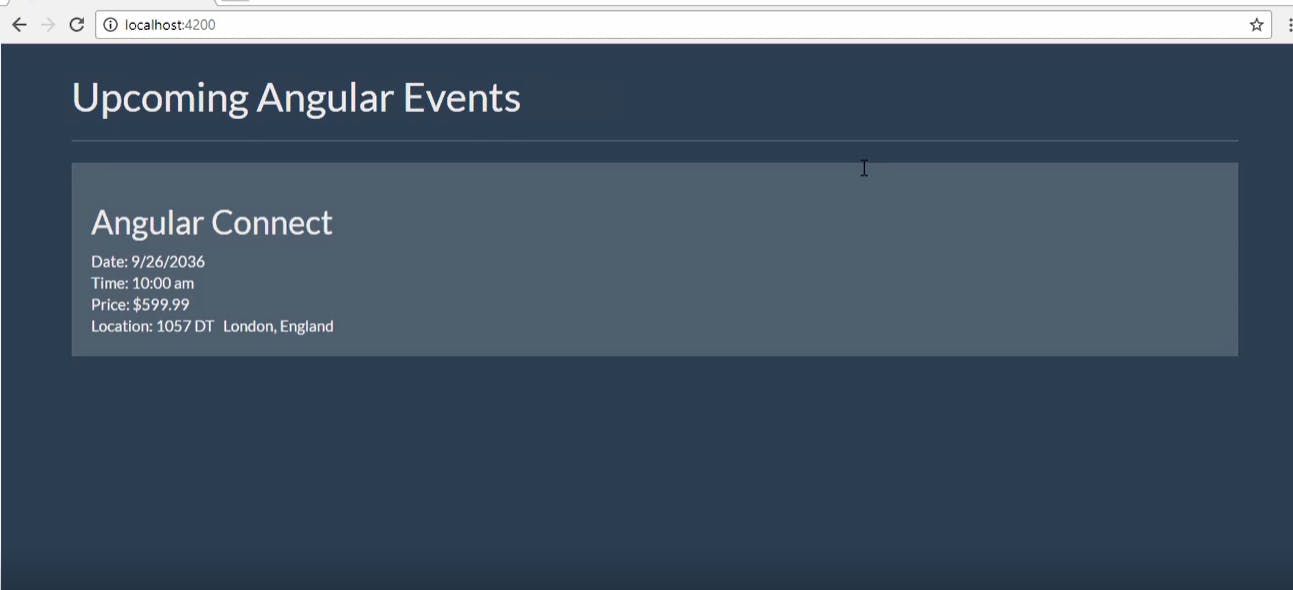
this will search for an object called "event" in the component and get the field specified which in this case is the name field and similarly the other fields also. We have also used bootstrap classes to add styling to the event. And when we check this in the server it will look something like
We don't want to put the html component in the .ts file so we create an events-list component.html file and put all our html there and in the .ts file we specify the templateUrl for the html component shown below
Parent to Child communication
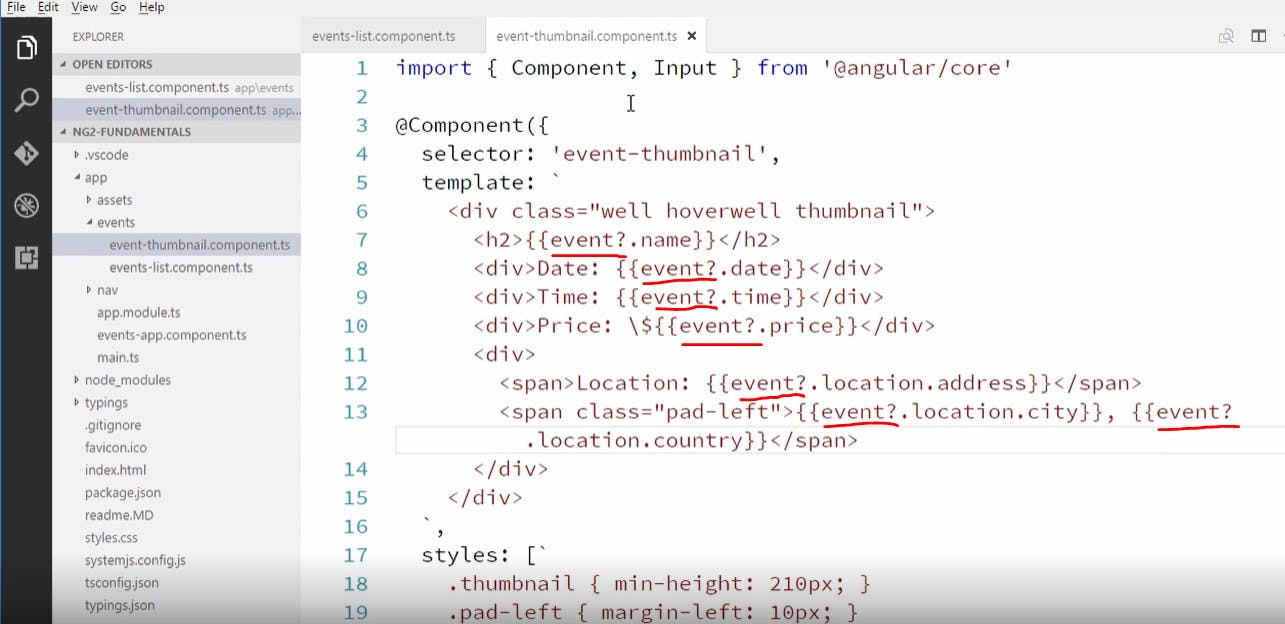
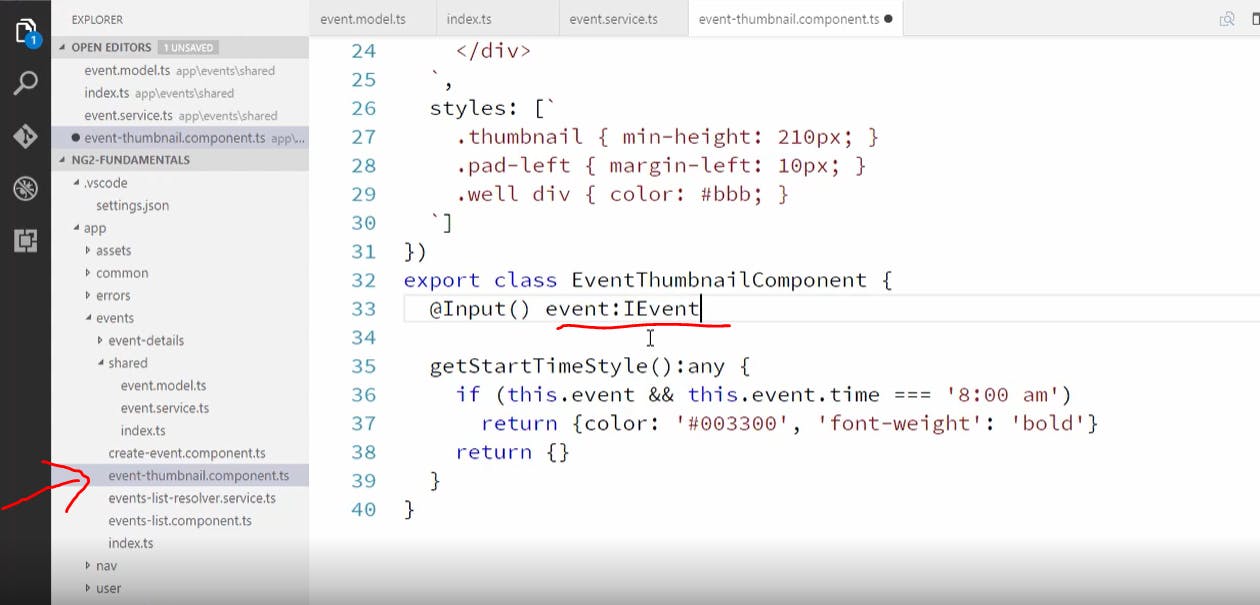
we use the @ Input decorator for parent to child communication. Now lets say we create an event thumbnail component which encapsulates all the display logic for our events. So we put all the html code for displaying our events in the event thumbnail component as shown below
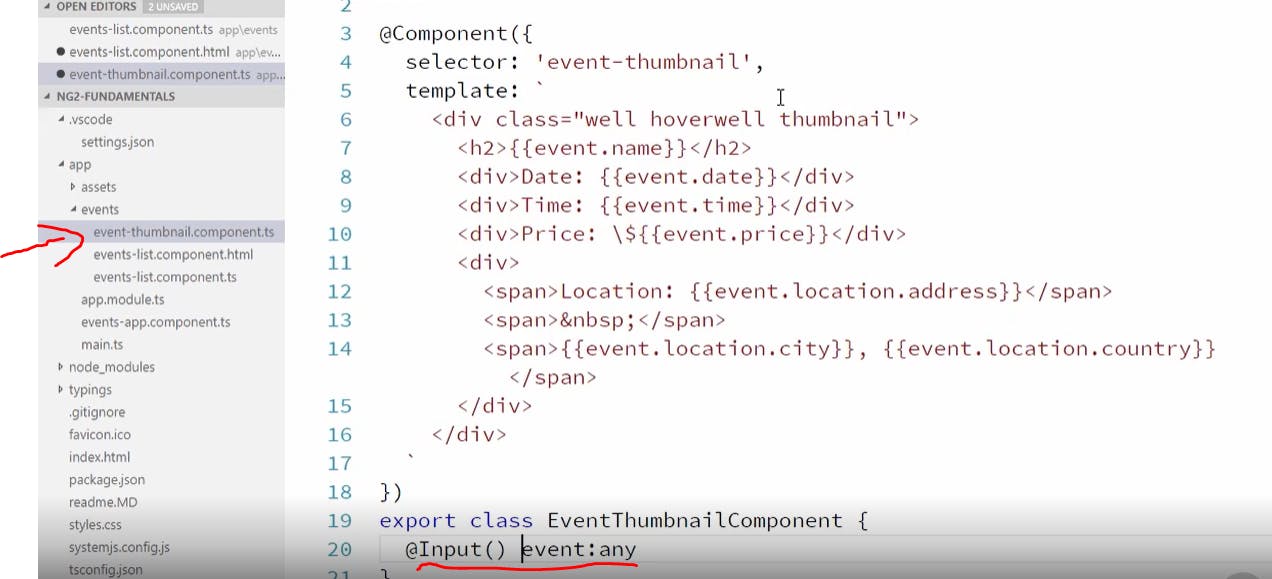
now our thumbnail component is set to bind with event property and here we are saying that there is a property called event which is of type any(for now its of type any) will be passed by another component.
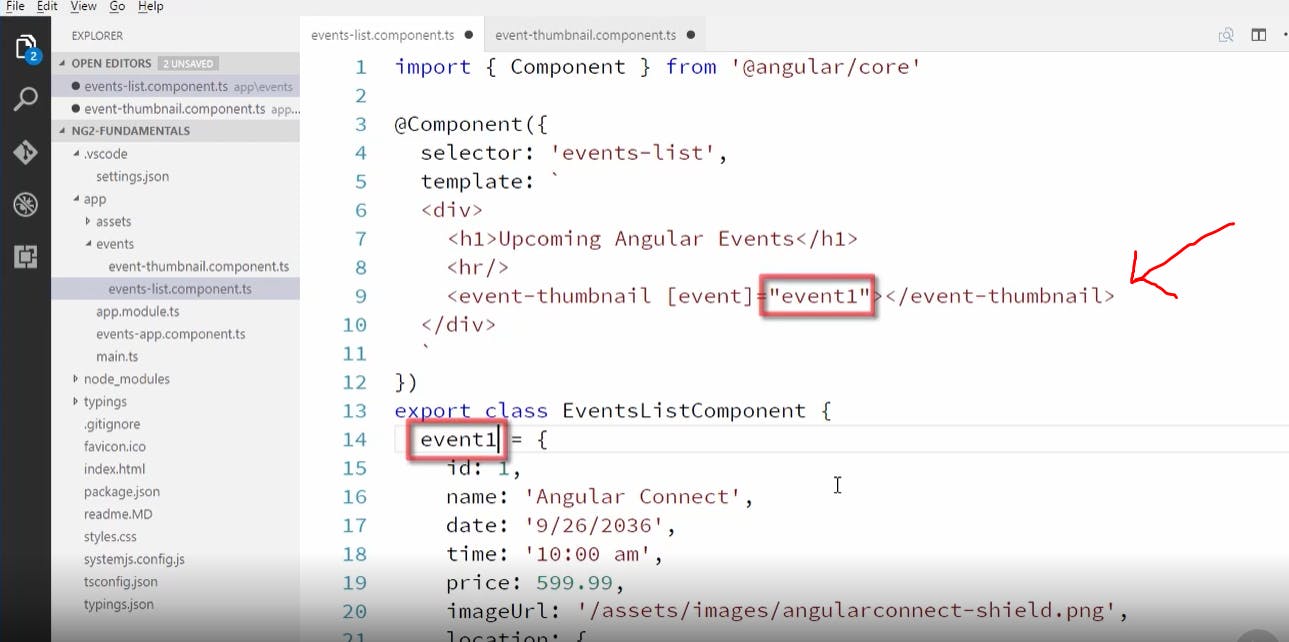
In the above picture we have passed in the thumbnail component in the app-list component inside the template and we are saying that there is an input parameter called event in the thumbnail component for which we want to pass the value of event1 of this component into that component. Once again don't forget to add the thumbnail component in the app module as shown below
Child to Parent communication
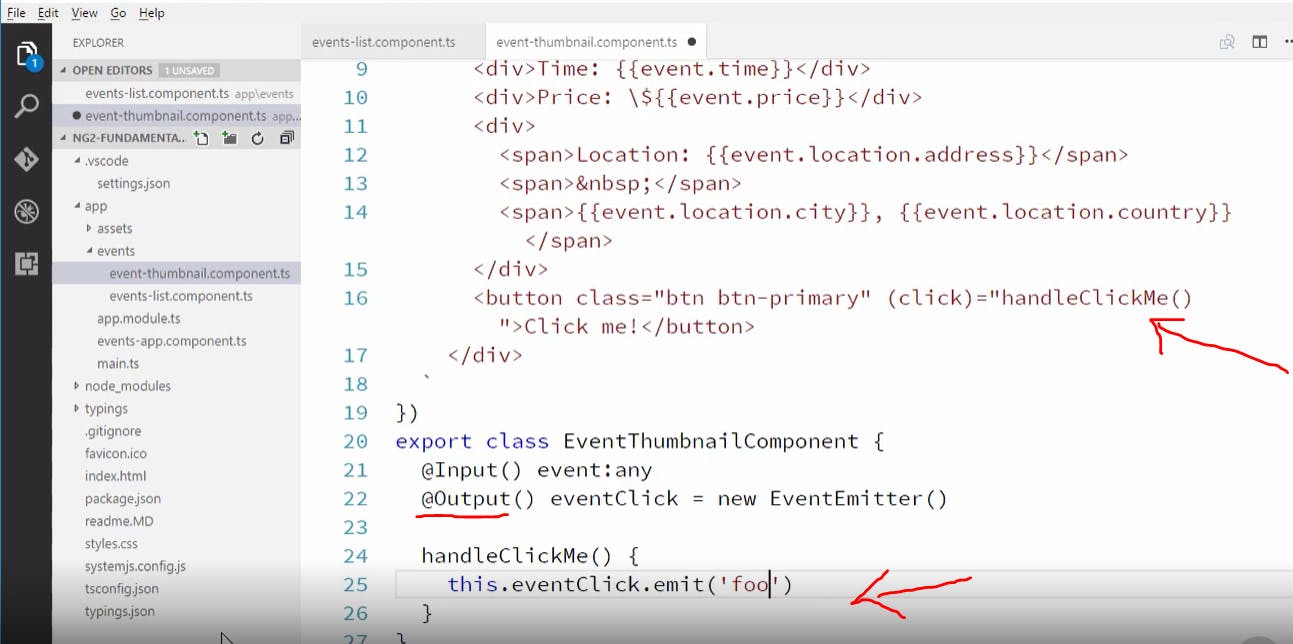
We use @ output decorator for child to parent communication. Lets say here the thumbnail component is the child component and we created a button called "click me" which emits or gives the message "foo" in the console every time its clicked as shown below
now we want our parent component to listen to this and we can do this by adding an event handler to the child component element our parent component which is the events list component as shown below
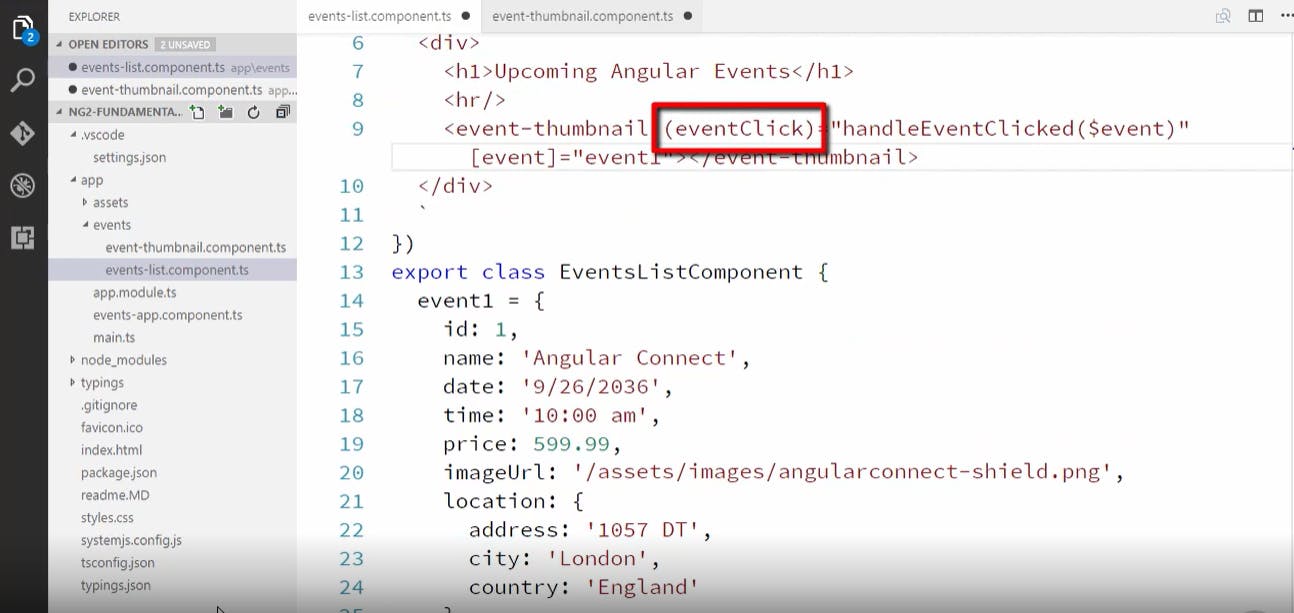
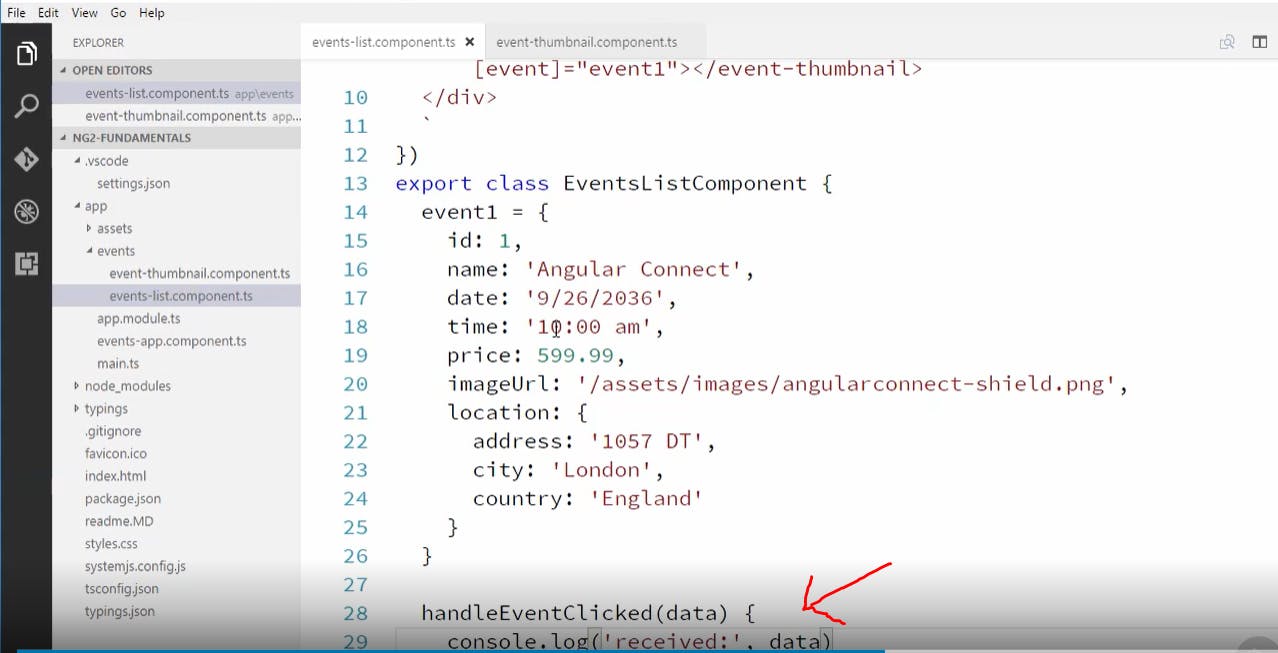
so here we are saying that when the eventClick(this event click should match the evenClick mentioned in child component) is fired in our thumbnail component call "handleClickedEvent()" method from the parent component(events-list component) shown below
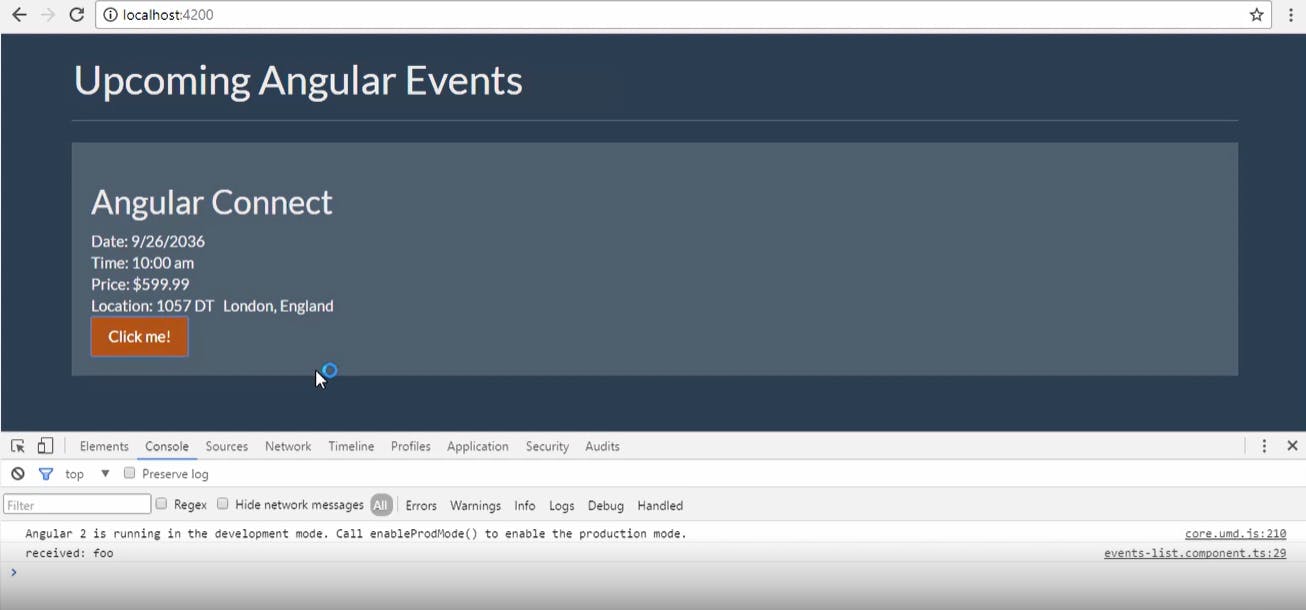
the Output we get in the browser is shown below
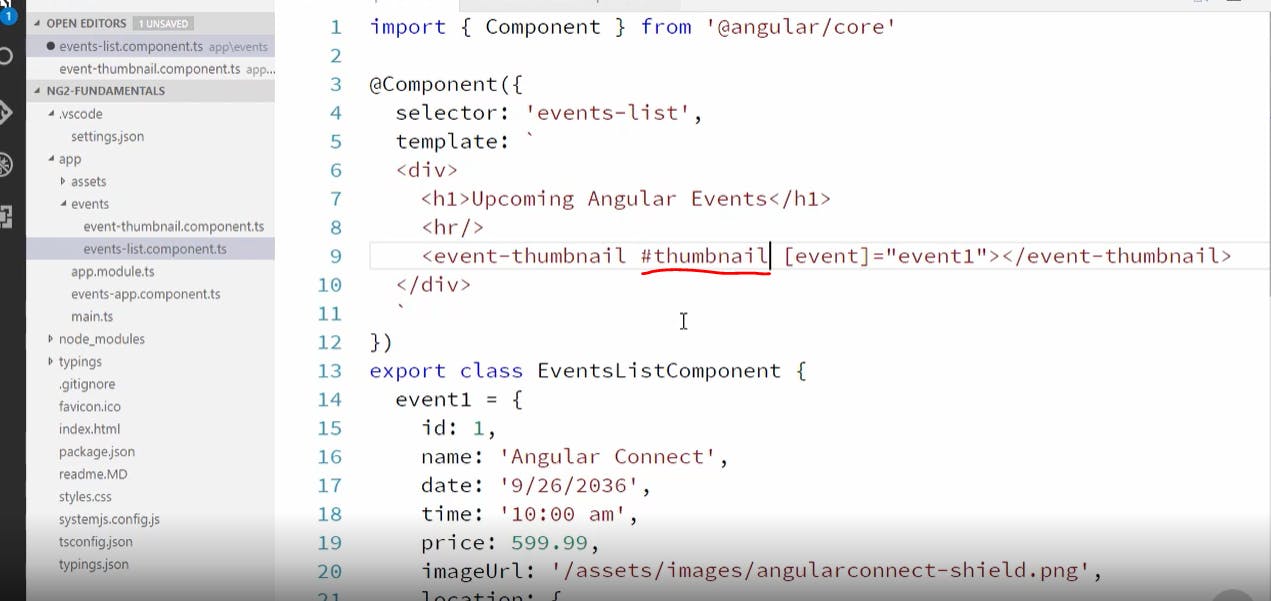
Template Reference variables to interact with child components
Lets say we create a variable named thumbnail in our thumbnail component which is inside our parent component that is the event-list component as shown below
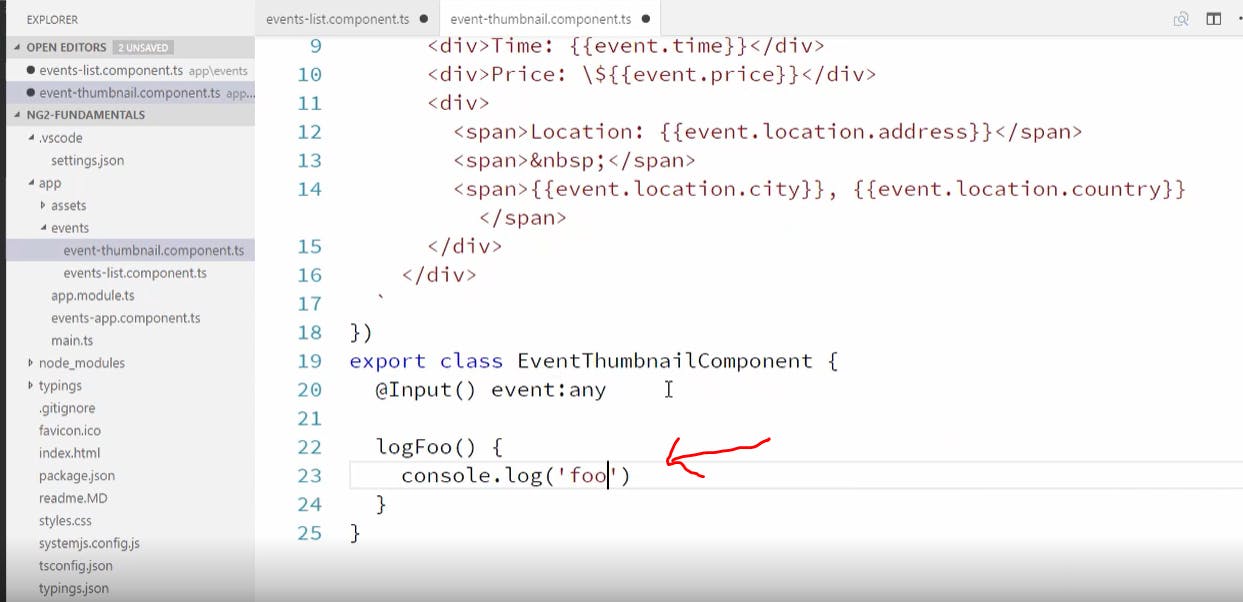
now lets create a method called "logfoo()" in our child component(thumbnail component)
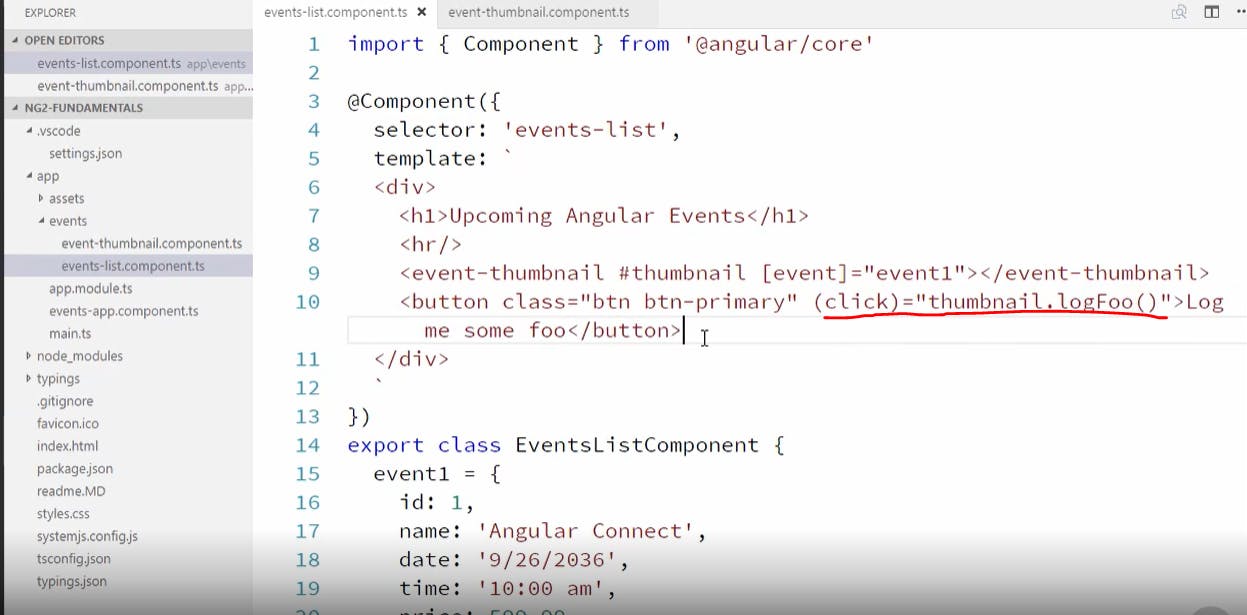
now this method can be accessed in the parent component with the help of the reference variable as shown below
Angular Template Syntax
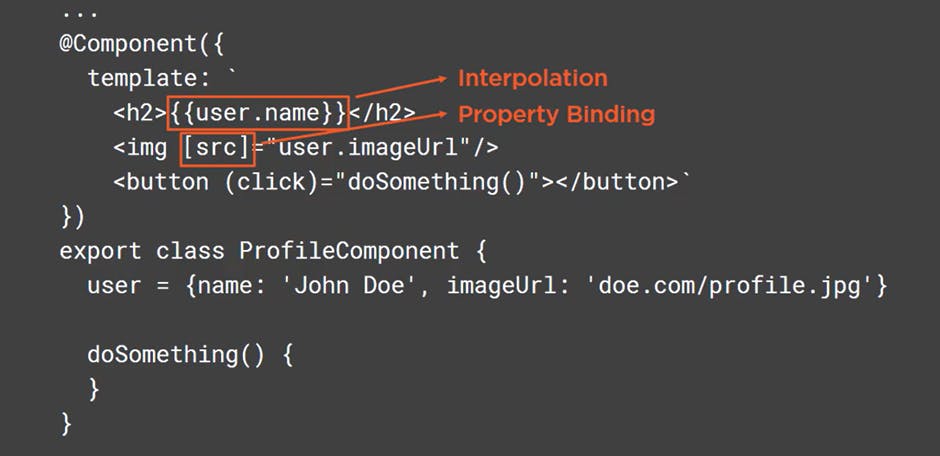
In the above picture both** interpolation** and property-binding are used to bind data from component to the template

in the above picture the highlighted part is called event binding. Here the event click is bound to a method called "doSomething()".
Repeating data with ngFor
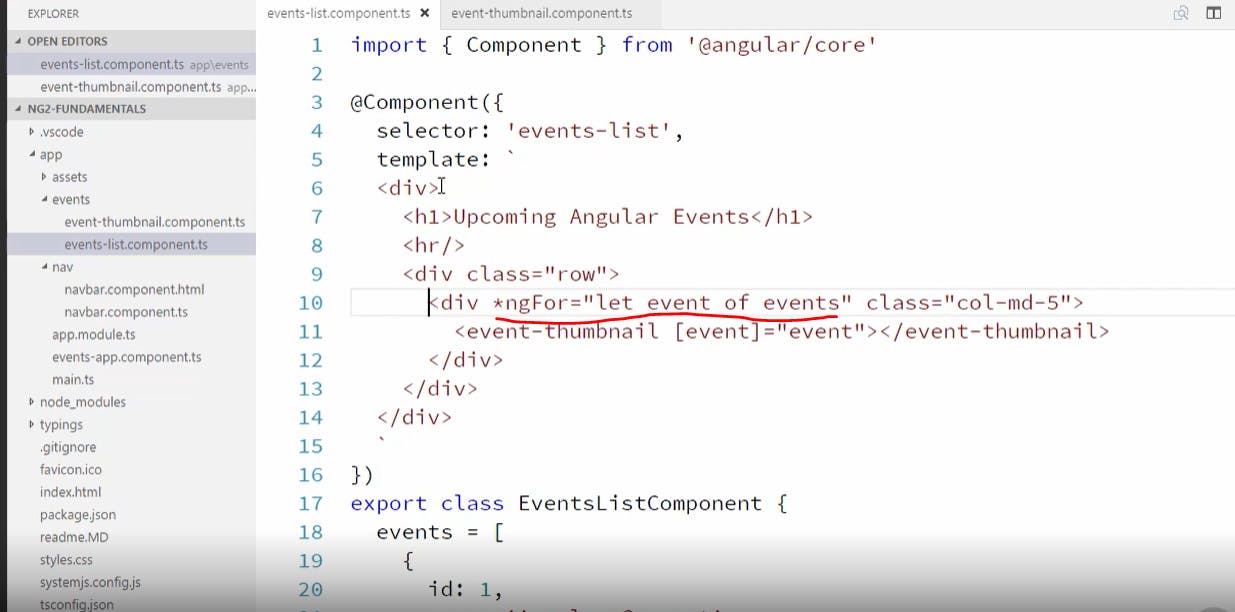
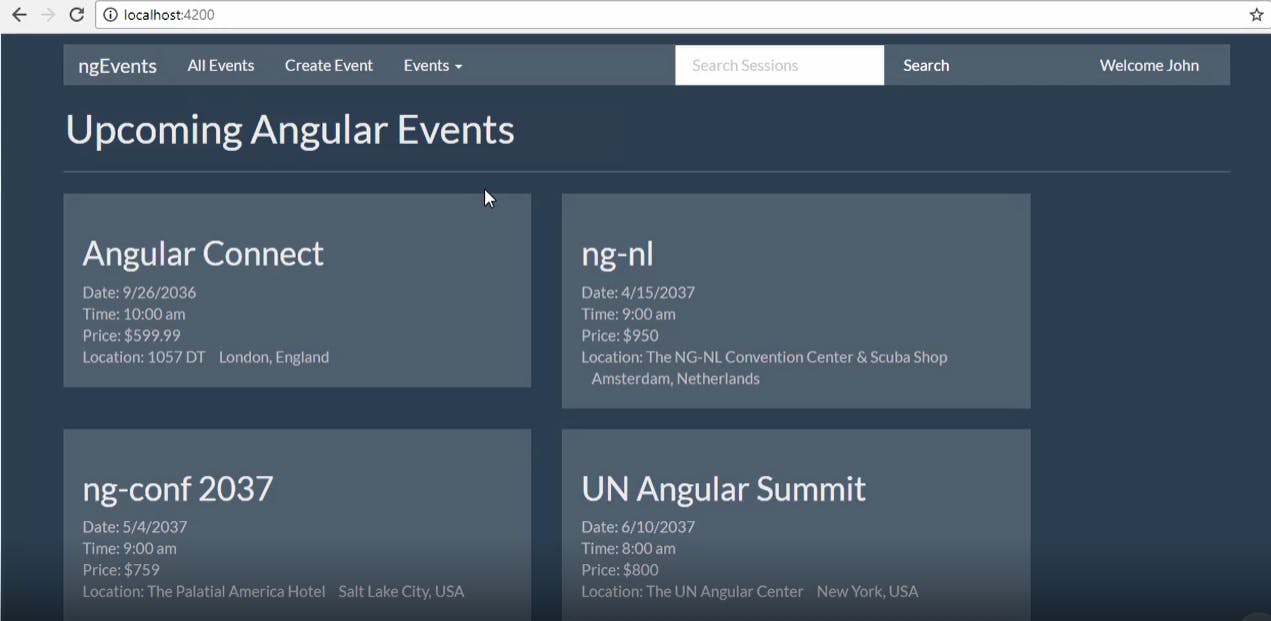
In the above picture we have used a structural directive "ngFor" to loop through the events array we have created. We have also used some bootstrap classes for styling and the final outcome would look something like below
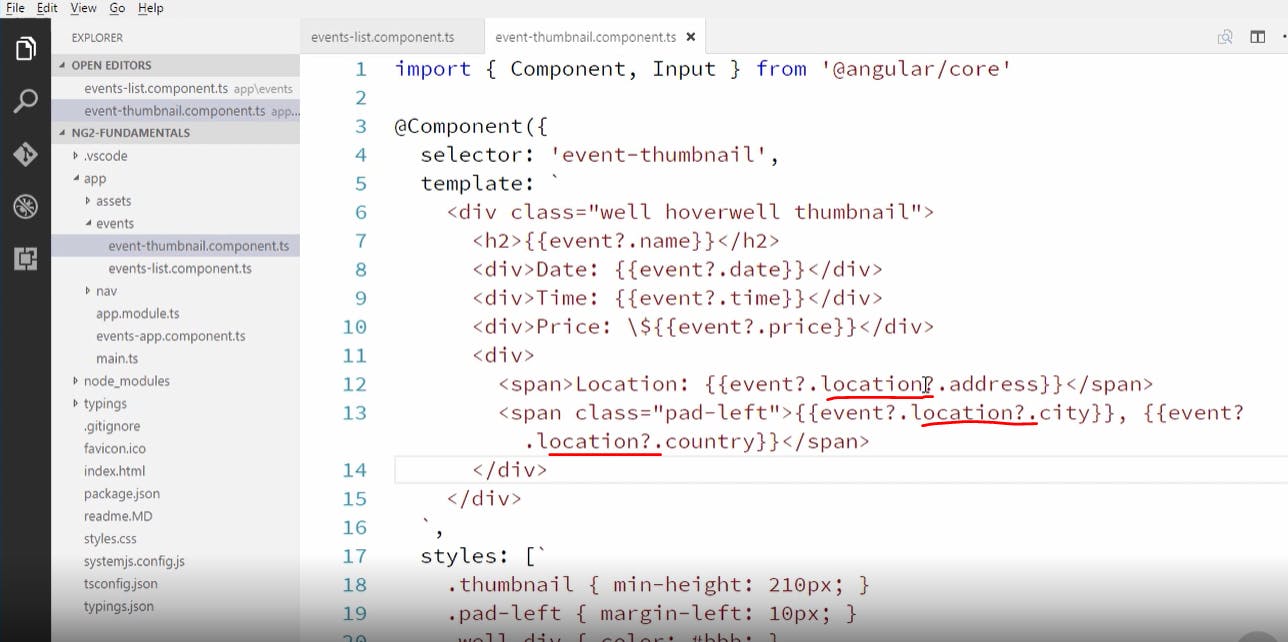
Handling null values with safe-navigation operator
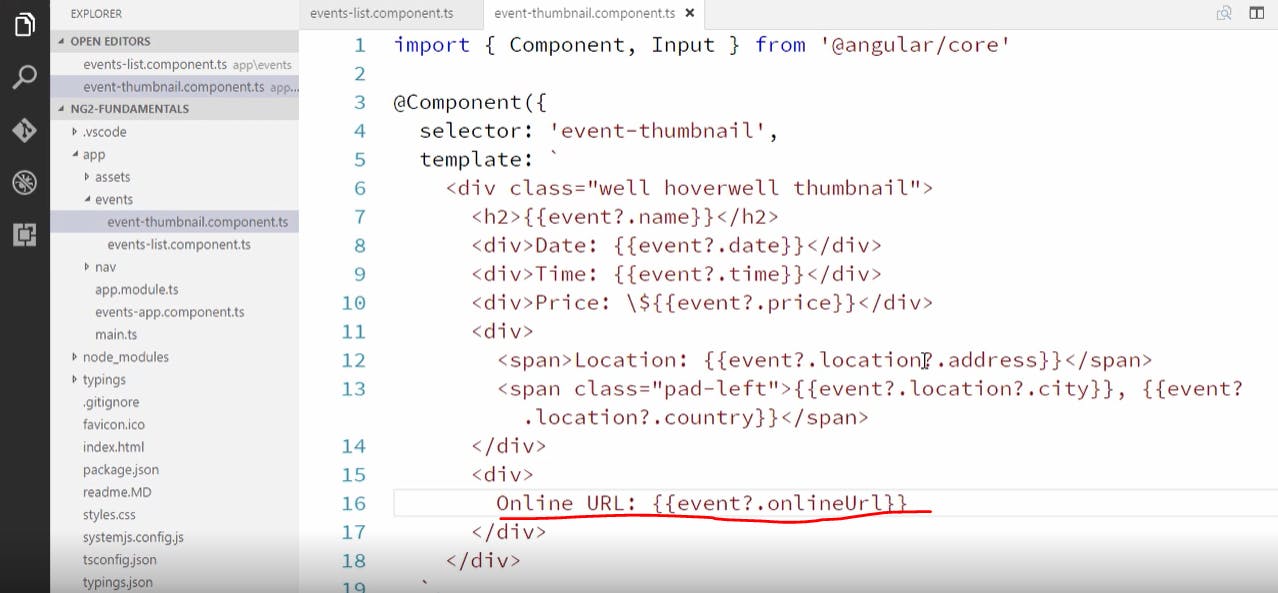
If we know that there could be fields that could be empty or null then we can use "?" operator as shown below
lets say in one of the events location is empty but that event has an online event which for which link is given in the onlineUrl field then we have to use "?" after location too as shown below
we created a div to handle the online url event as shown below
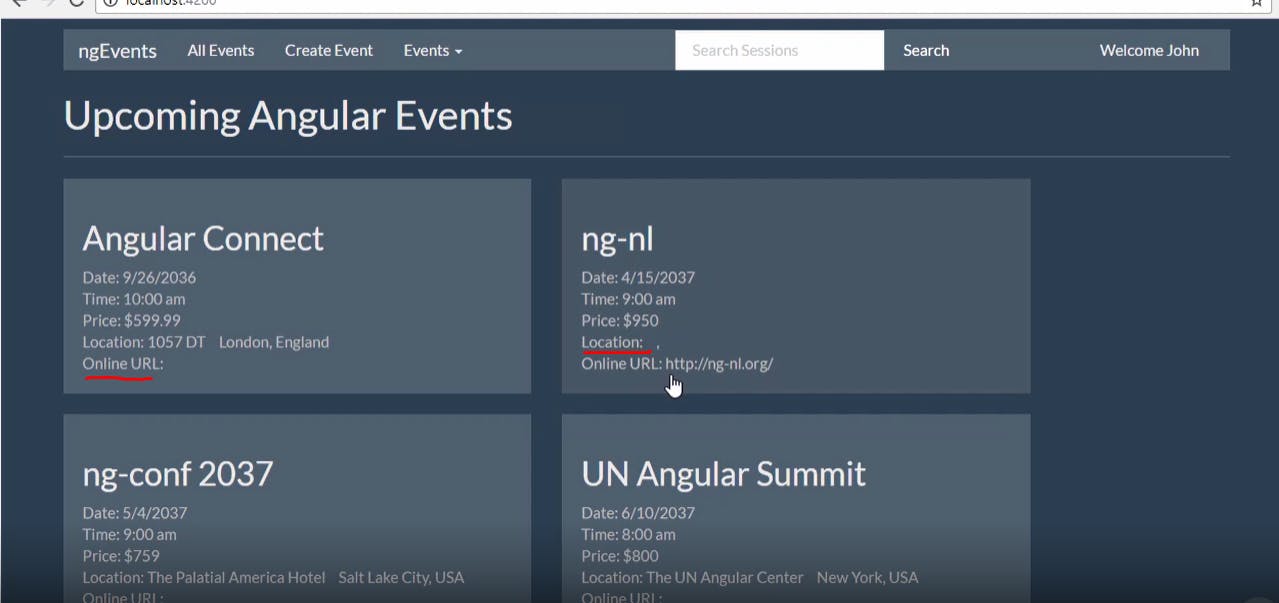
now our application would look something like the picture below but here we see that for those events which have no location that field is still visible and for events with no online url it is still showing up with no values and we will see how to fix this in next topic
Hiding and showing content with ngIf
ngIf is a built in structural directive that allows us to show content only when an expression evaluates to true.
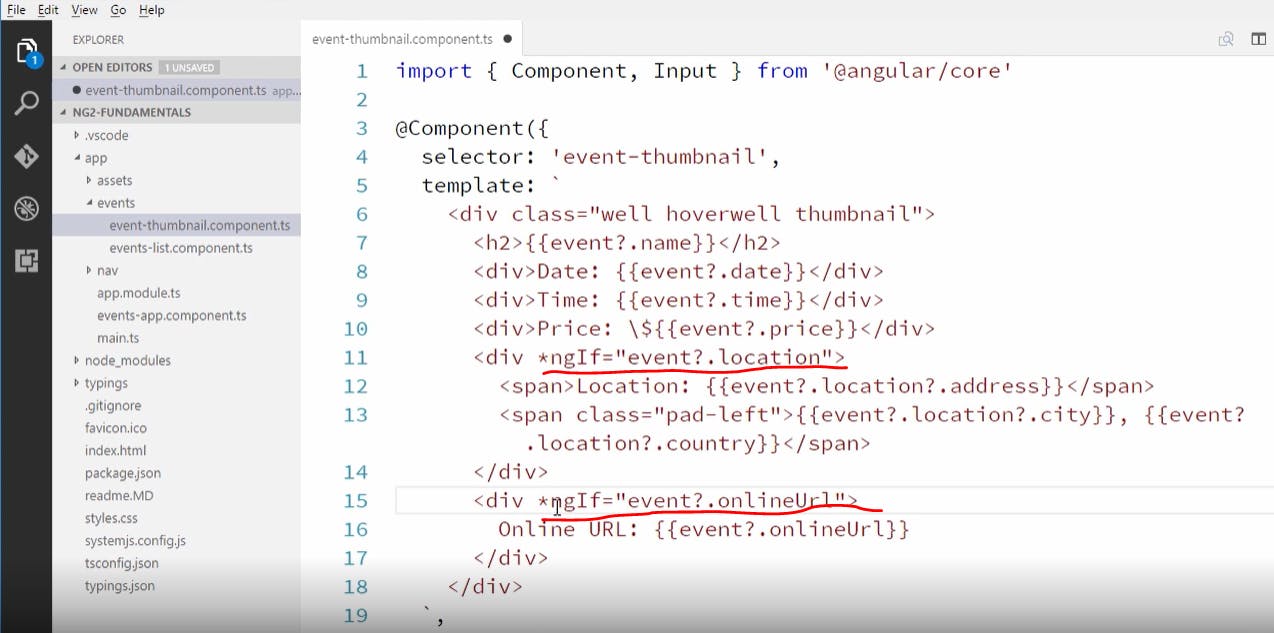
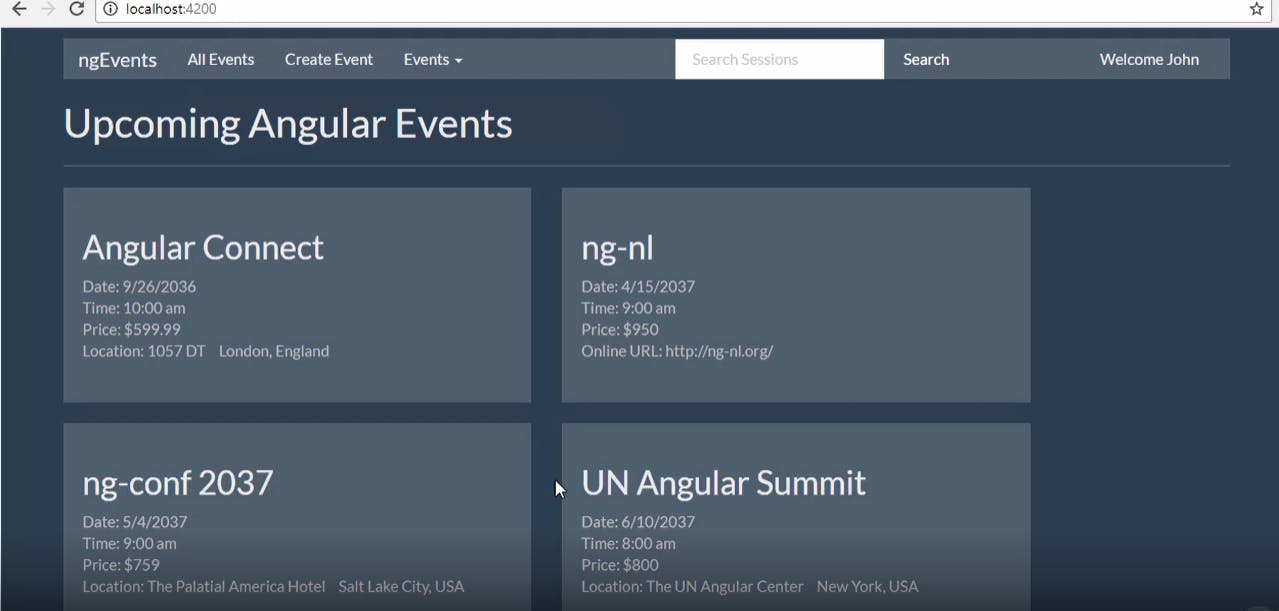
In the above picture we have used ngIf which says if the location or url is available for that event make it visible else don't show that element in the browser. We can see how the application looks after applying ngIf as shown below
Hiding and showing content with ngSwitch
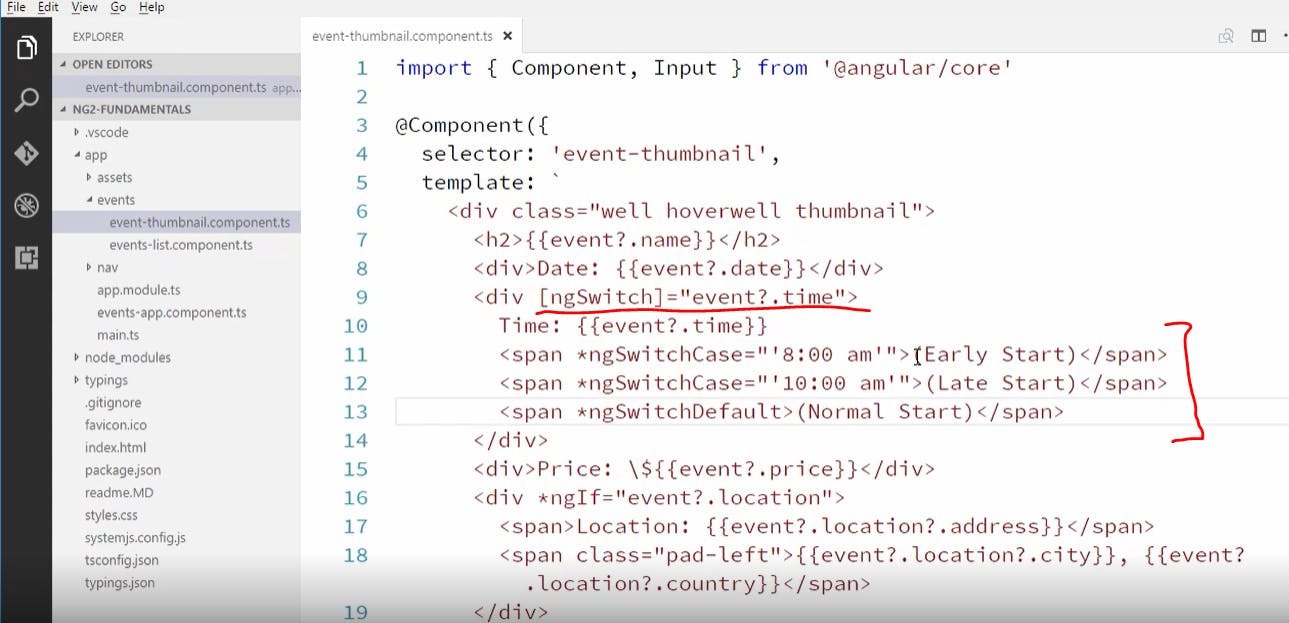
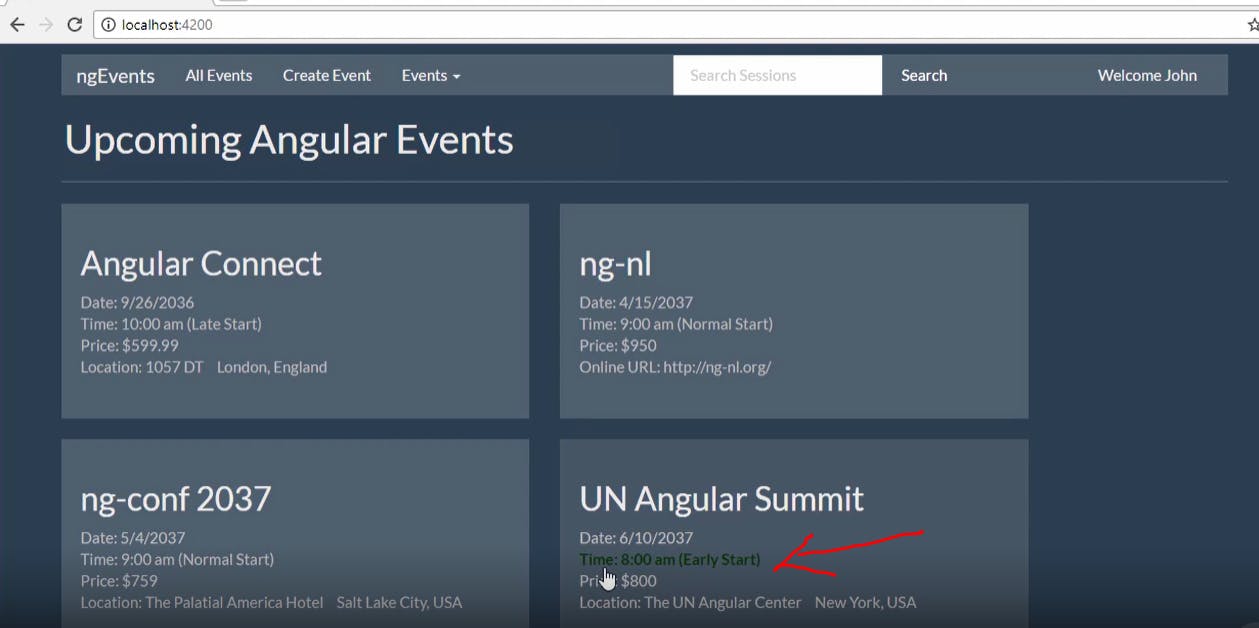
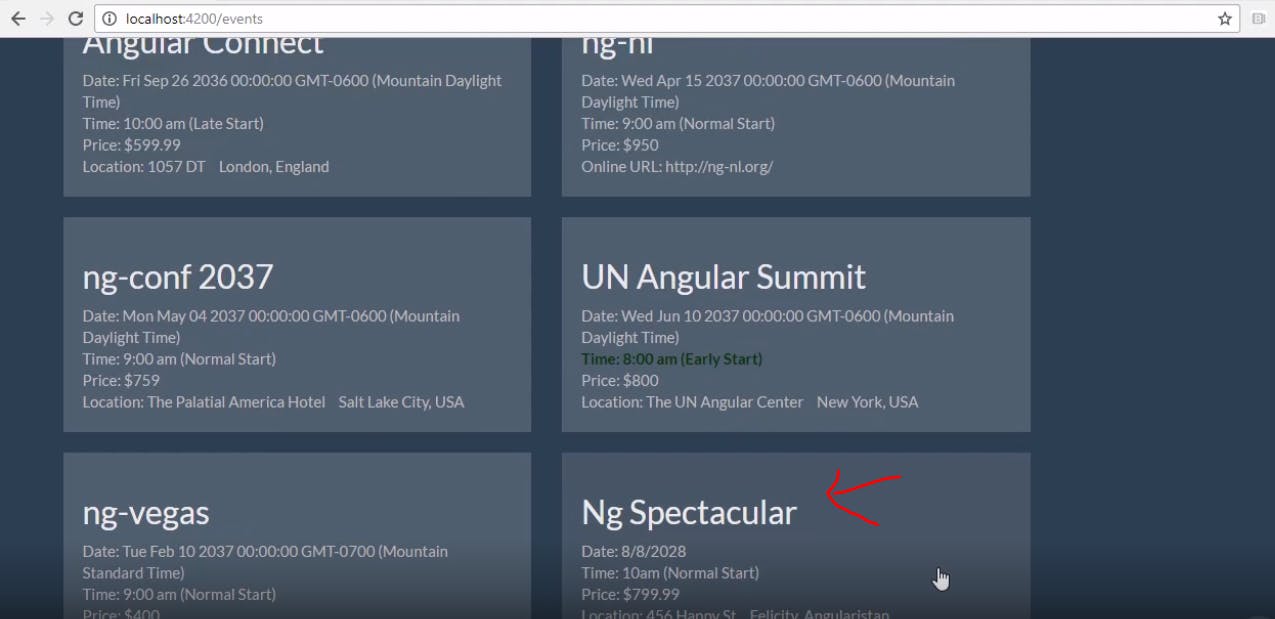
Now lets say we want to say "early start" for events which start at 8am, "late start" for events that start at 10am and default case should say "normal start" and all these cases are based on time so now lets see how we can do this using ngSwitch as shown below
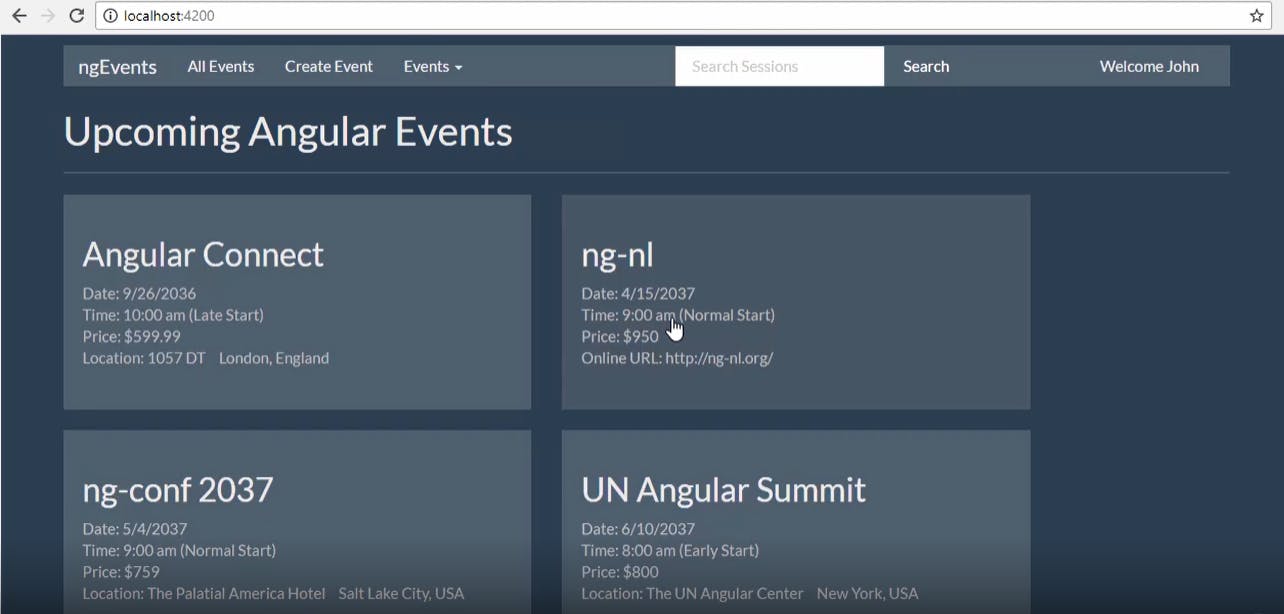
now lets see how this looks in the browser(shown below)
Styling components with ngClass
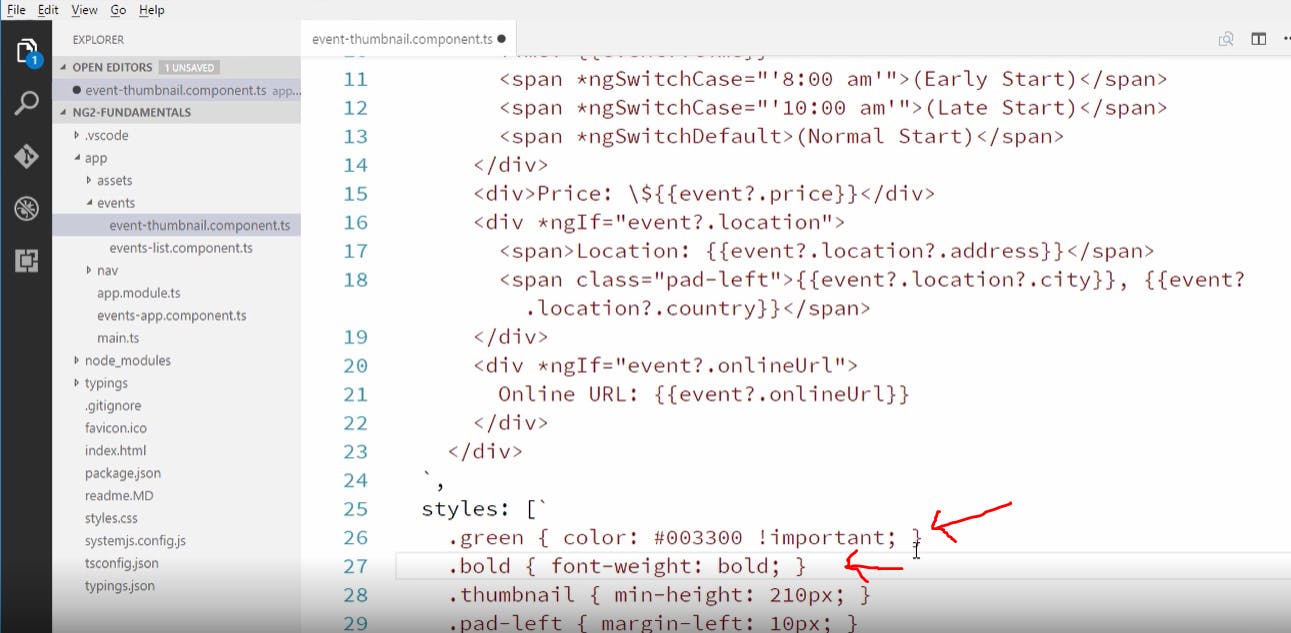
lets say we want to highlight the event which starts at 8am. For that we create two classes "green" and "bold" as shown below
then we use ngClass to add the green and bold class to our event as shown below
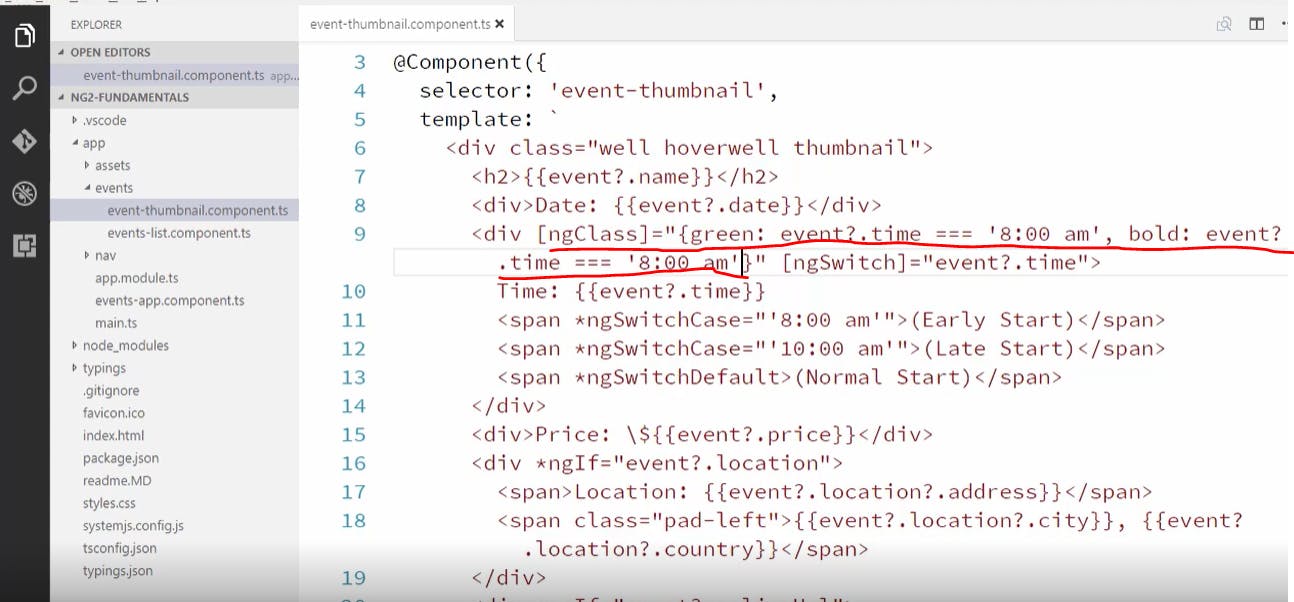
here the ngClass expression adds the green and bold class to the event objects that have time equal to 8am and it would look something like this in the browser(shown below)
Services
What are services?
A service is a class with a narrow and well defined purpose which is reusable and can be used in other components of our application.
Creating your first service
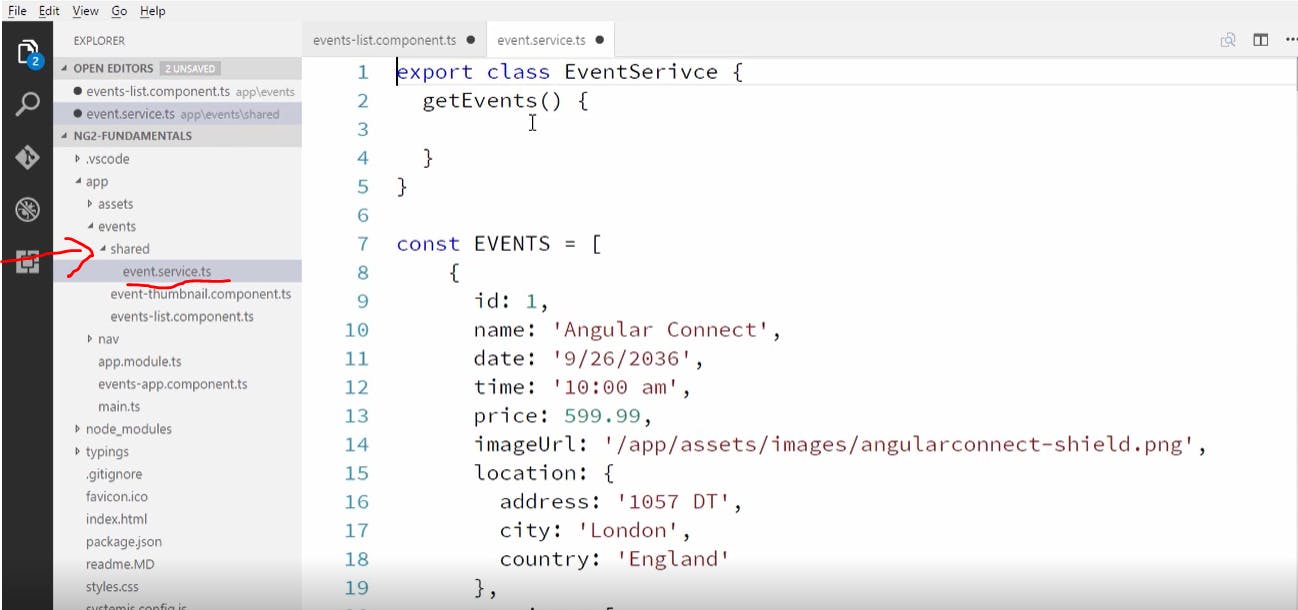
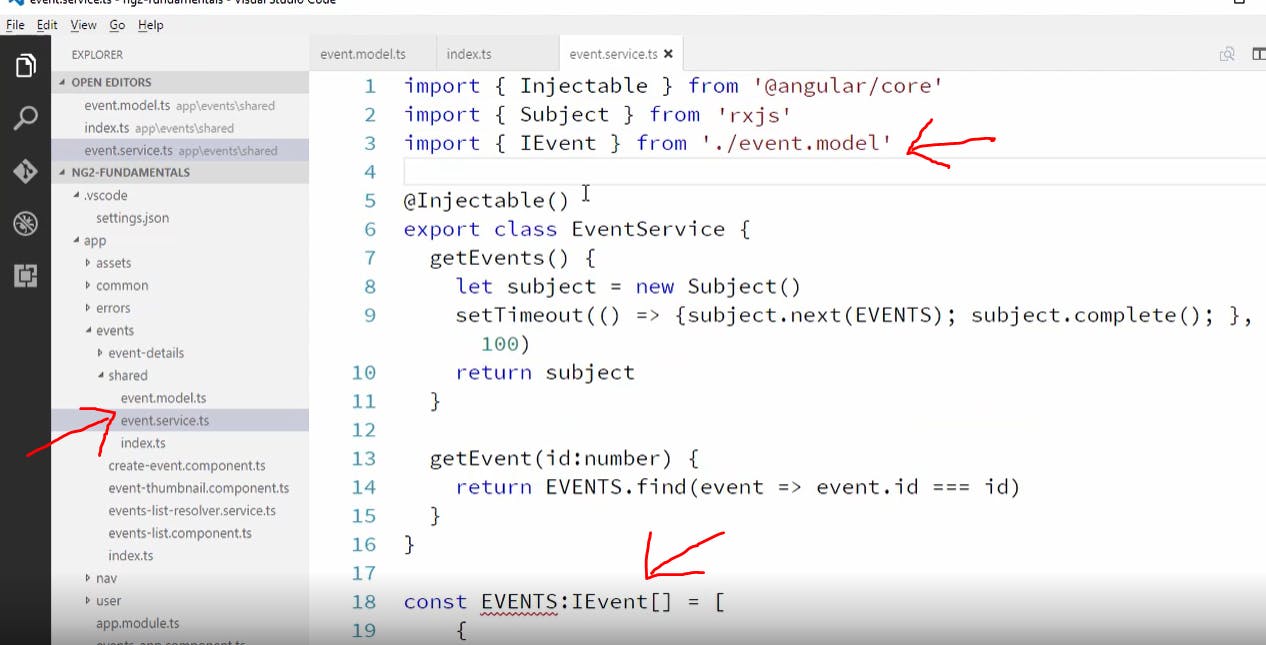
now lets create a service which returns all the hardcoded events. We make a folder called shared inside the events component and then inside the shared folder we create a file event.service.ts which will have the function to call all the events as shown below(we added all the events as constants)
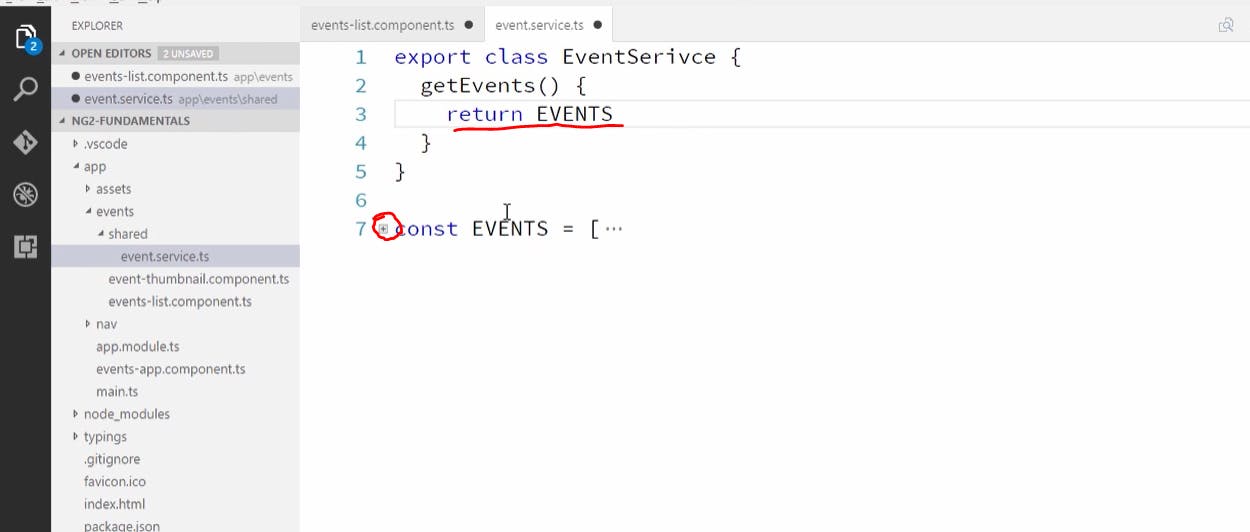
we now return these events in our function/method(the constant events are just collapsed)this is the same service as shown above but with the function having the return call(shown below)
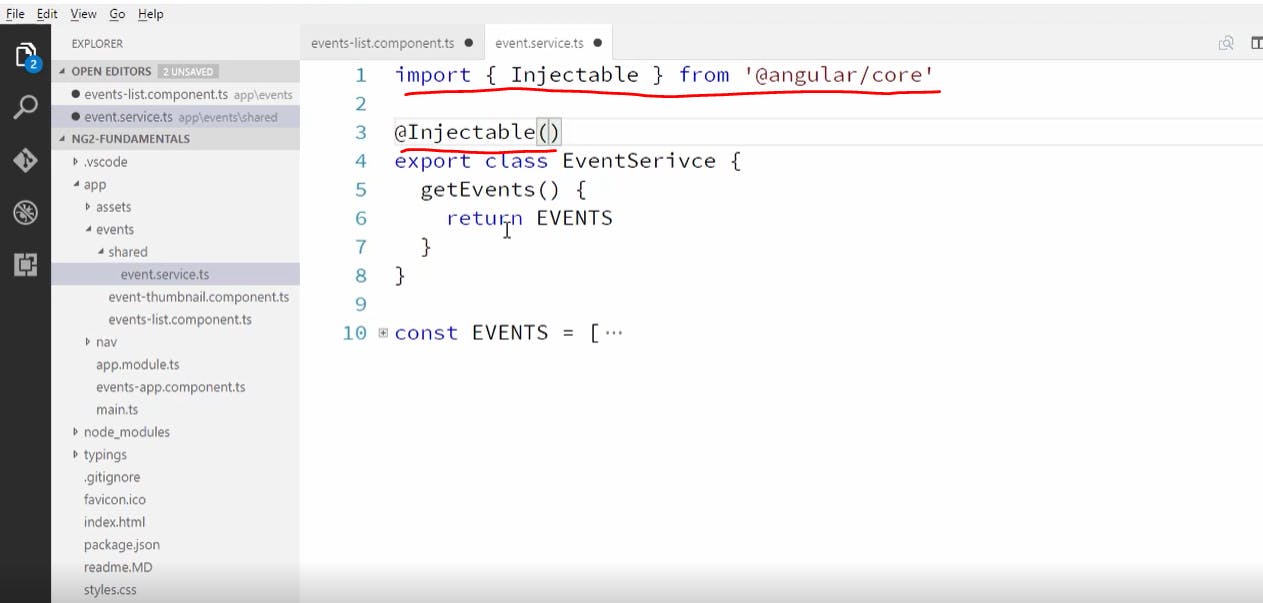
now to use this service in other components we have to use the @ injectable decorator so that angular knows that this is an injectable class which can be used in other components as shown below
Don't forget now that we created a service we have to import it in app module file and provide it under providers in the app module so angular knows that this exists(shown below)
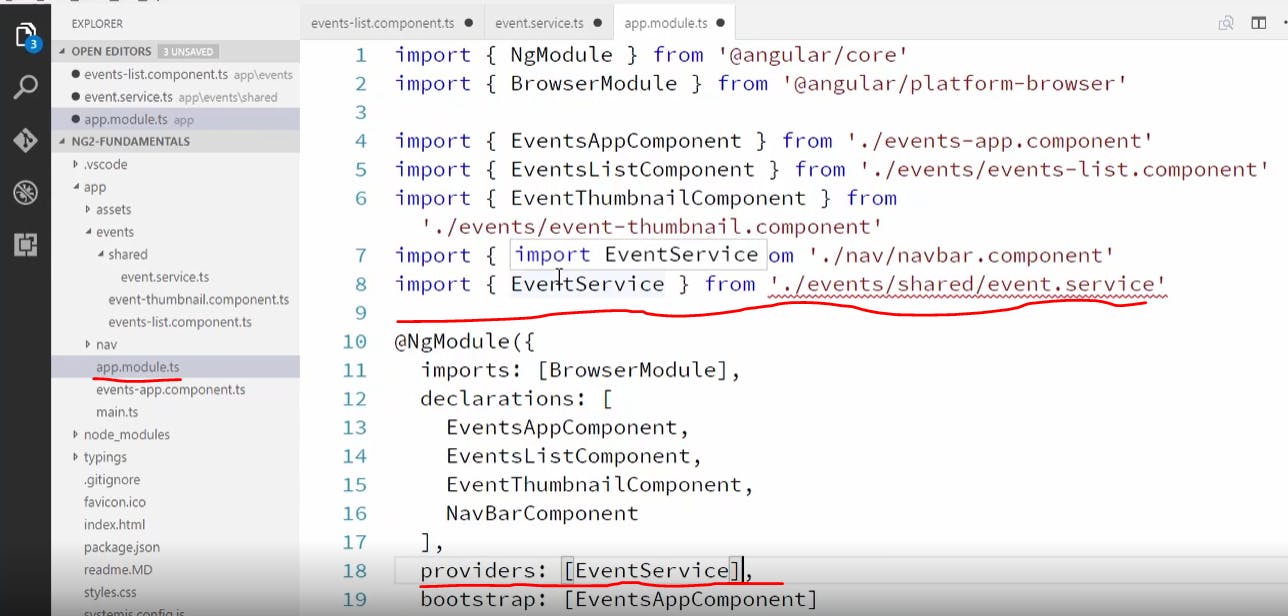
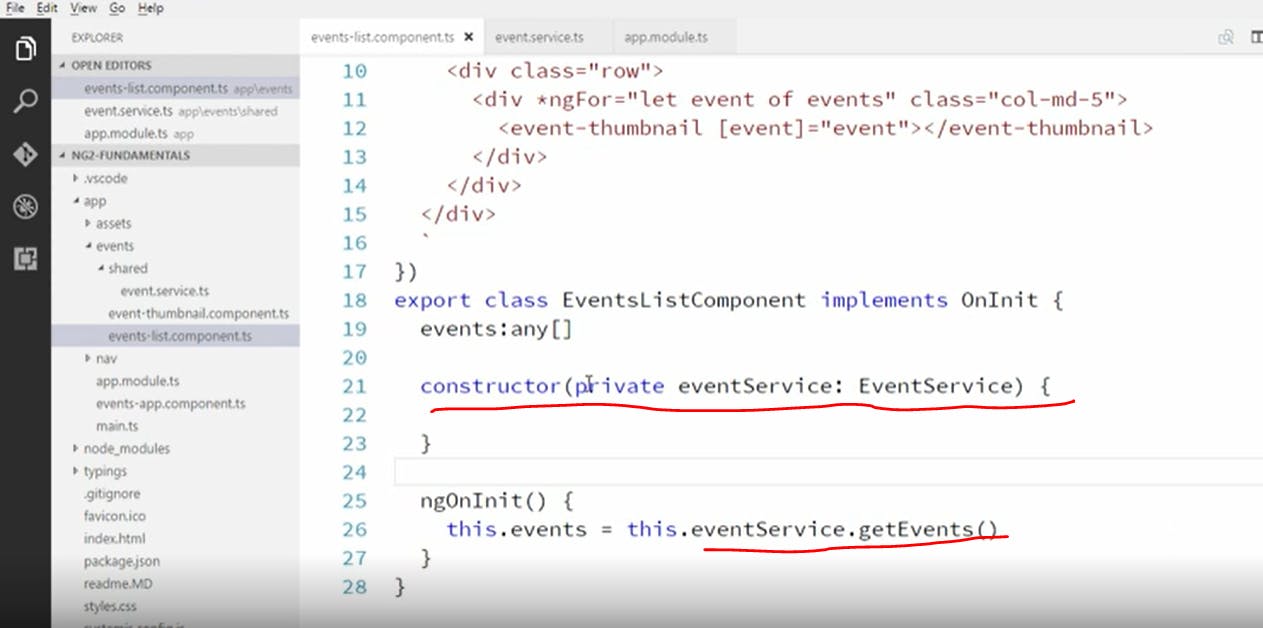
now we are gonna inject this service which gets all our events in the events list component by injecting the service inside the constructor as shown below. You will see something called ngOnInit() which is an angular life cycle hook which basically tells when this events list component loads what we need to show and we have also created an events object of type any[] (don't worry too much about life cycle hooks for now). We are getting all our events by calling our service and then calling the method inside our service as shown below
Routing and Navigating pages
now to route to another page when we click on any of the events for more details, We will need an event details component. So lets create an event details components as shown below
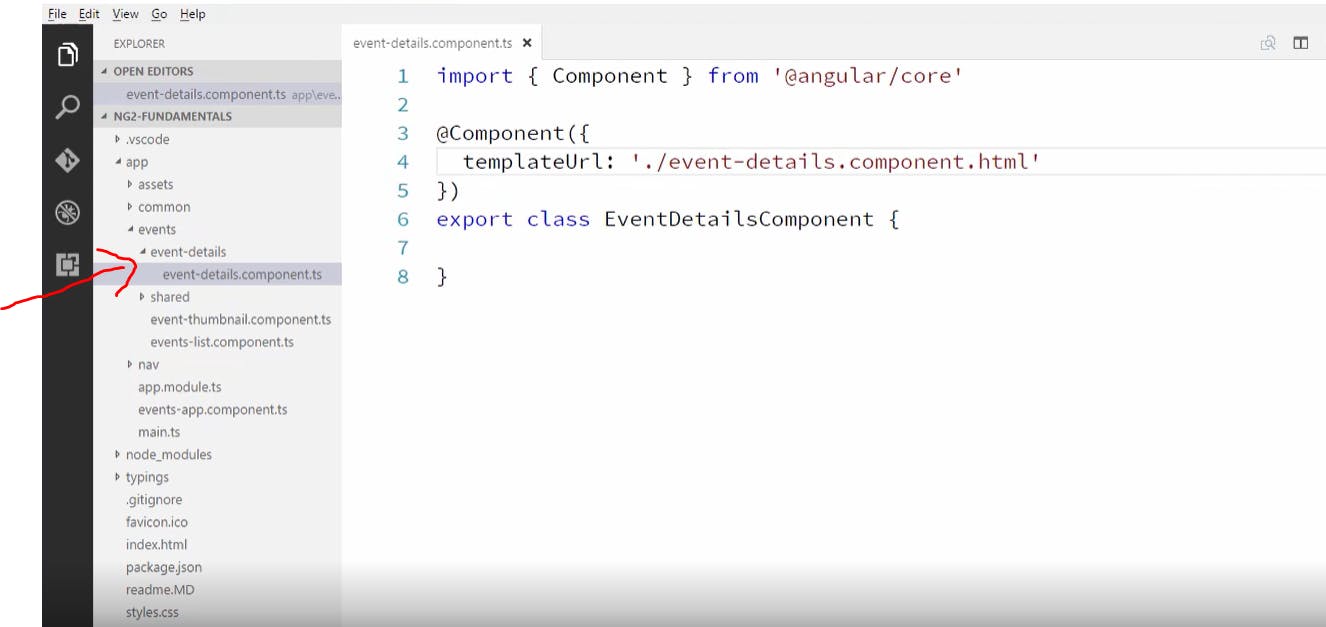
since this component will not be a child component to any other components we haven't given this a selector since we will be directly routing this component. Now lets create the html file for this as shown below
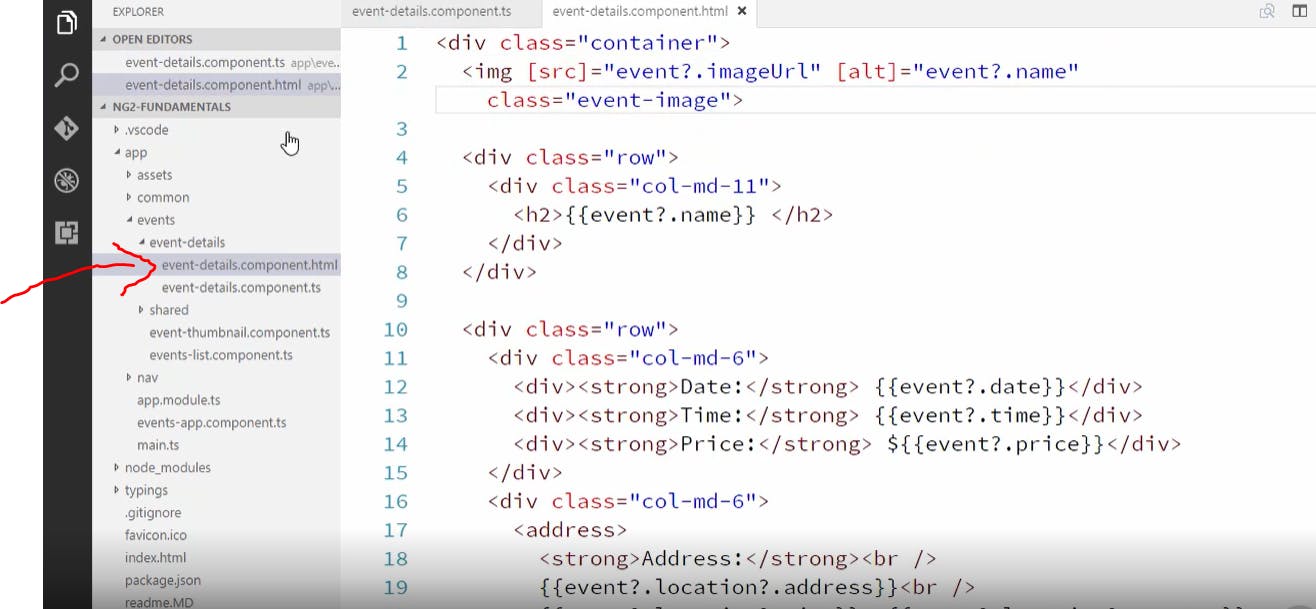
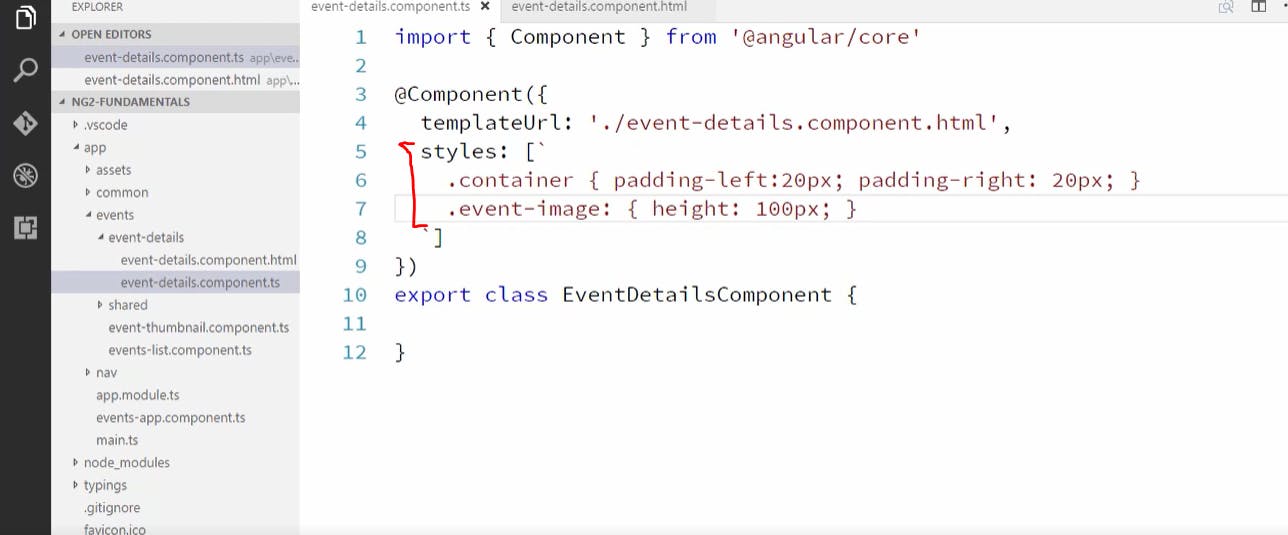
we have added some classes for styling here so let's give some styling to these classes in our event details component.ts file as shown below
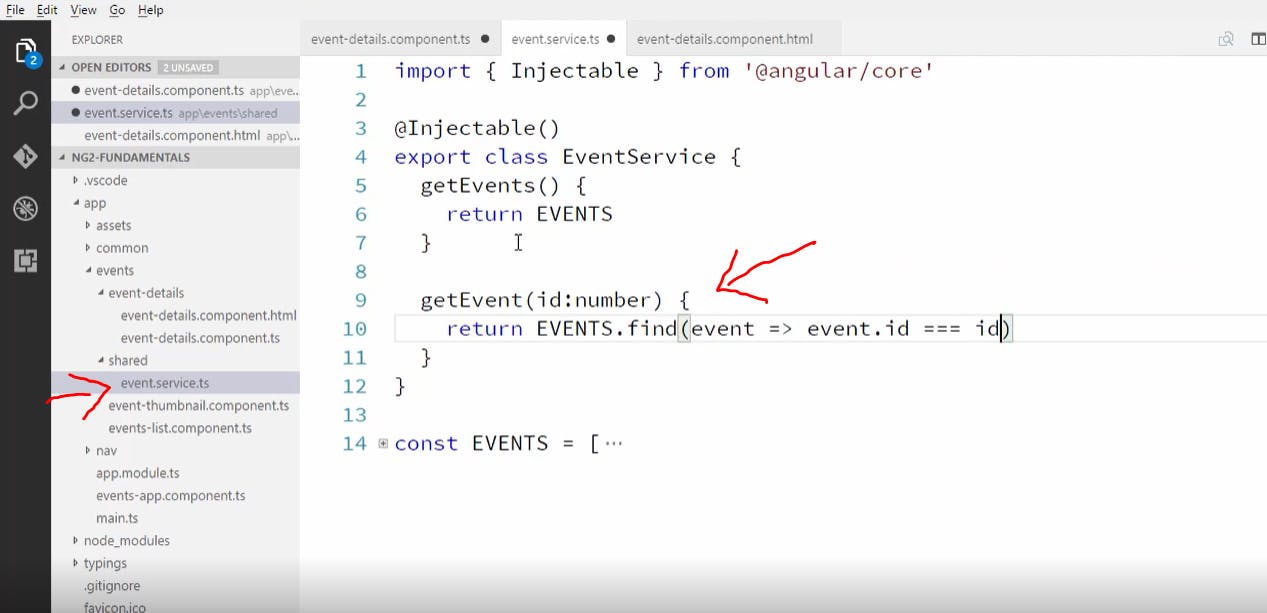
now since we want to get event details of a particular event that we click on, We want to create a method in the service which would get an event by id as shown below
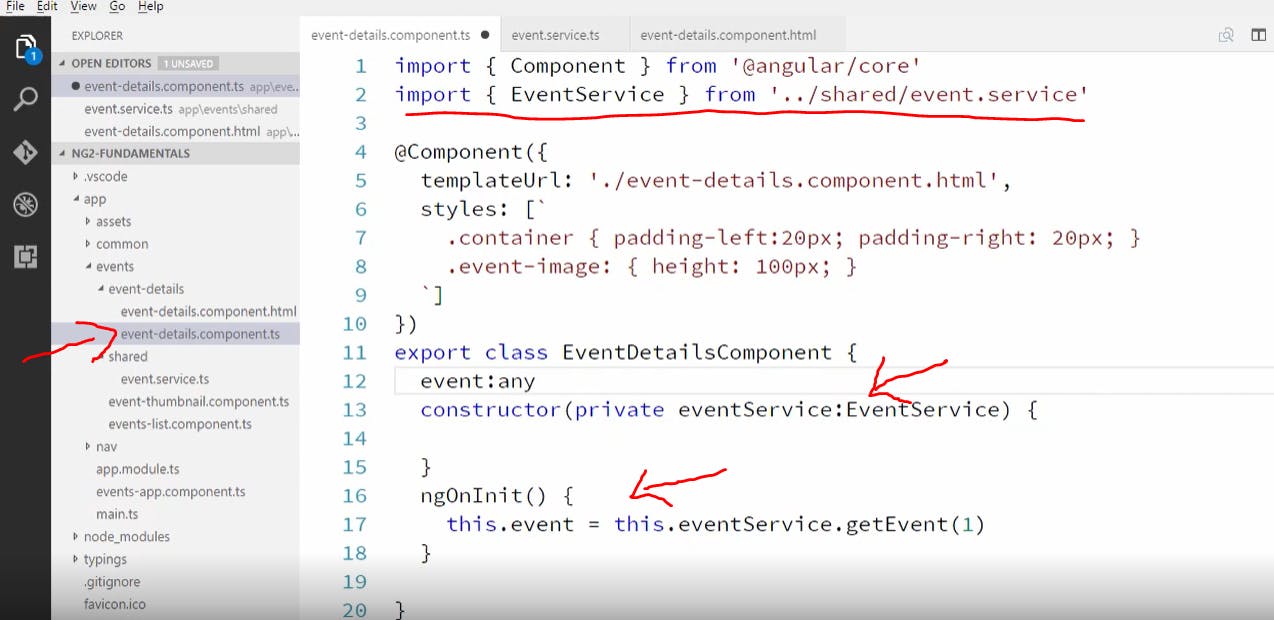
now let's inject this service in our component as shown below so that we can use. we have hard coded the id as 1 here for now
now we need to register this component in our app module so that angular knows about this component as shown below

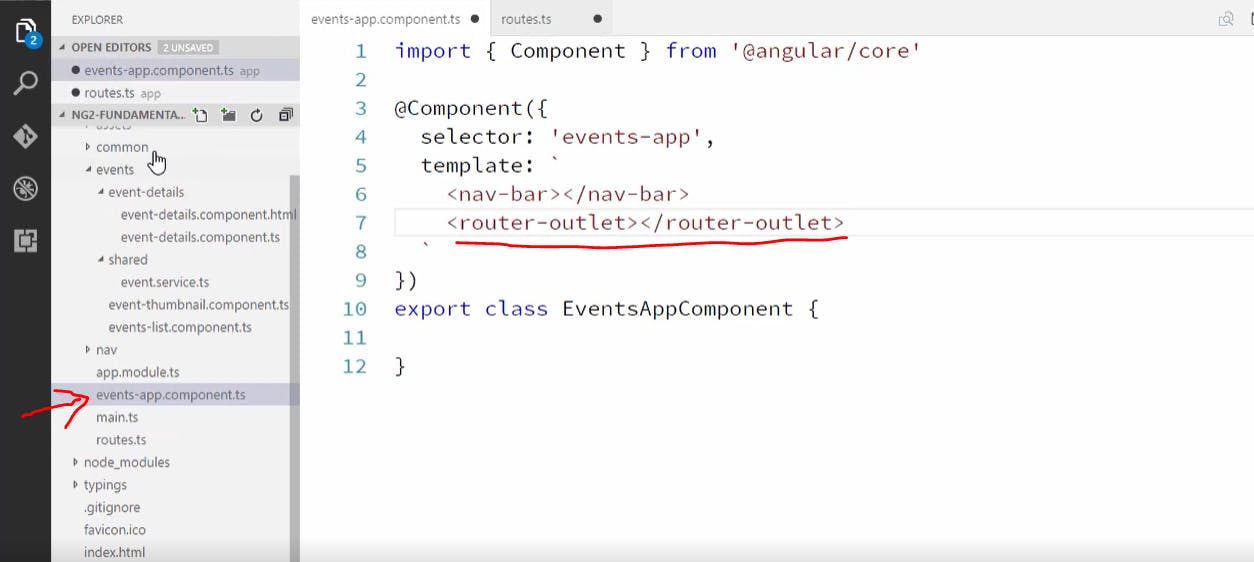
now let's start with routing. Since we now want to use routing we use something called routers in our components and we put router outlet in our events app component.ts file so that angular knows what routing to use when we call a particular Url as shown below
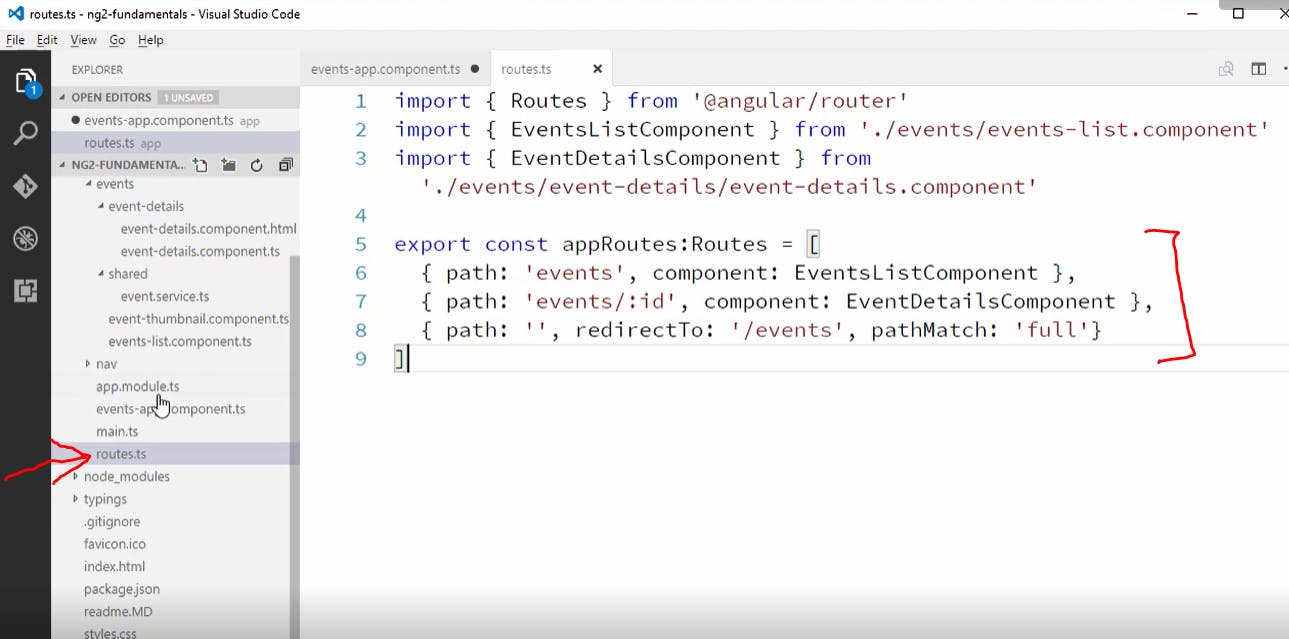
now we create a routes.ts file where we tell angular where to send the user when he requests for a specific path as shown below
now we have to import and declare these routes in our app module.ts file as shown below

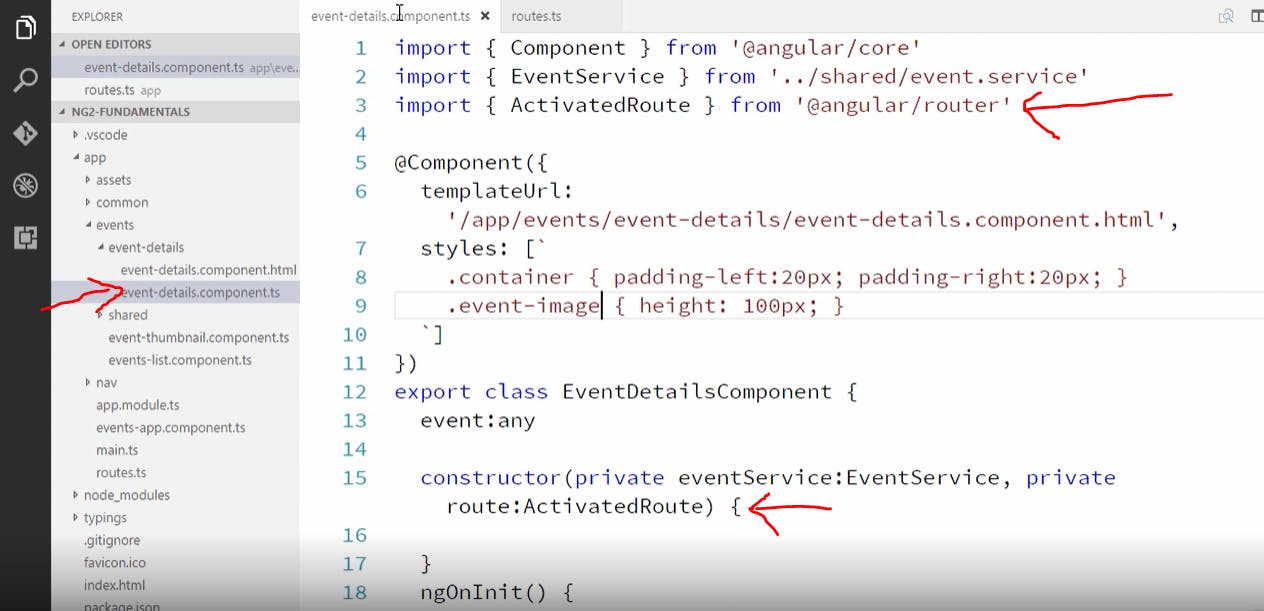
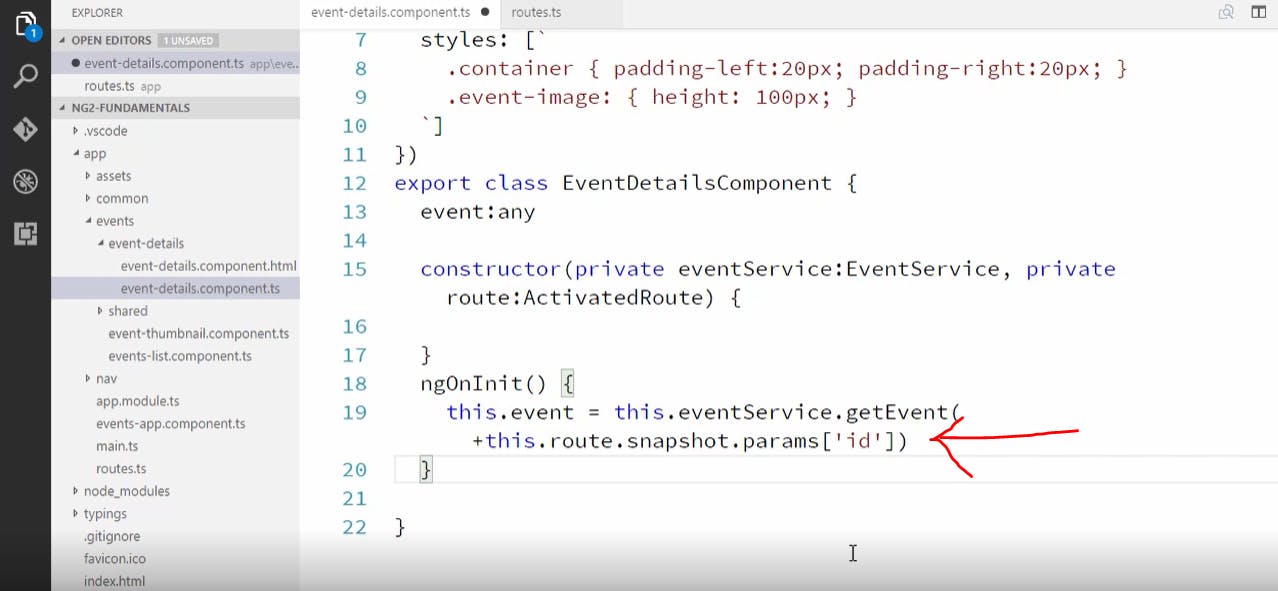
now to pull of the parameter(id) from the url we use "activated route" as shown below and then we inject it inside the constructor too so that we can use it in our method
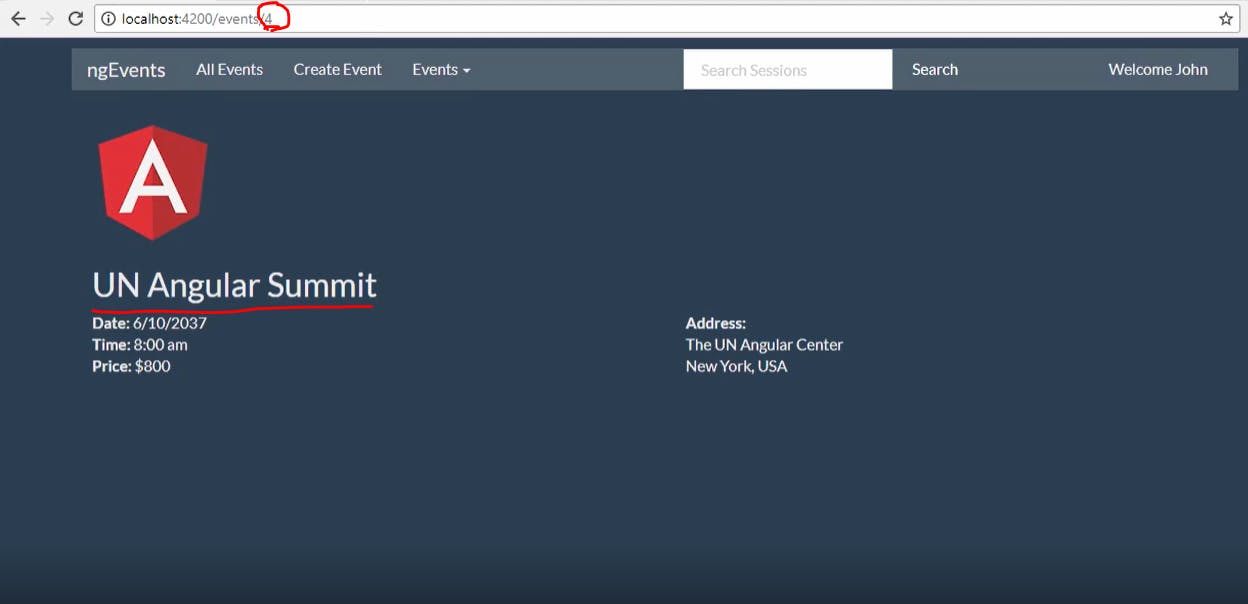
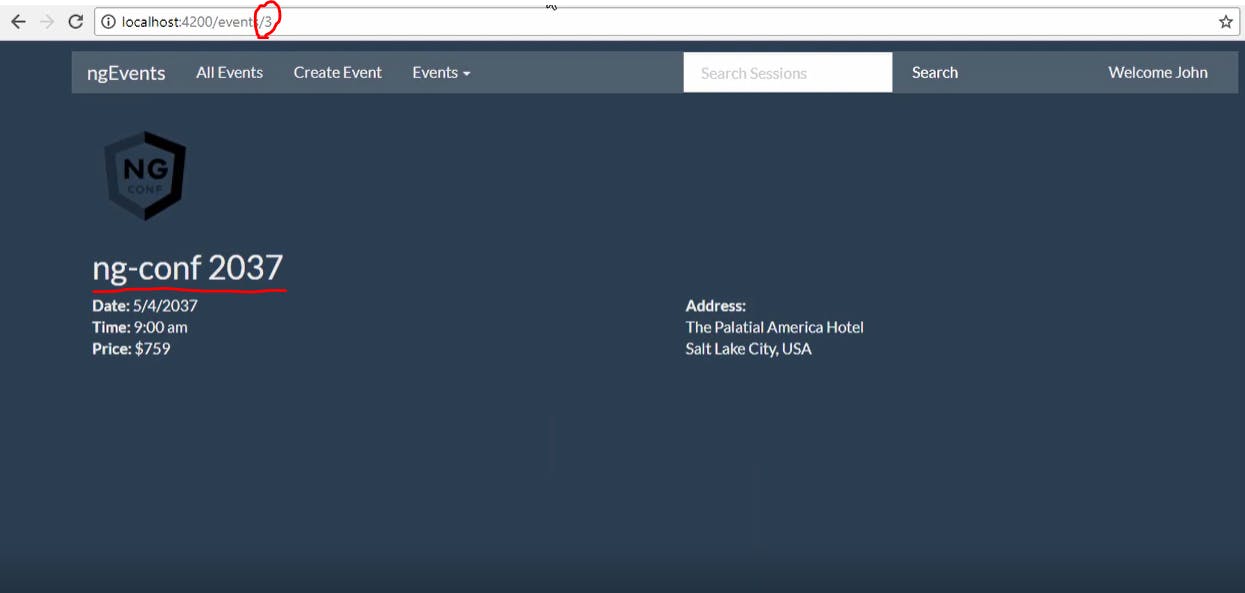
now whatever id we give in the Url that corresponding event will show up as shown below
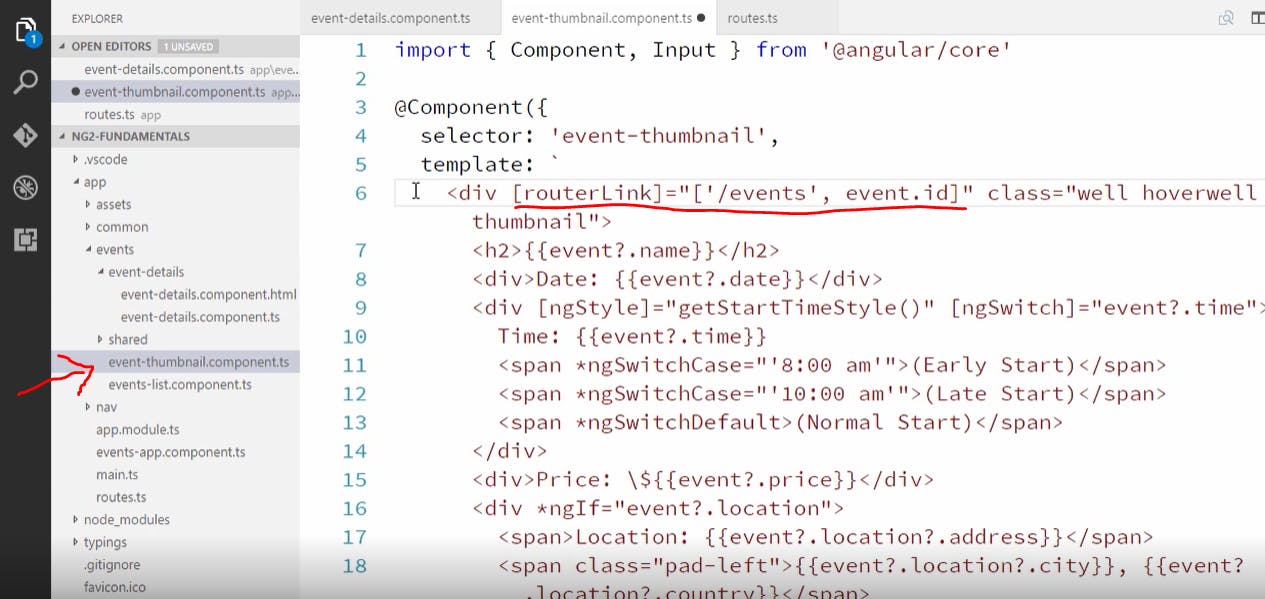
now we want to make the event details component load when we click on any events that are in the events thumbnail so we add a router link in the events thumbnail component as shown below
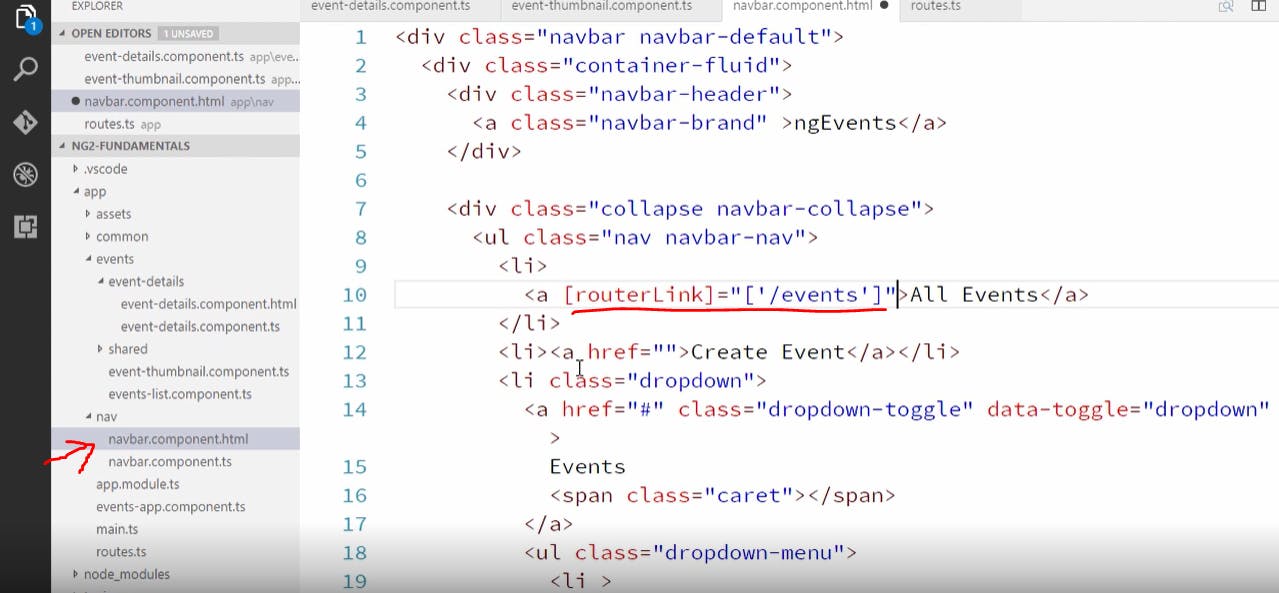
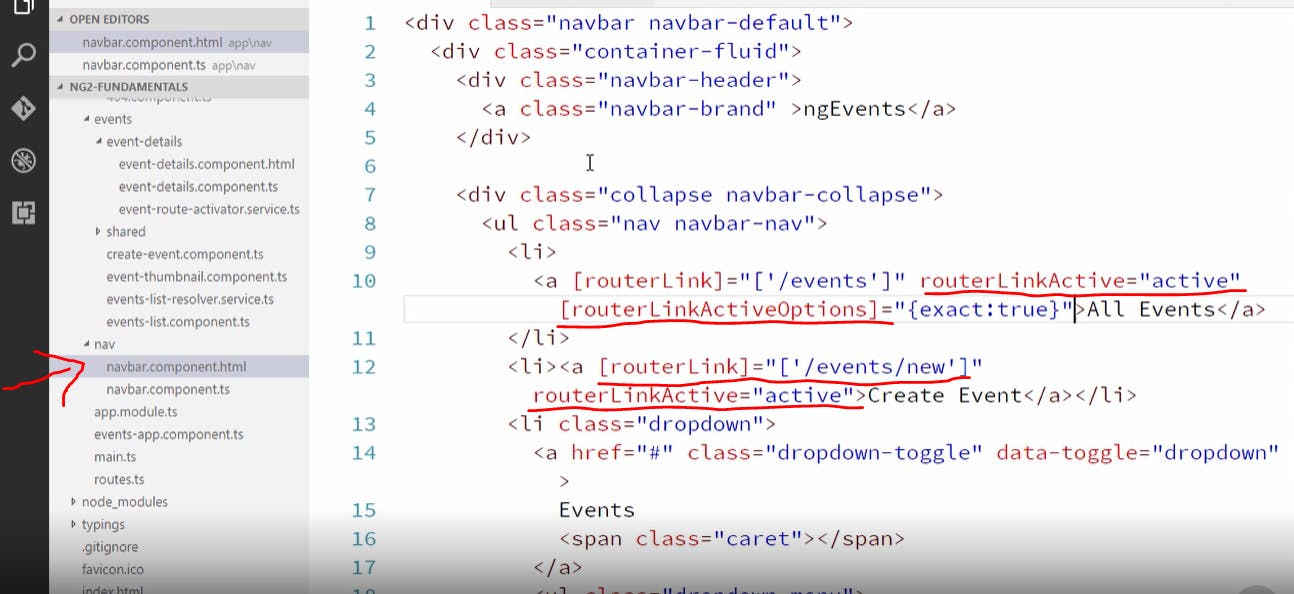
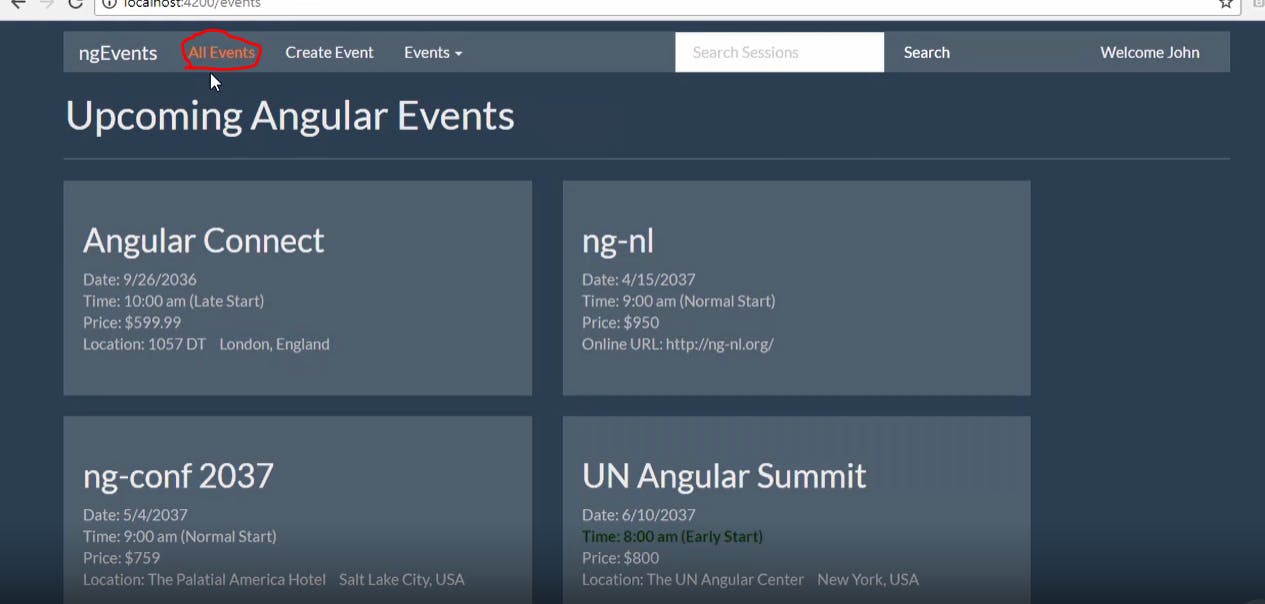
now we want to make it such a way that when we click on "all events" in the nav bar we should be redirected to the events page. We do that by adding a router link as shown below
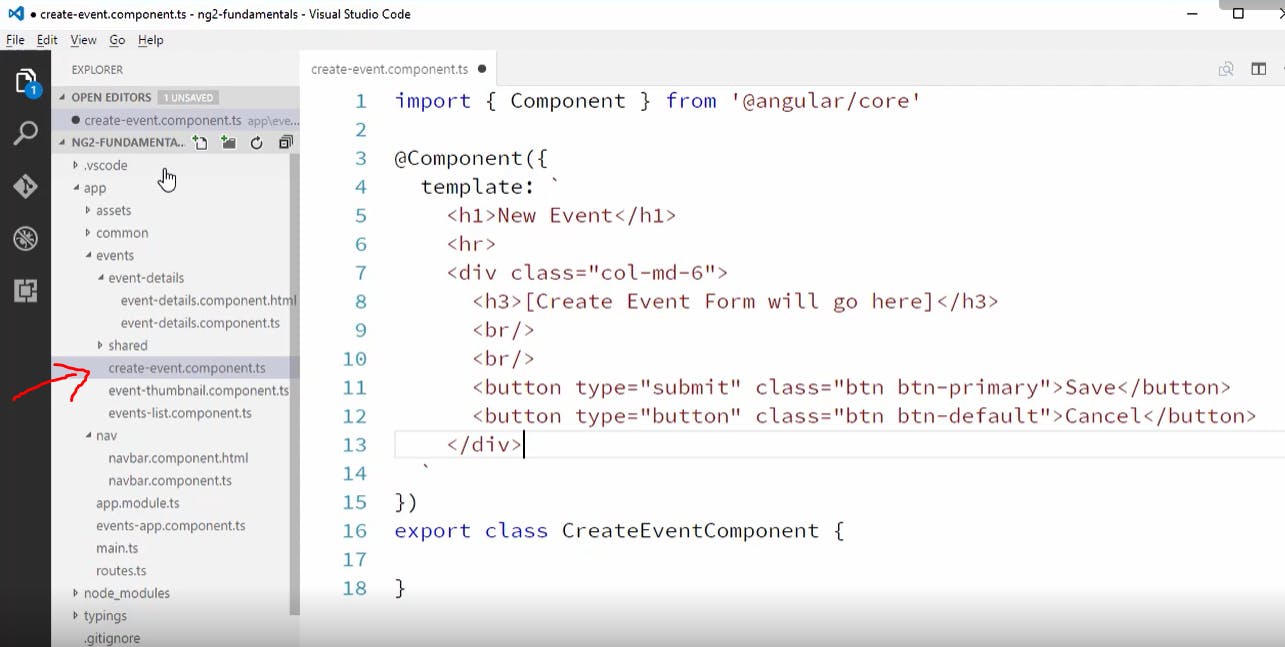
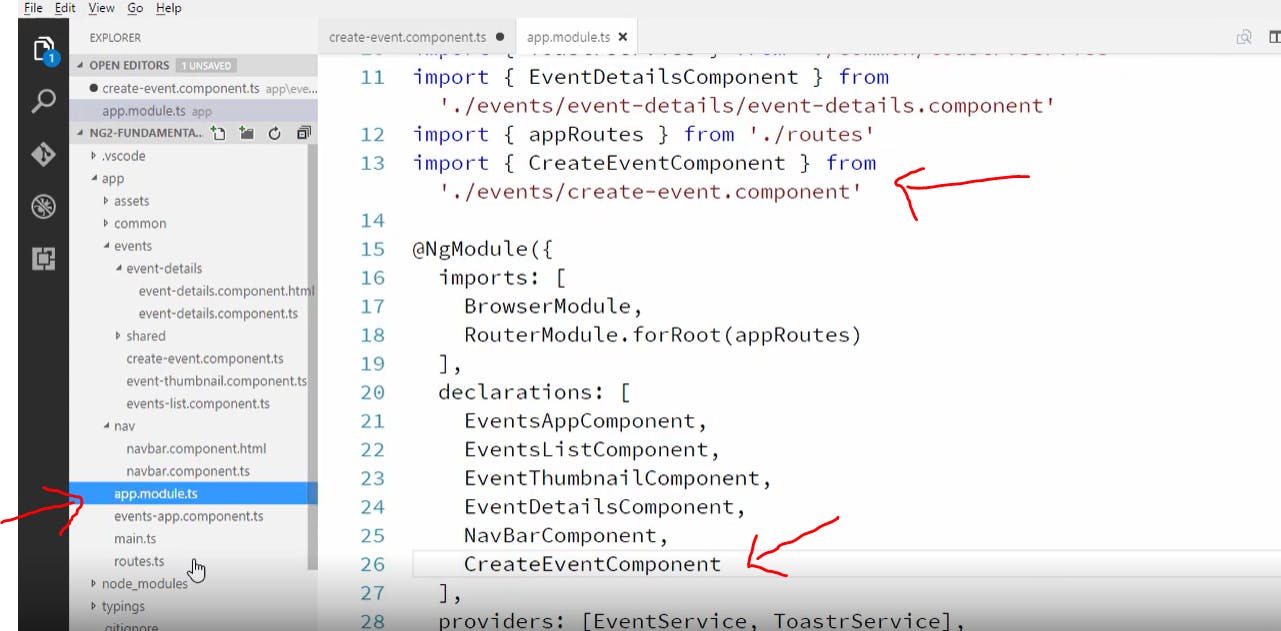
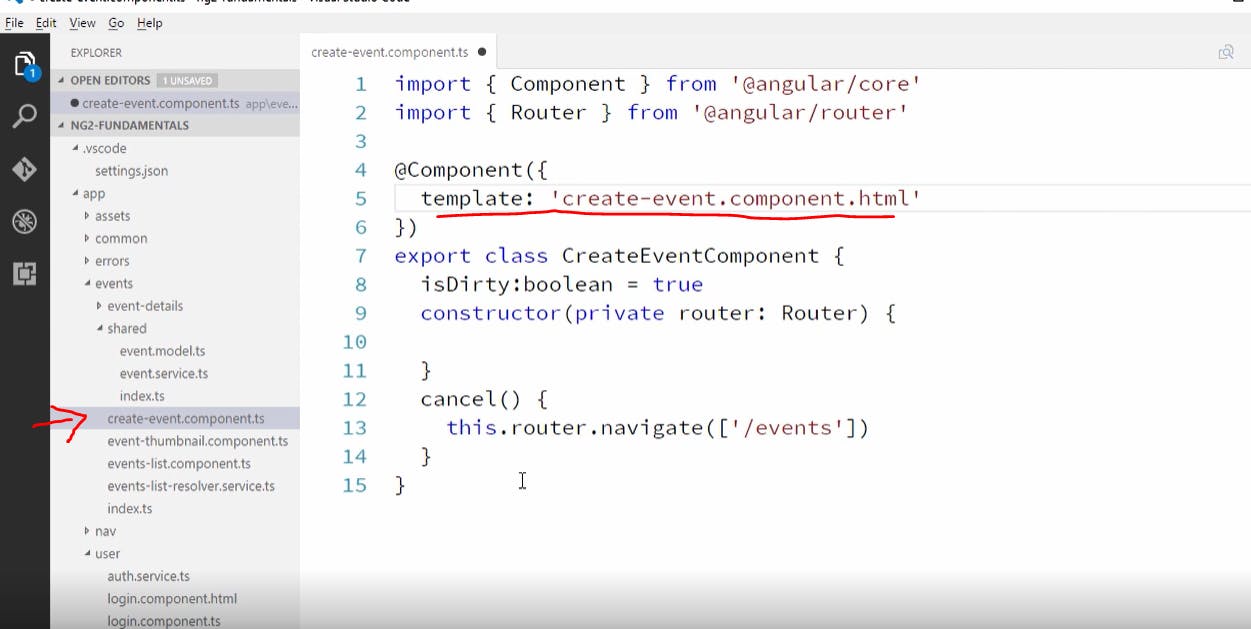
now lets create a "create new event component" as shown below
now let's add this component to our module as shown below
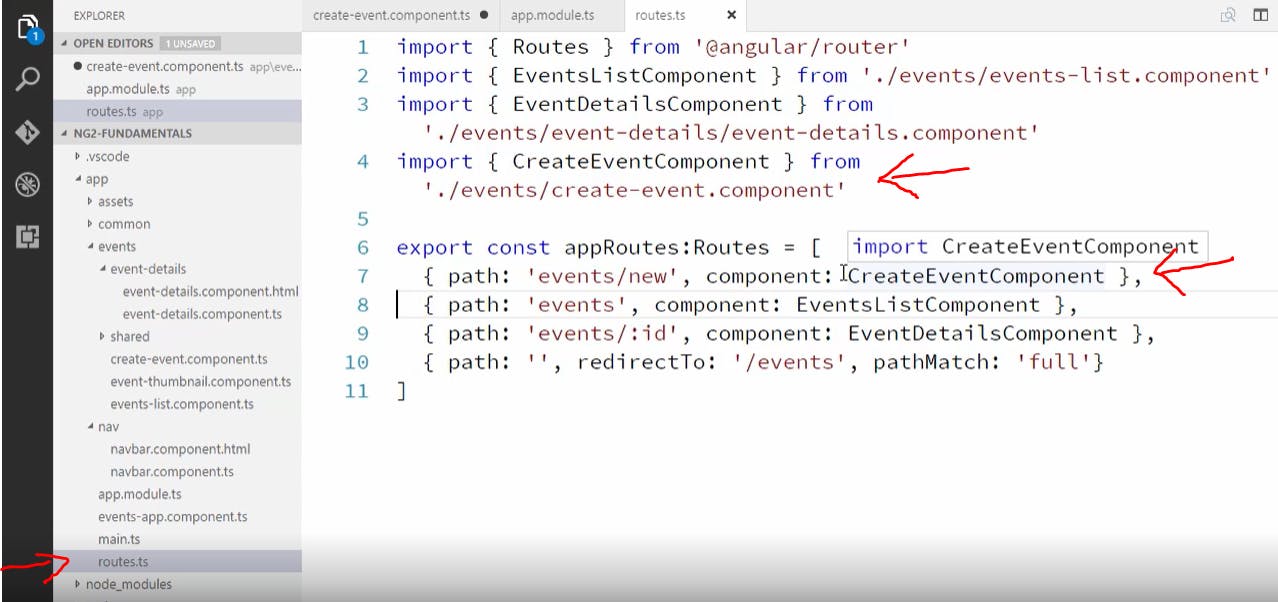
and now let's add route for this page as shown below
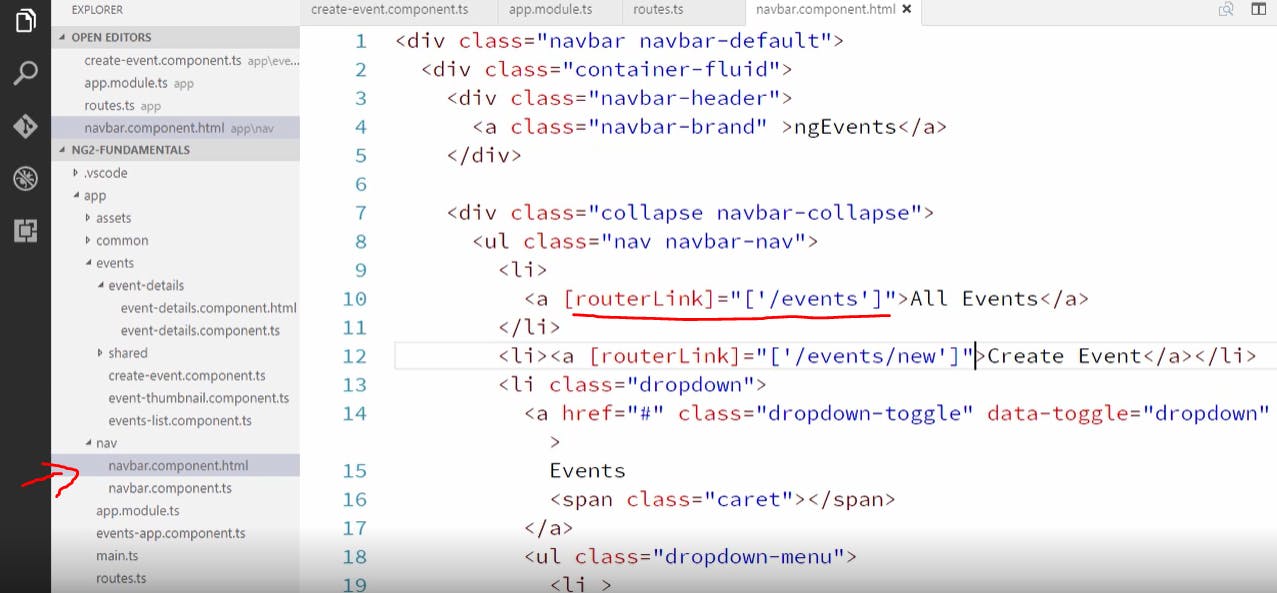
now lets add router link to the "all events" in our navbar as shown below so that when we click on all events it takes us to the page which displays all events and just below that we have also added router click to "create event" so that when we click on create event it takes us to that url
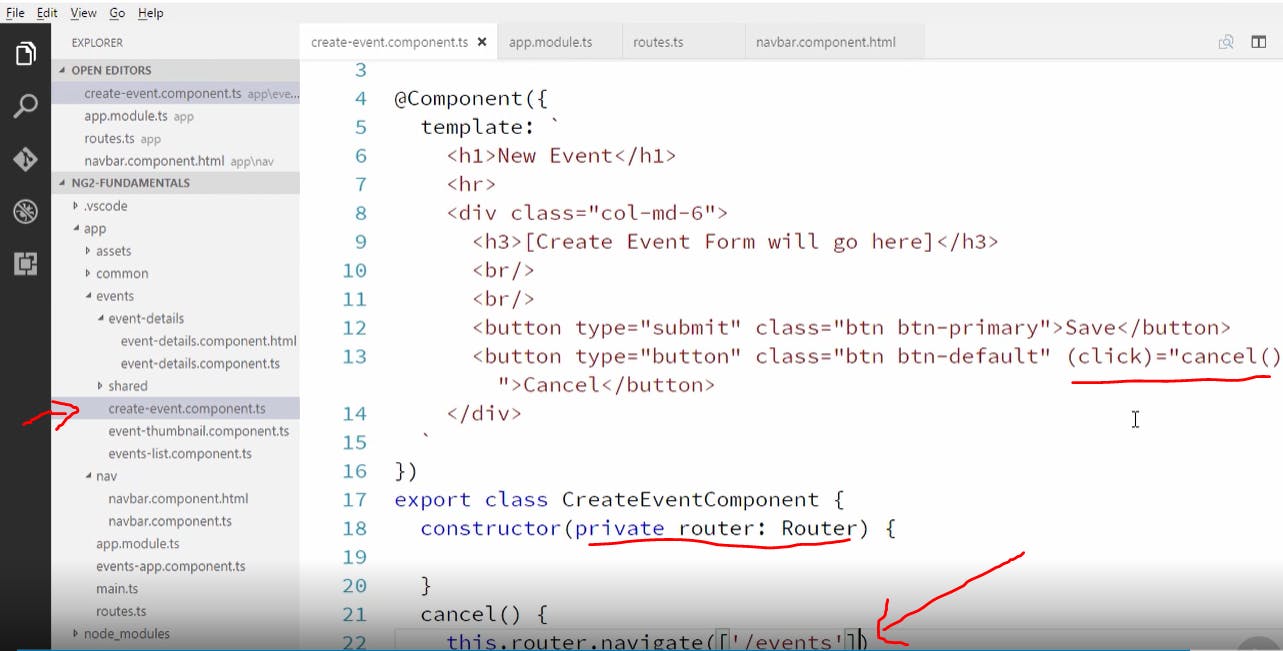
now when the user clicks on cancel we want our application to redirect back to events page and we do that by adding a click handler which calls a method which would redirect the user back to the events page as shown below
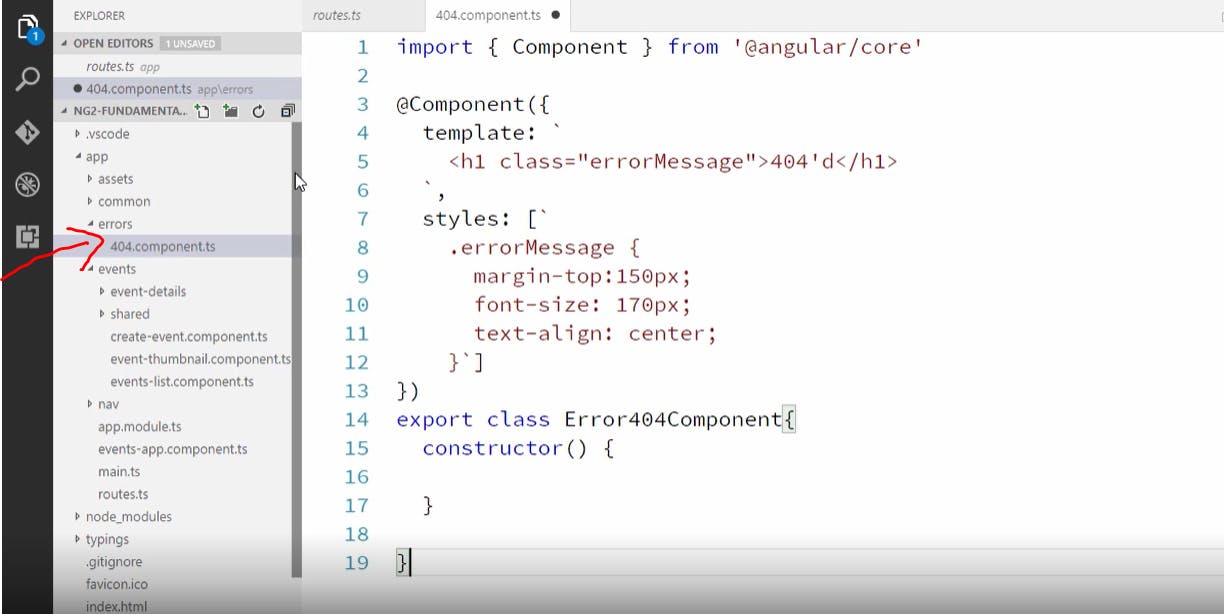
now let's create a 404 page which would appear if the user passed in an invalid even id. Let's create a 404 component as shown below
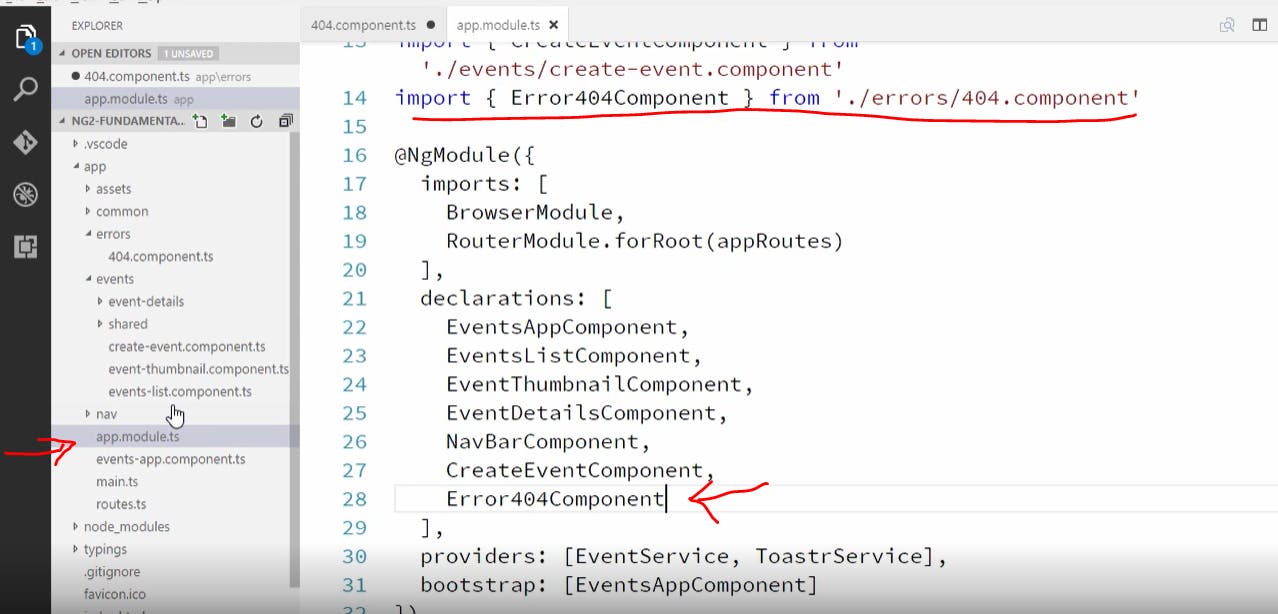
now we add this to our app module
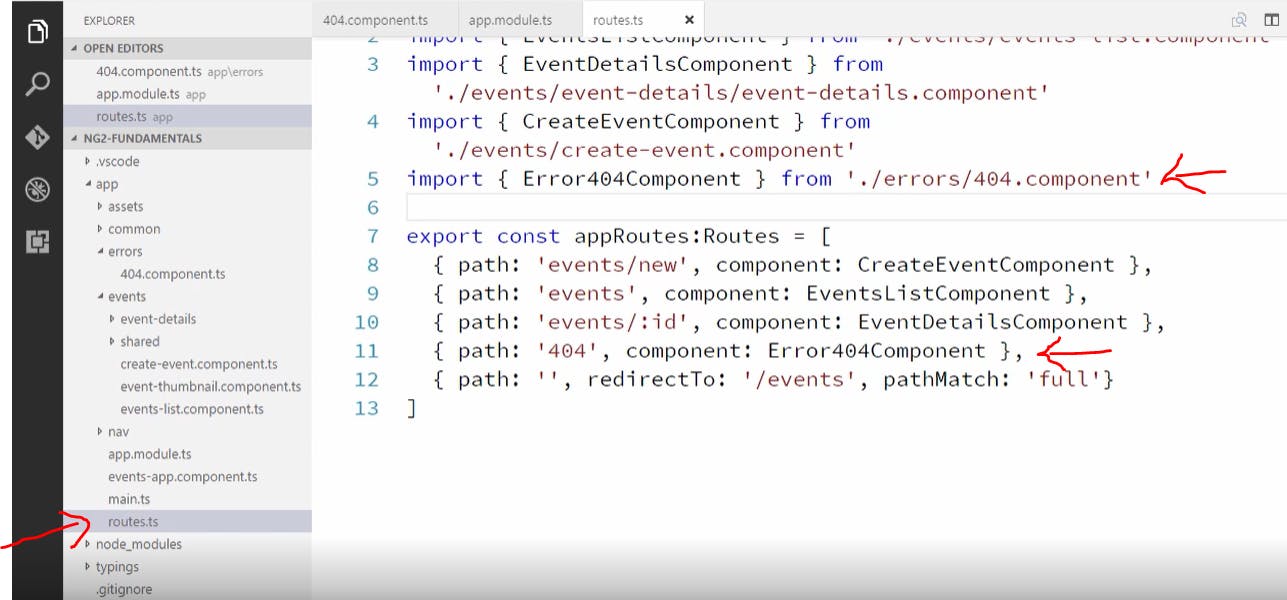
now lets add route to it as shown below
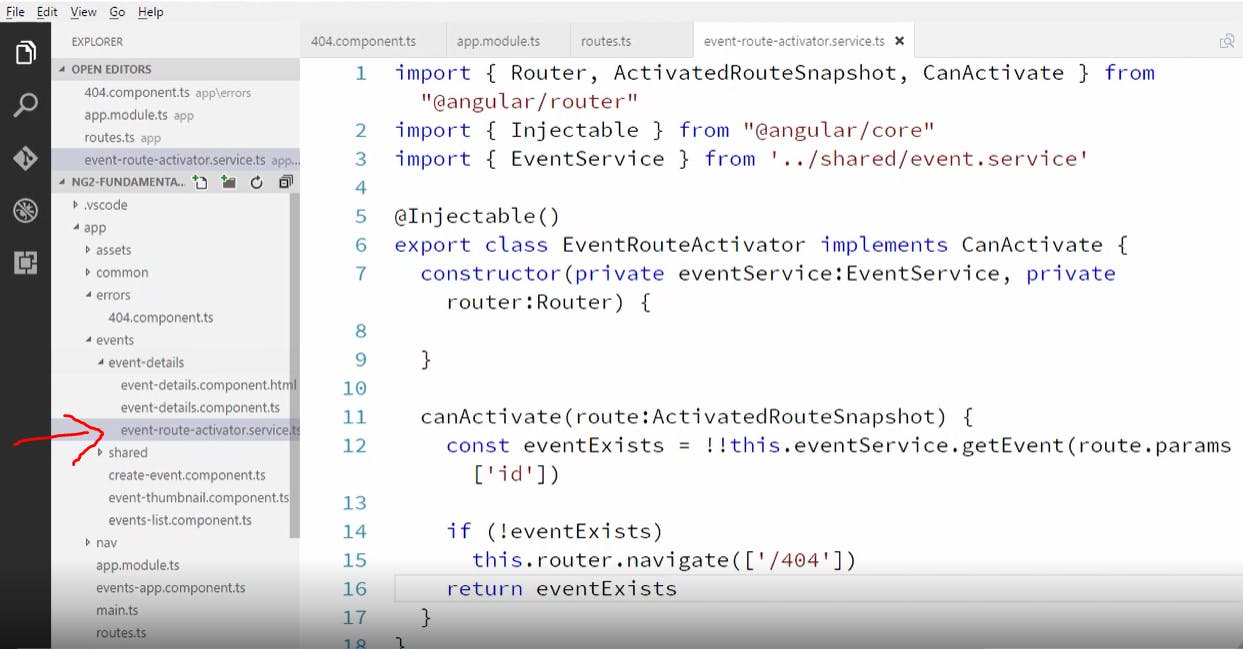
now let's create a service called route activator . Here we created a method which checks if the user entered a valid event id or not and casted it as a boolean so that if id is valid then take the user to that event or else take the user to the 404 component(shown below).
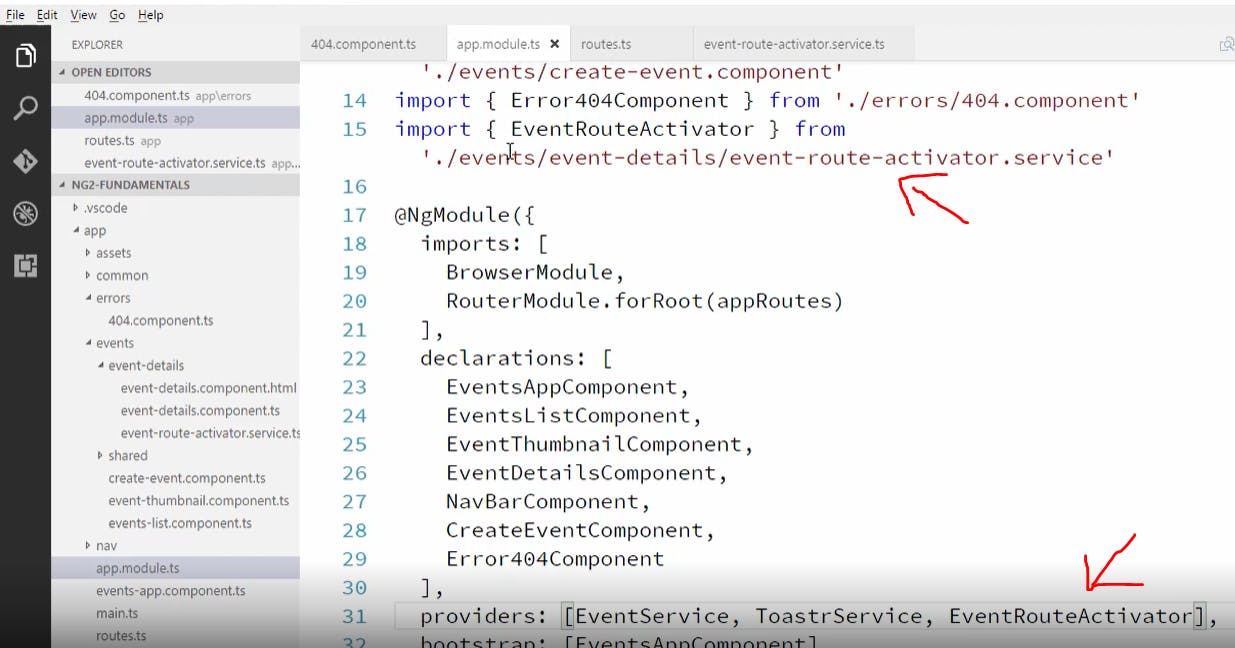
then we add this as a provider in our app module as shown below
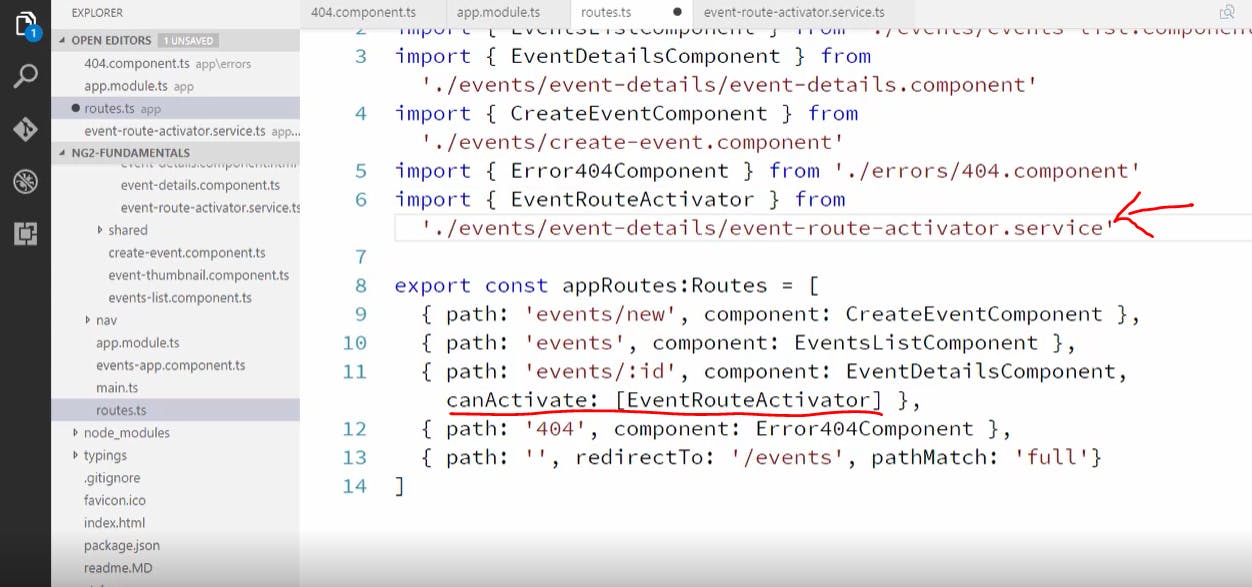
now we are gonna use this in our route as shown below so that if the user enters an invalid id it will take the user to the 404 page
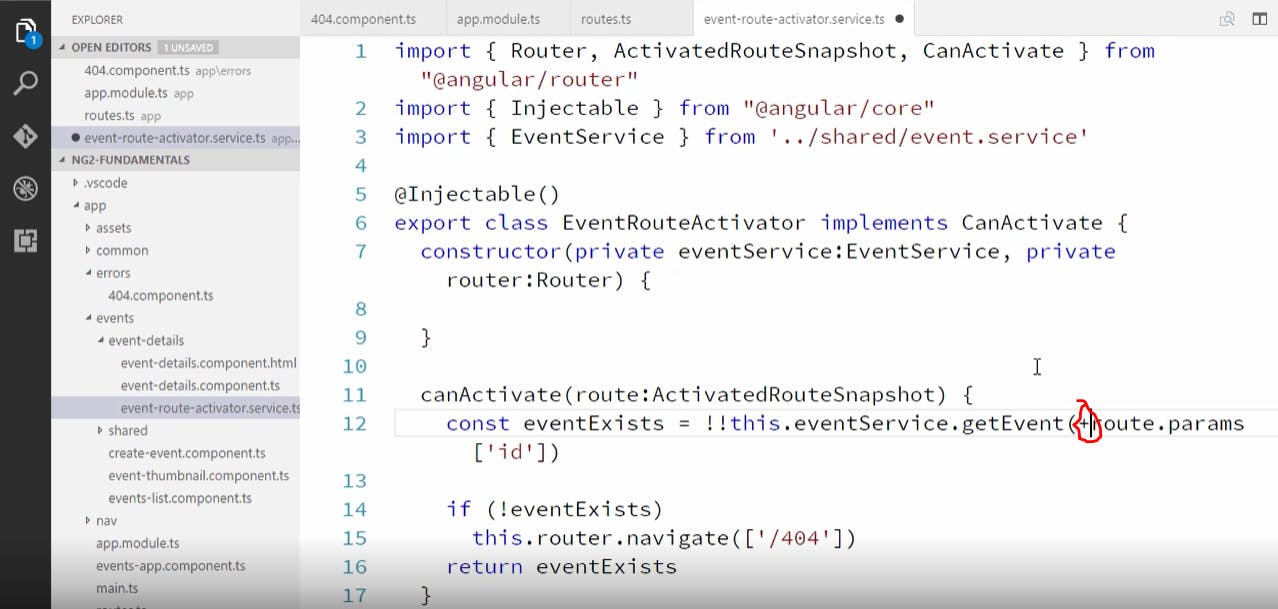
we forgot to cast the id as a number here so we changed that as shown below
now if we enter any invalid id in the url it will take us to the 404 page as shown below

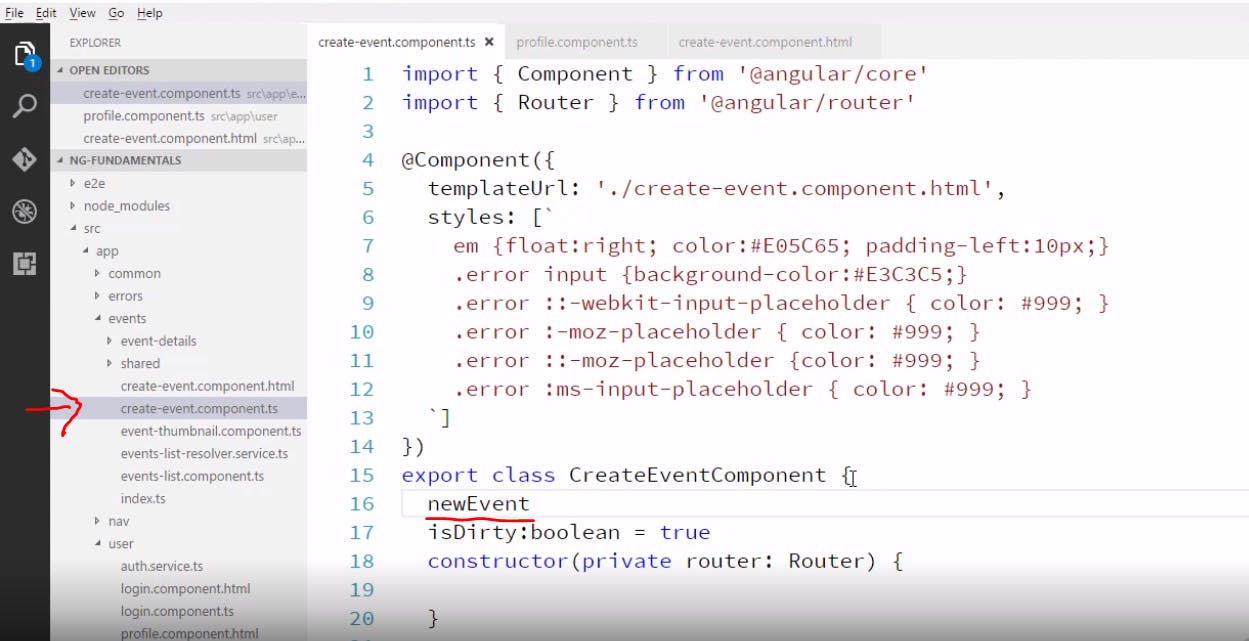
now lets say we don't want the user to navigate away from a page without saving the data and we would want to send a warning or alert message when the user tries to navigate away from a page. We can do that using route guard and we will use something called DeActivate property in our create event component as shown below and we will pass a function name which it should call when that event occurs
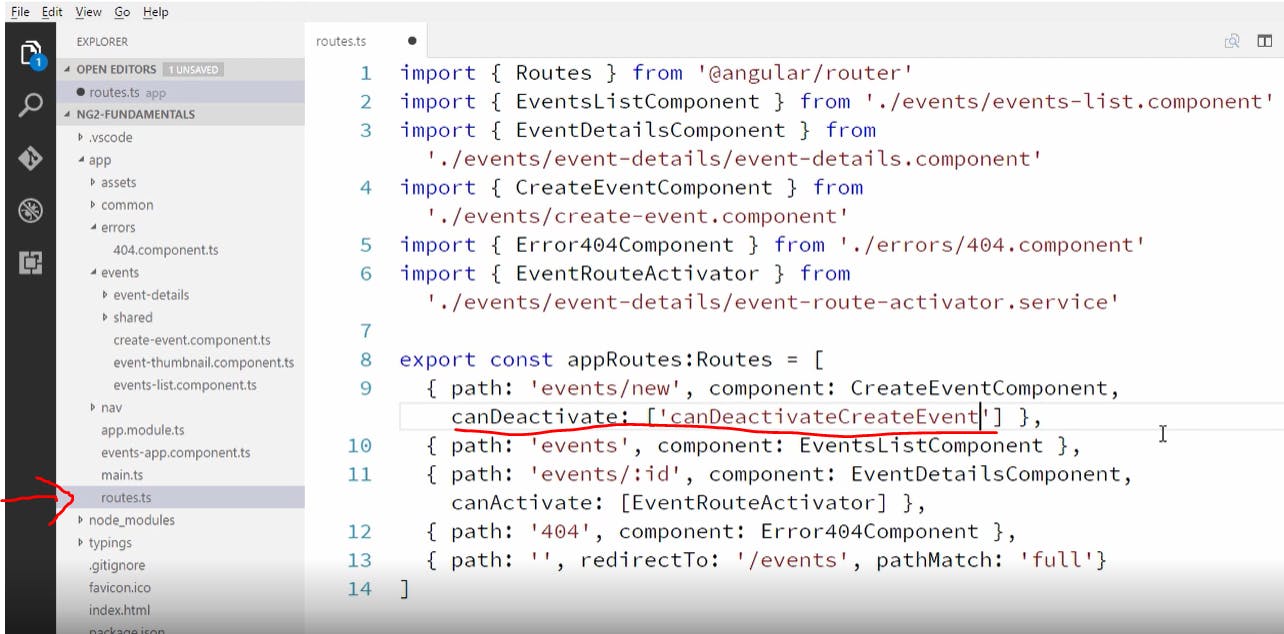
now how do we access this function? we can do that by adding it as a provider in our app module in long hand approach which basically says when "canDeactivateCreateEvent" is called use "checkDirtyState" method. To do all this first let's create an isDirty property in our create event component and set it to true by default as shown below
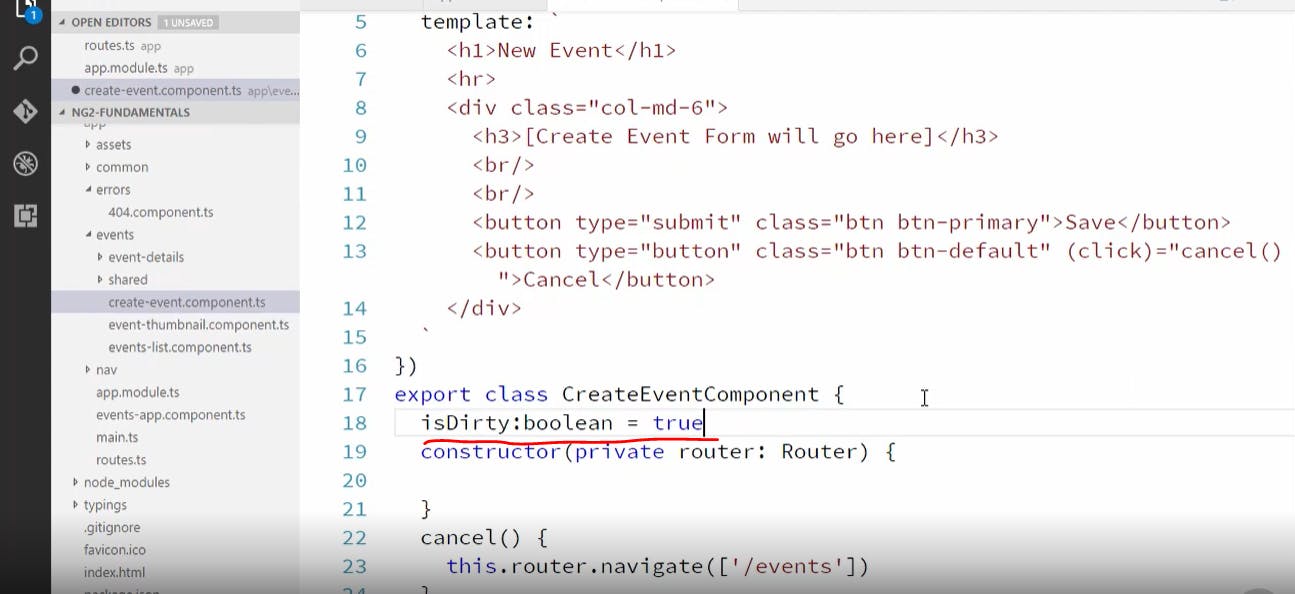

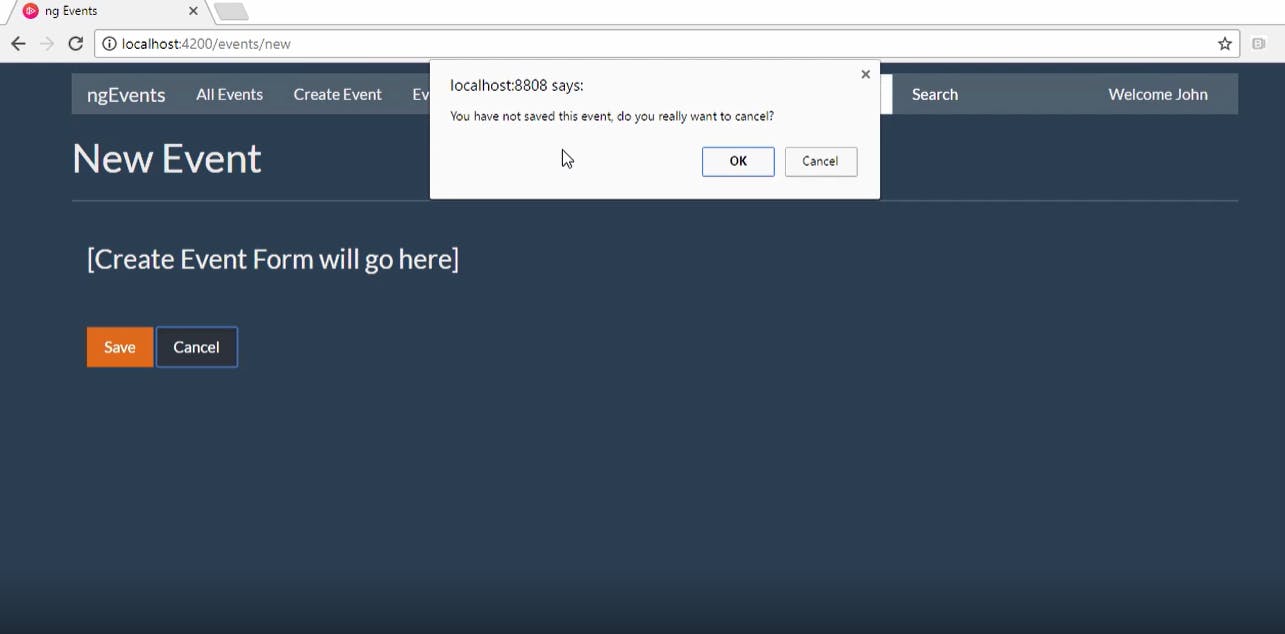
in the above picture we are saying if the user hasn't saved the data(or the page is dirty) in the create event page and he tried to leave that page show an alert or a pop up message which would throw him that message as shown below
now lets create some styling for our components in navigation bar. We want to have some color on the link that is active on the nav bar that is we want the user to know which link is he currently in by making that link active with orange color as shown below
now lets create a separate new user module to handle our profile(editing profile) in the web application as shown below

now let's create the user module. Since these are lazily loading feature modules we usually create them as shown below. In the normal app module we would import browser module but here we import Common module
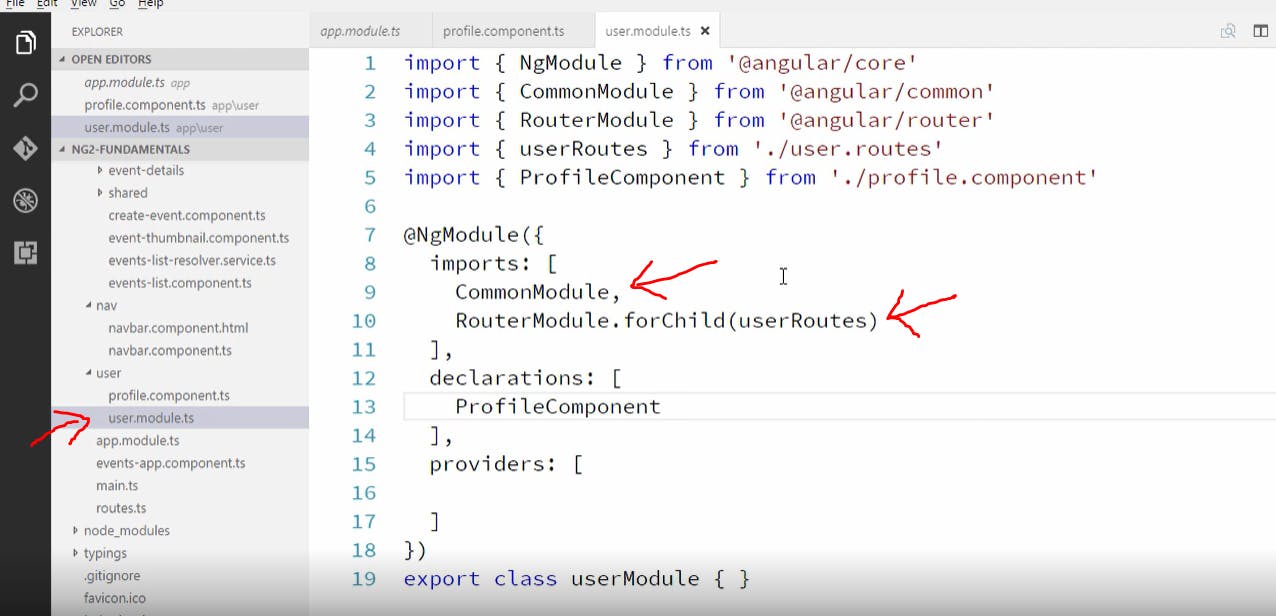
notice the difference between the imports in app module and our user module. Now let's create a new routes file as shown below
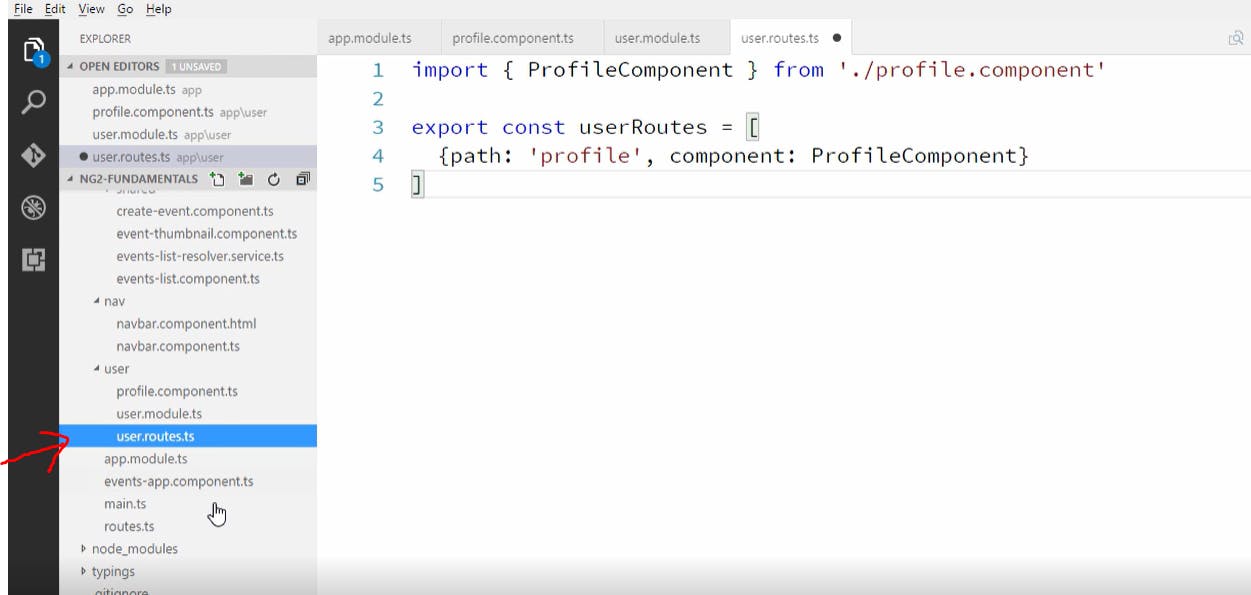
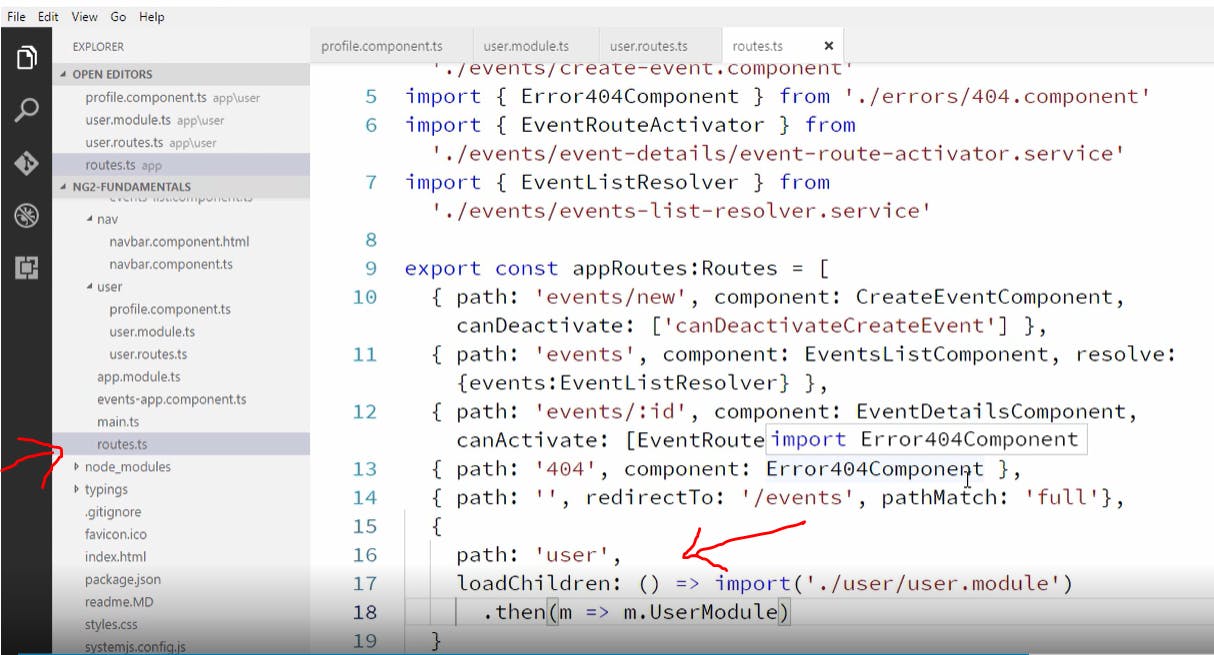
now let's route this up in our main route.ts file as shown below. We will load the user module using dynamic import wherein we specify the path of the module and basically say whatever module is returned from the import use the class returned from that module(shown below)
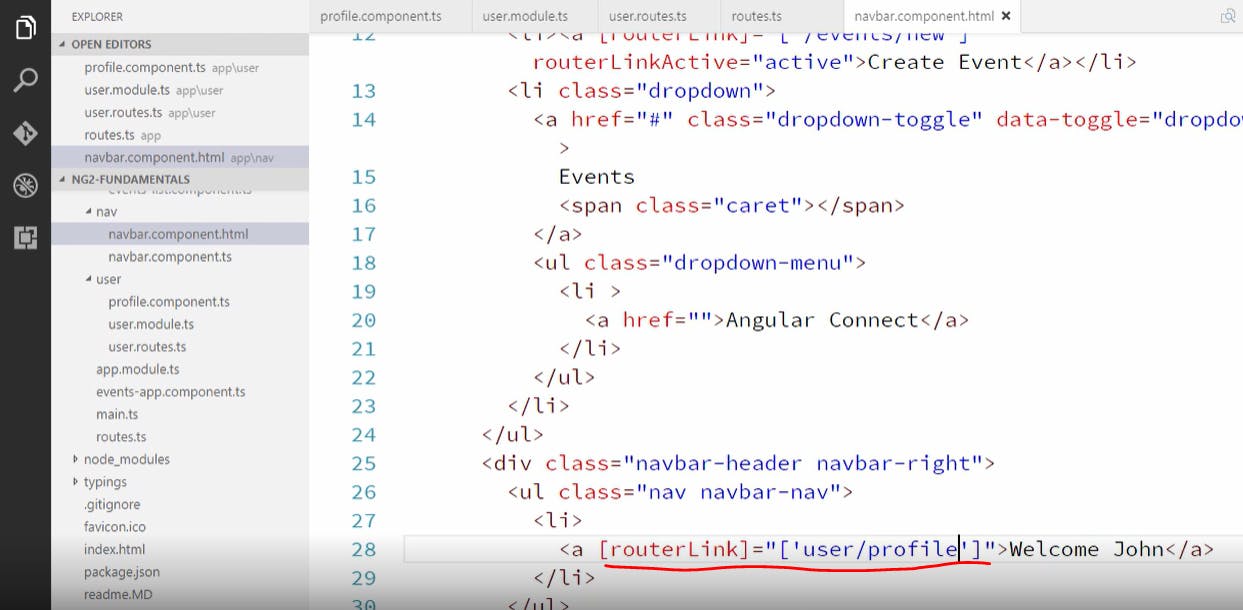
now let's wire this up in our navbar component where our profile can be accessed as shown below
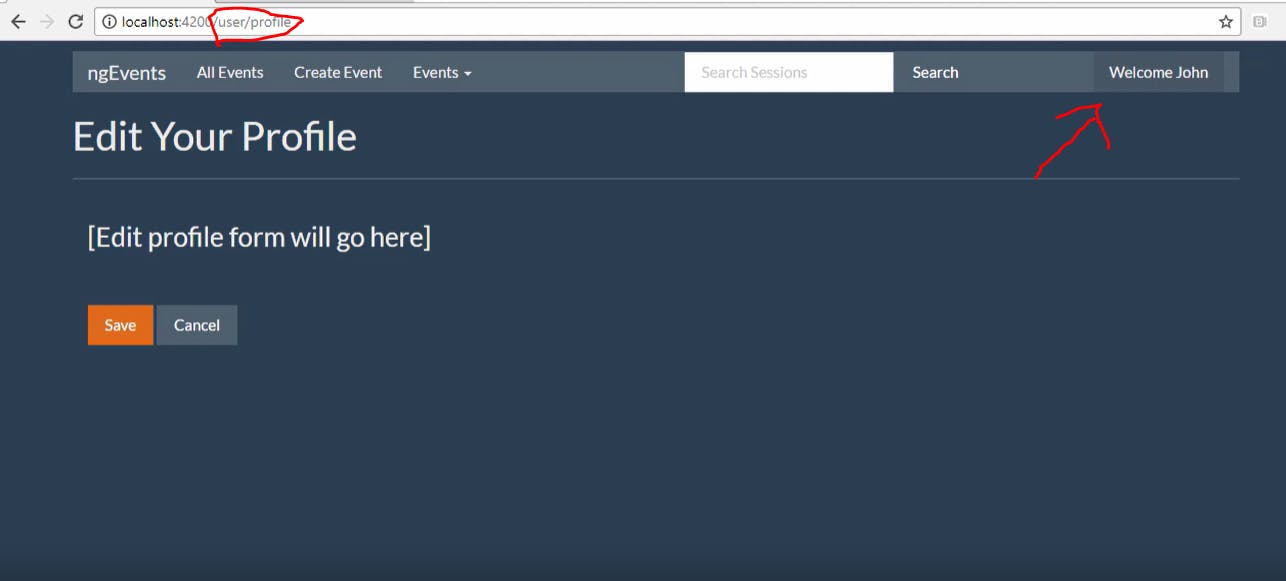
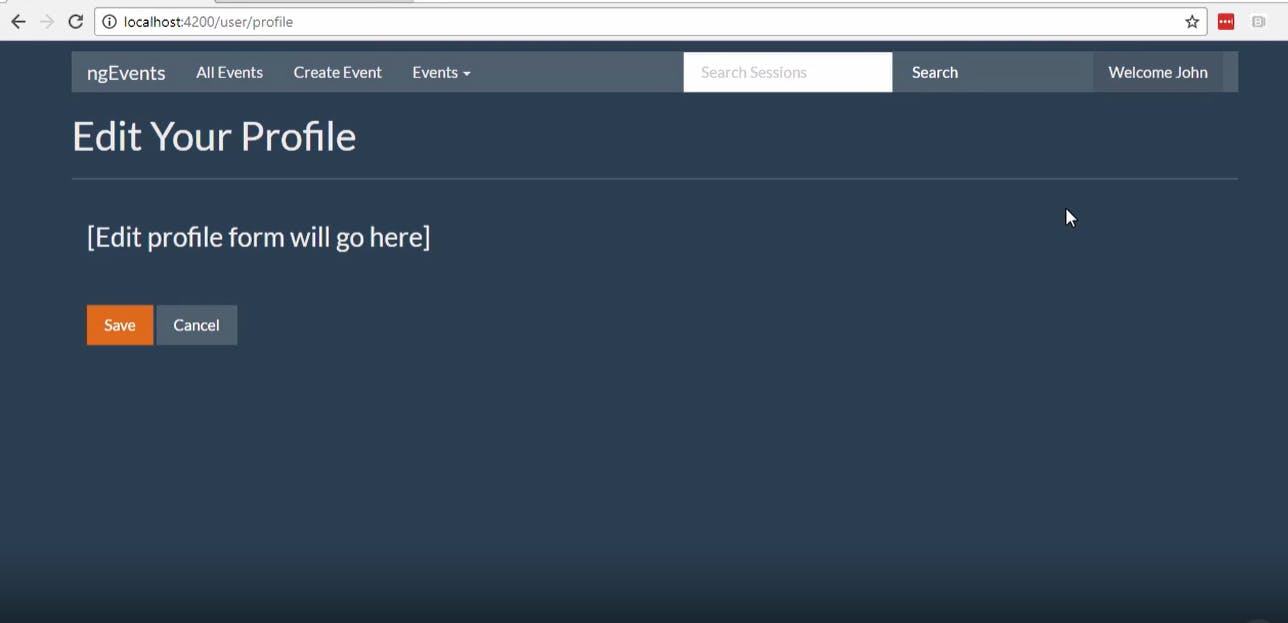
now when we click on the user name on the top right hand side it will take us to the user/profile path as shown below
Preloading data for components
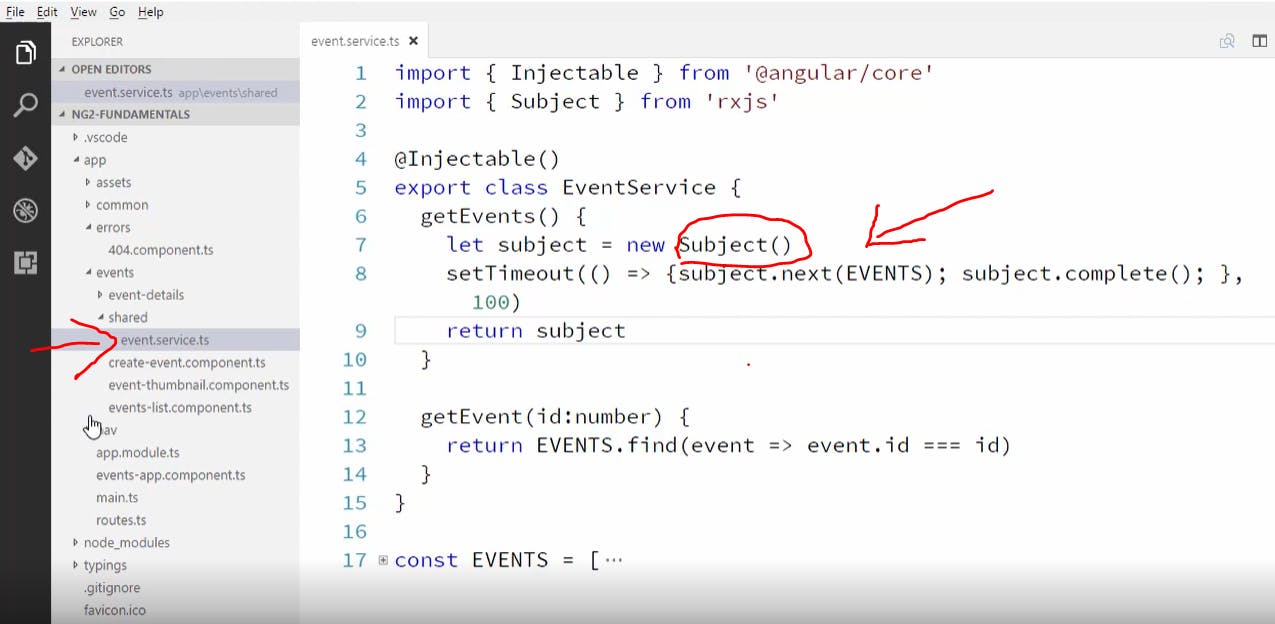
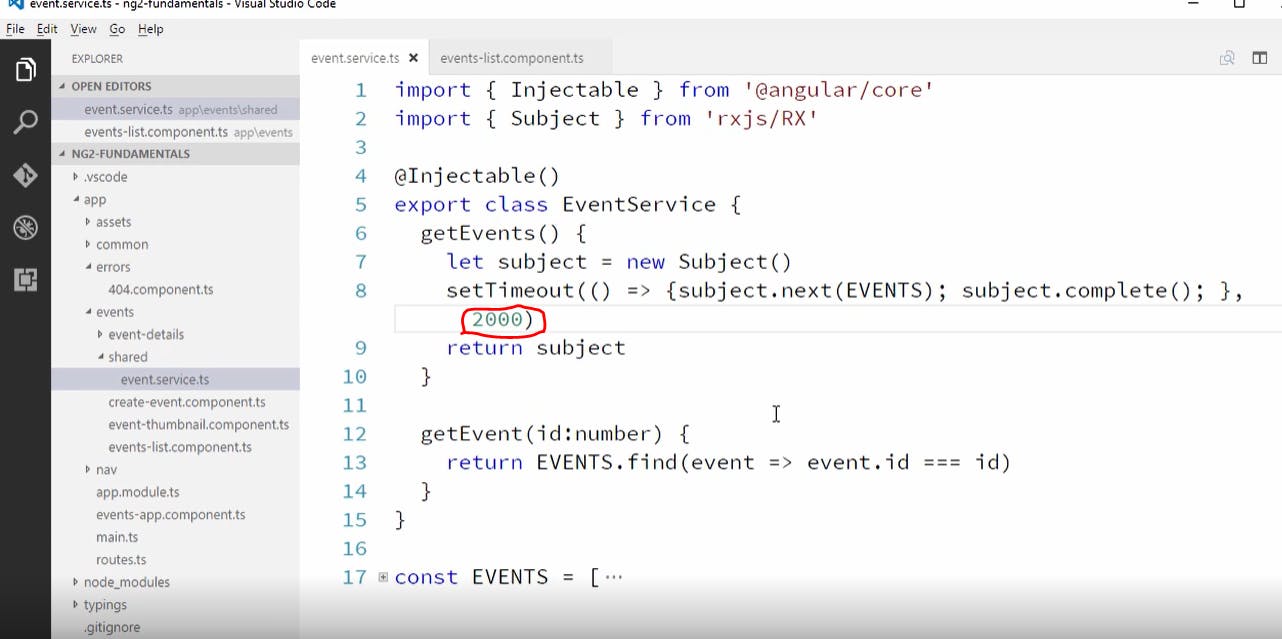
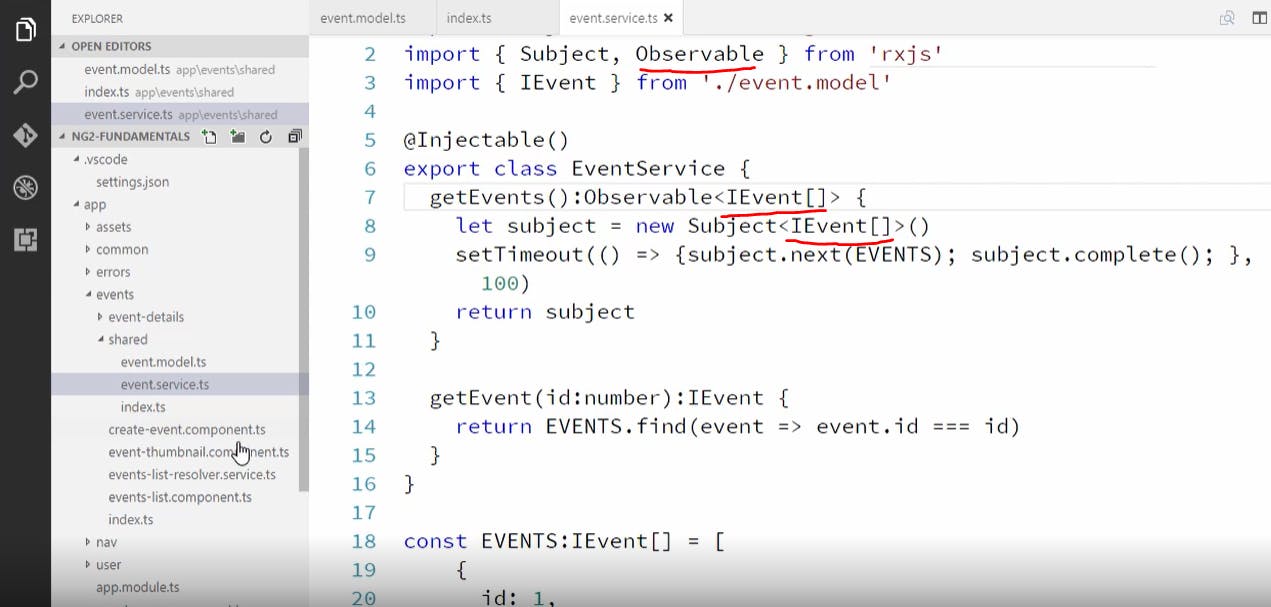
Here we are gonna use something called** Rxjs Observable**. Let's make asynchronous call to our get events method in our event service component. This returns a promise or an observable as the return type and to use this observable we would need to subscribe to it. Don't worry about the syntax used here for now we will cover it again in our future topics. First we are gonna import Subject and then we will create a new rxjs observable subject as shown below and then we are gonna use javascript's time out method as shown below. Observables are like streams of data that arrives over time and here Subject is a type of observable and we are adding data to this observable stream. So after 100 milliseconds we will add data to this stream and then we are returning the subject/observable(shown below).
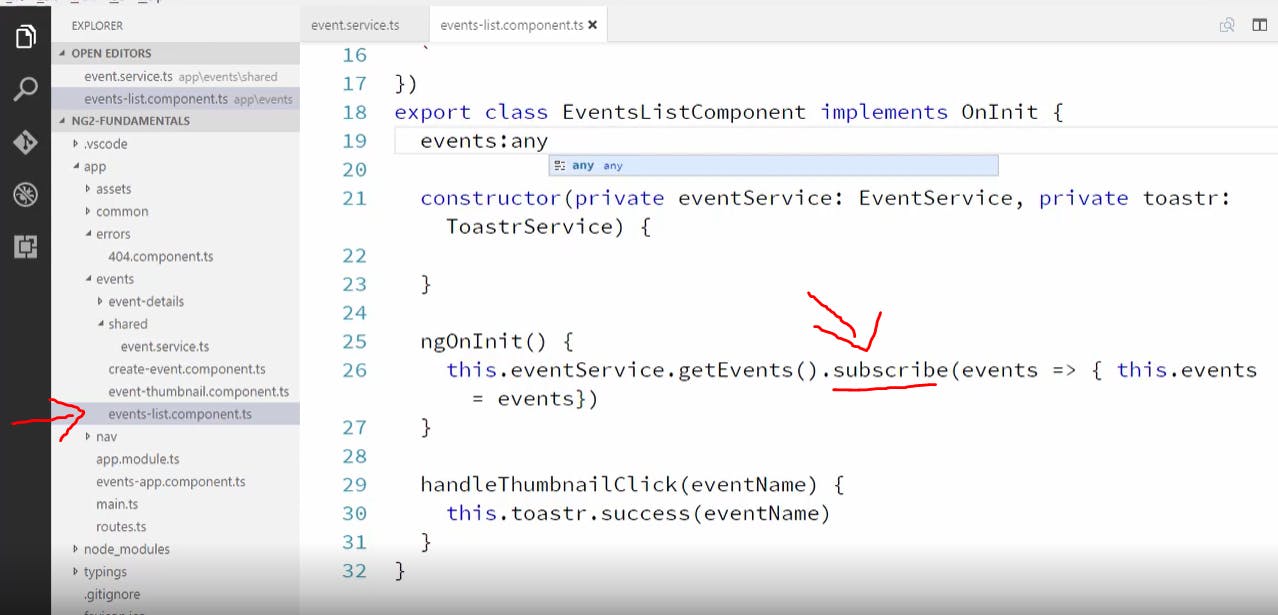
now we have to go adjust the consumer of this data which is the events list component. Here we get the data out of the observable by subscribing to it as shown below
Let's make the page load after 2 full seconds and we can do this as shown below
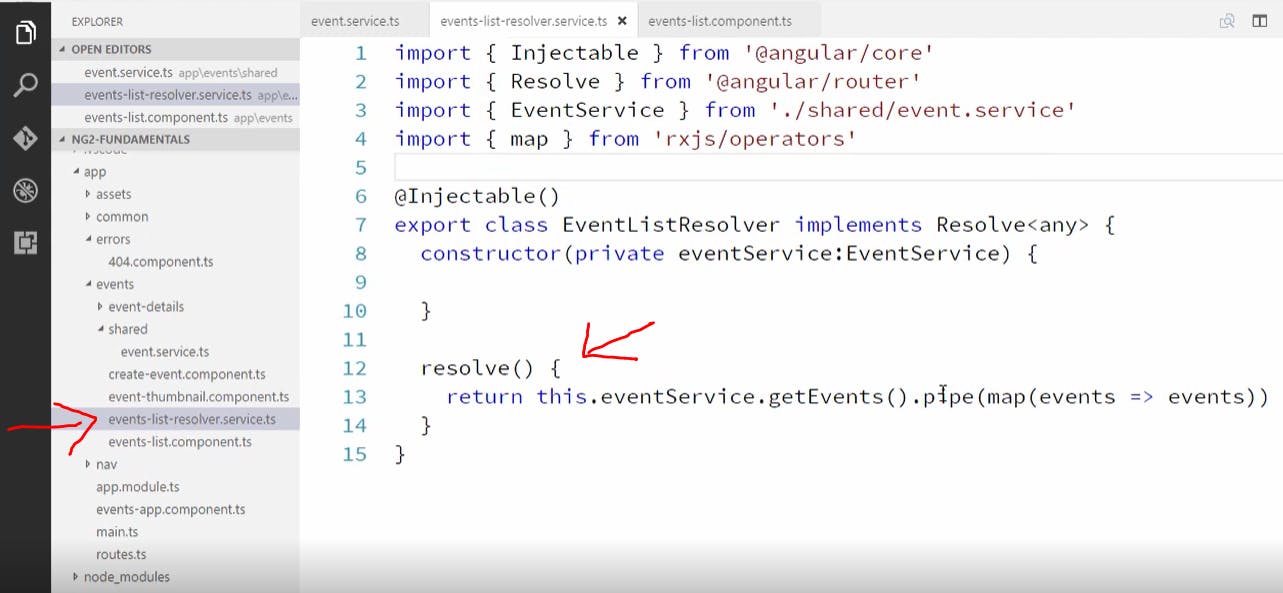
Now lets create a resolver to load the data before displaying the component. We do that by creating an events list resolver service. This will be an injectable service which implements resolve. In resolve method we are calling getevents method which returns an observable and then we are calling map on that observable which gives us access to the events that are passed in the stream and we return that(shown below).
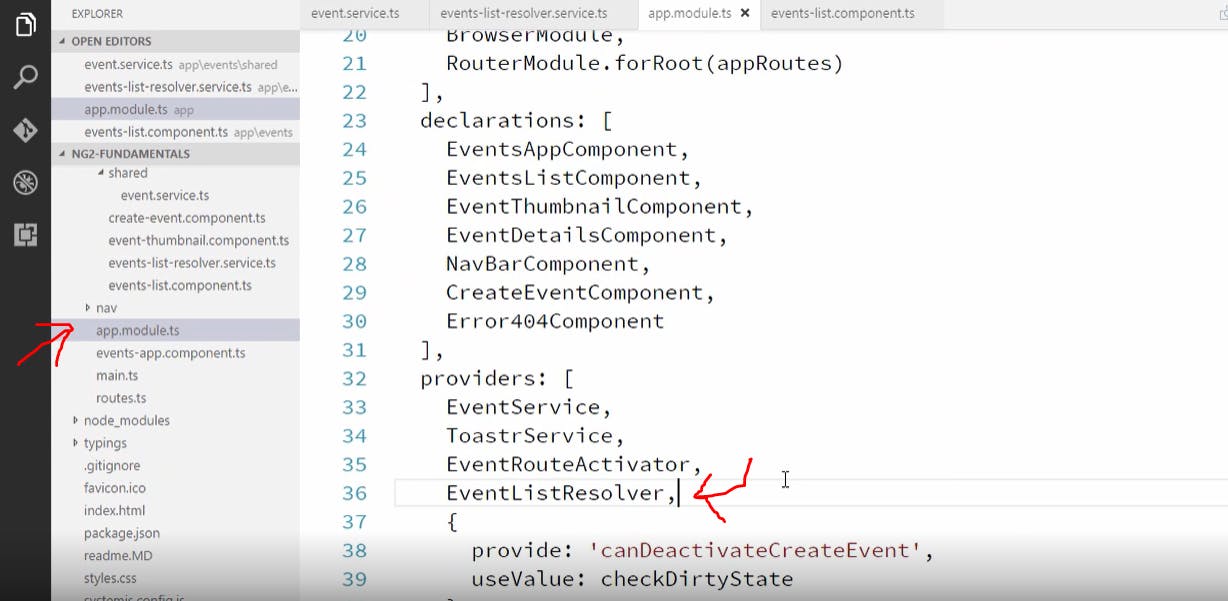
Now let's add this as provider in our app module.ts file
now lets add this in our events list route as shown below
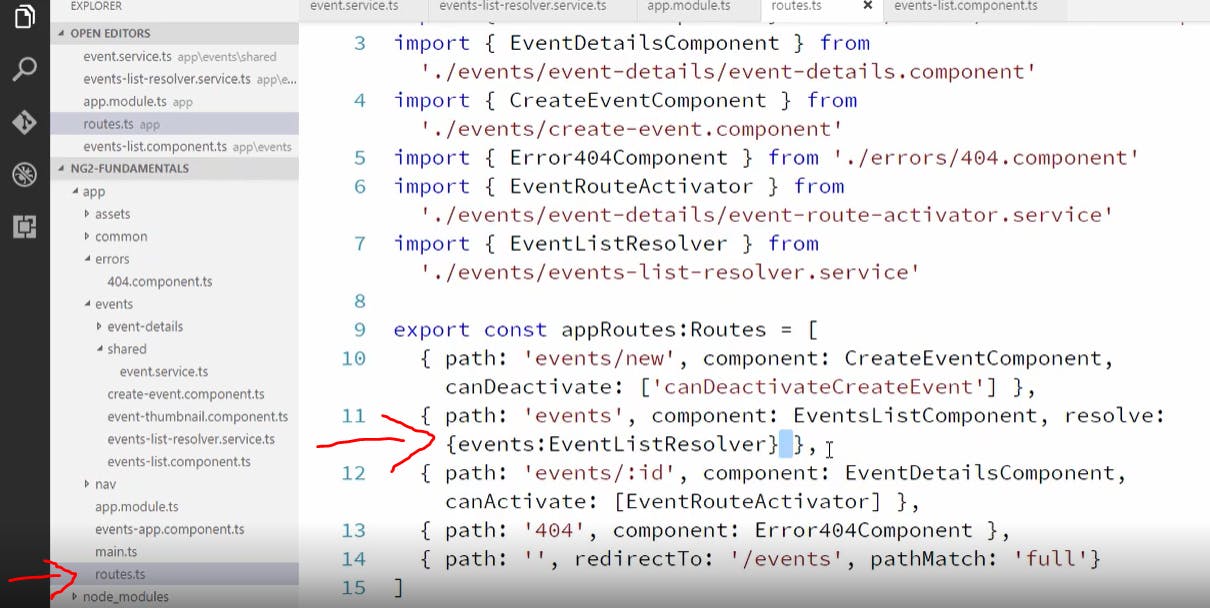
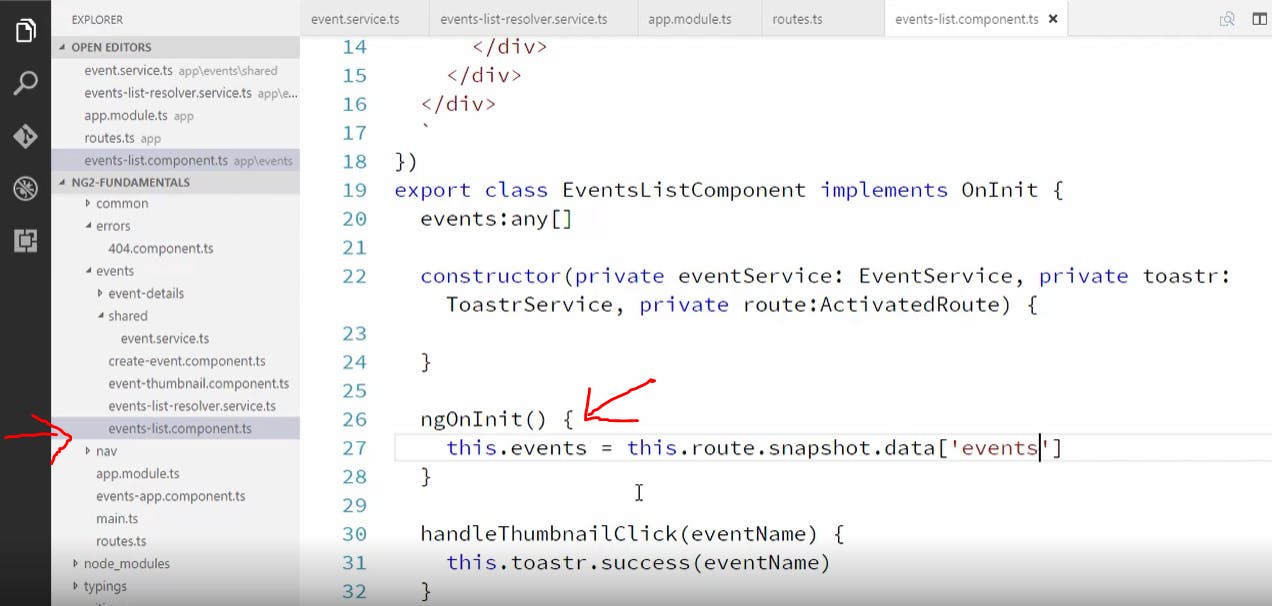
what the above picture is saying is before resolving this route call this eventsListResolver and then when that resolver finishes and returns the data add this data to the route as a property named events. now since we are getting the events in our resolver we don't need to call it in our ngOnInit in our events list component (shown below). Also don't forget to import activated route here in the events list component.
Collecting Data with Angular Forms and Validation
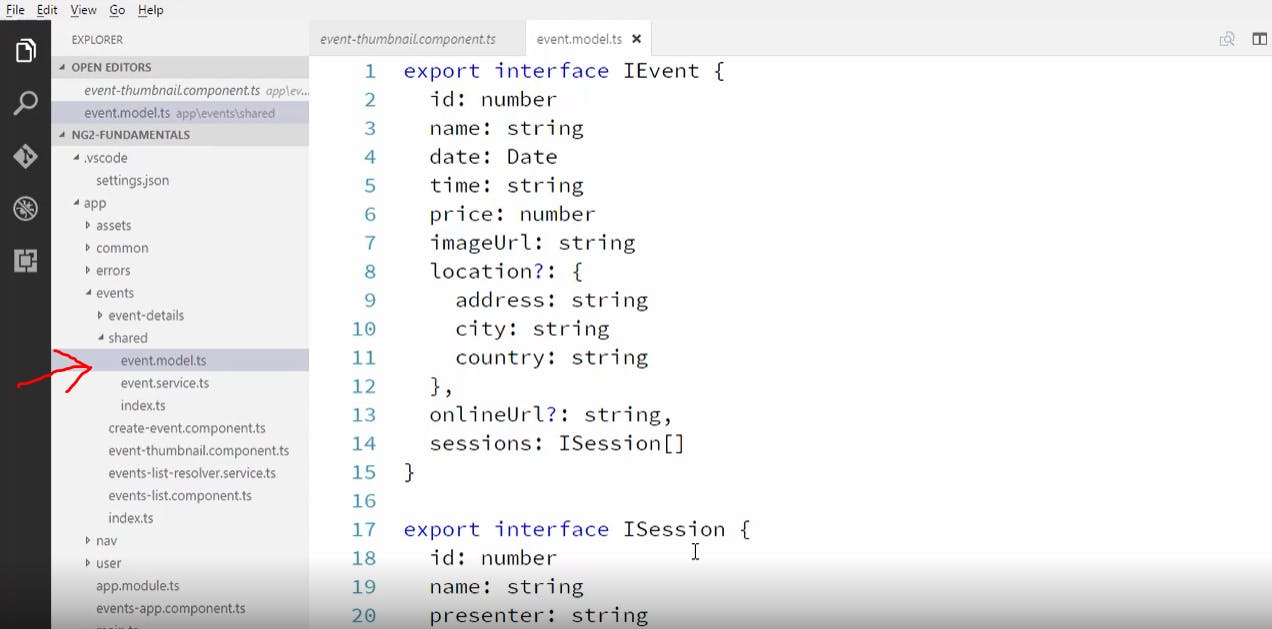
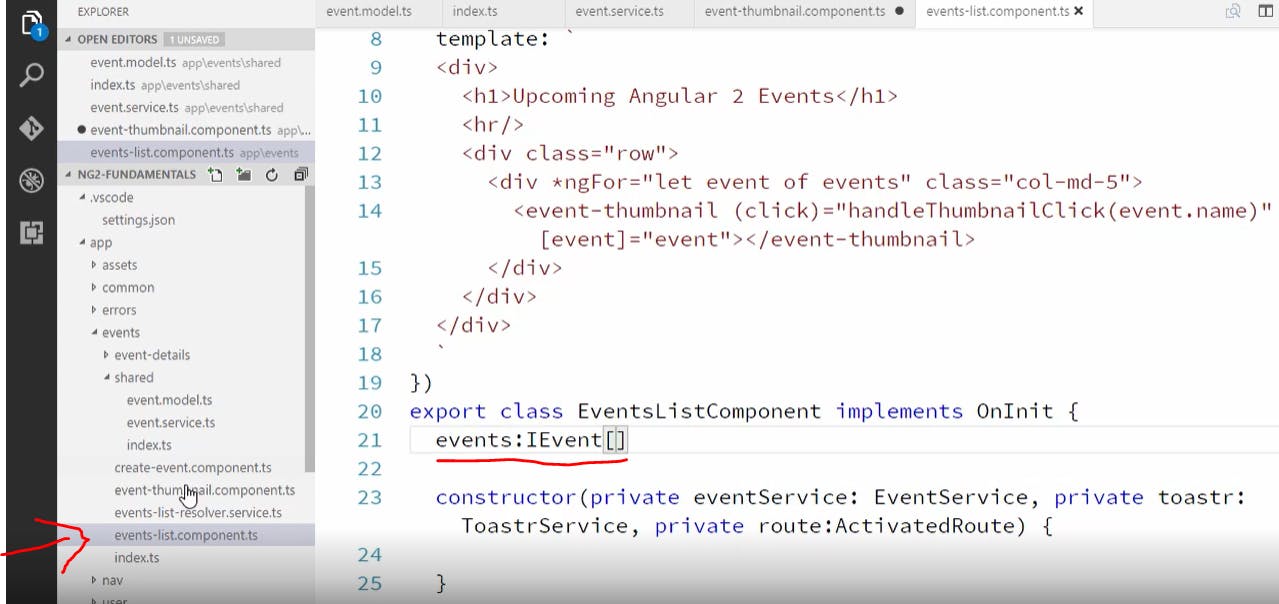
Now as we know in all our components where we have used events as a property we mentioned it's return type as any but we don't want to do that and we would like to specify the data type for our events. now let's create an event model to tell typescript the return type of our event. So in our shared folder let's create event model as shown below
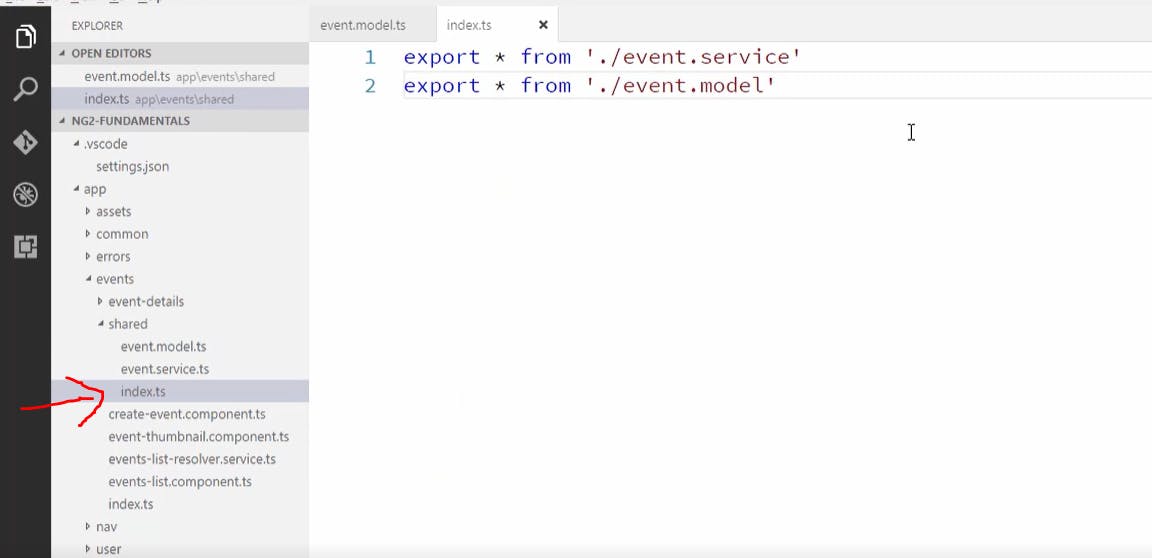
now let's go put this in the shared barrel as shown below
now let's go to event service and change the return type of our events to ievents(our model) and import it too as shown below. We will get some errors we will see how to fix them too.
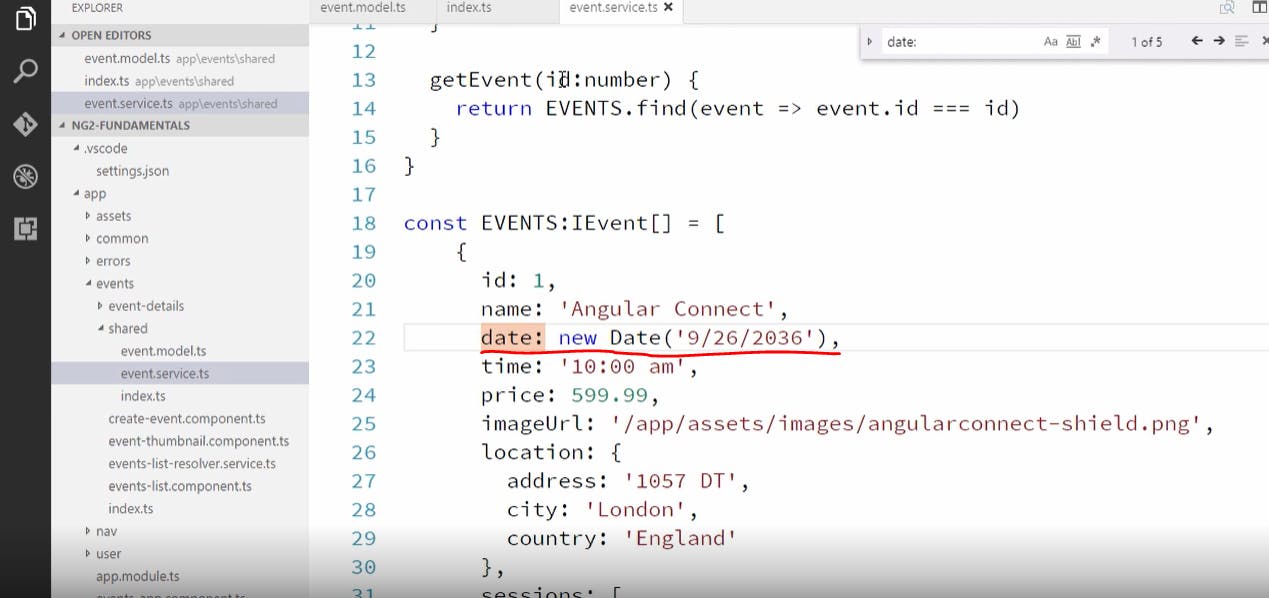
now the error would be thrown at our date field and we can fix that as shown below. Do the same for all the dates in our events
Lets do these changes in few more of our components as shown below and dont forget to import the ievents module in the components we are changing the return types for.

Creating Template based form
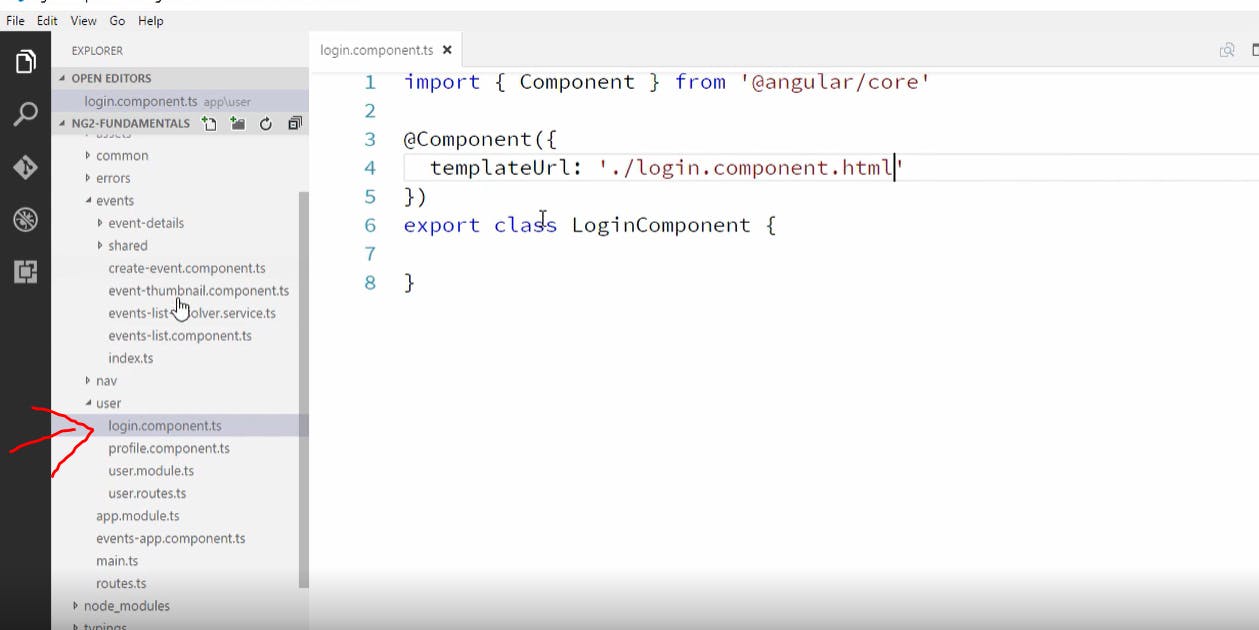
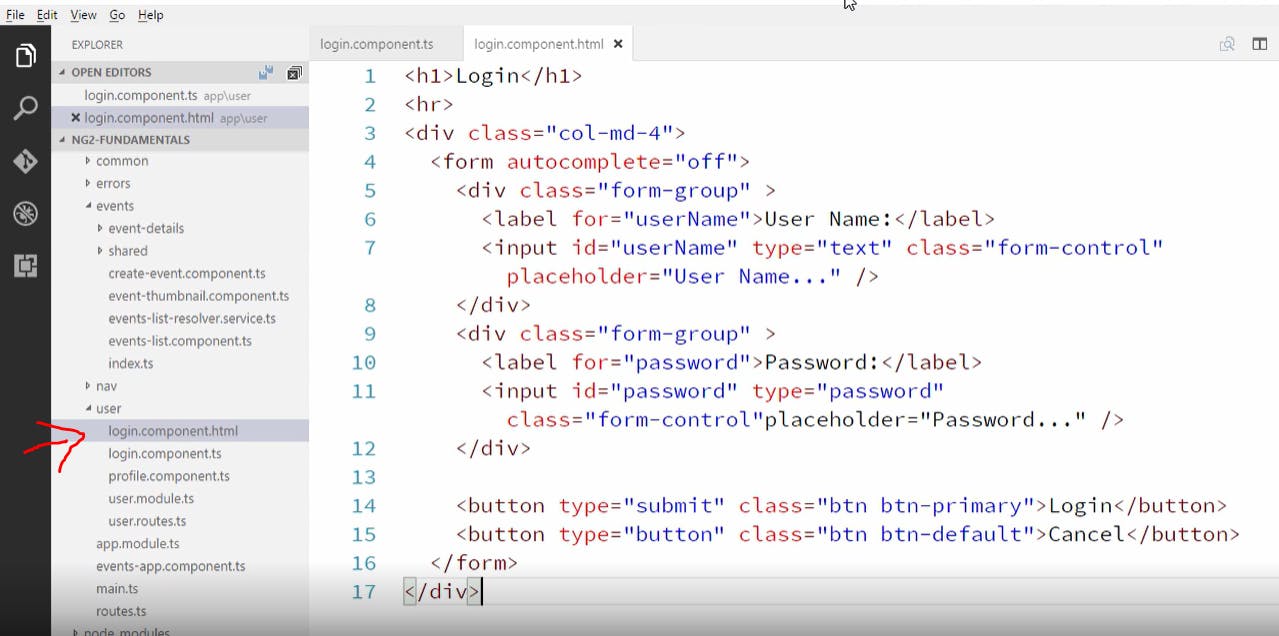
For this we will create a new login component in our user module
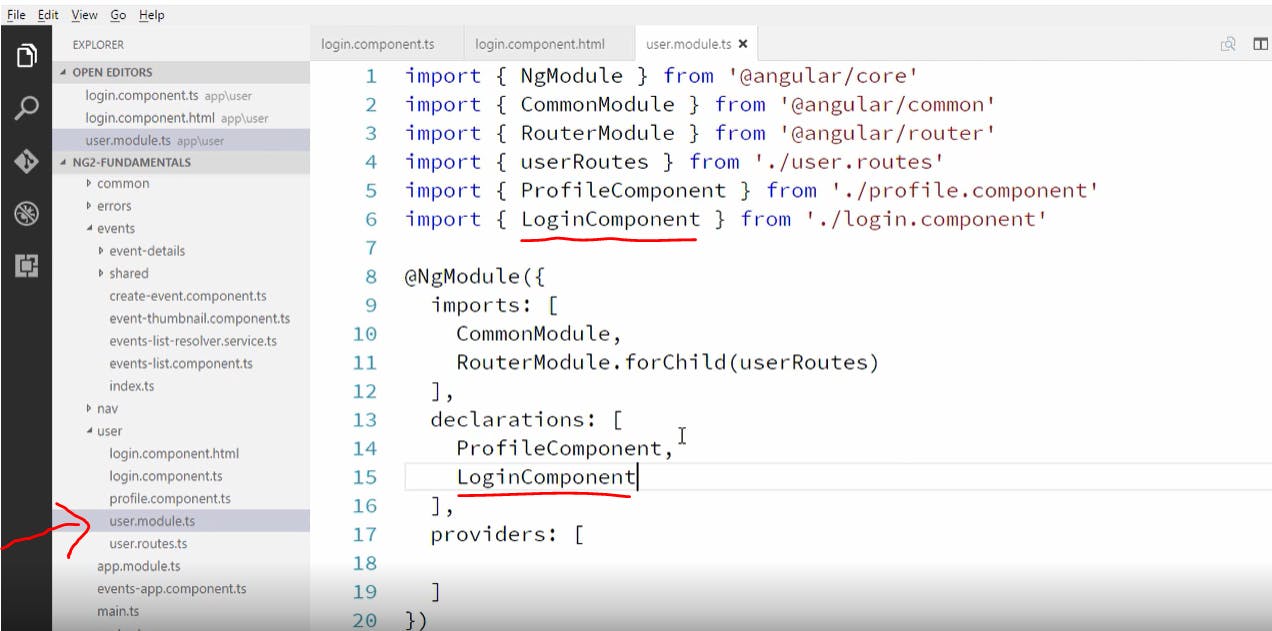
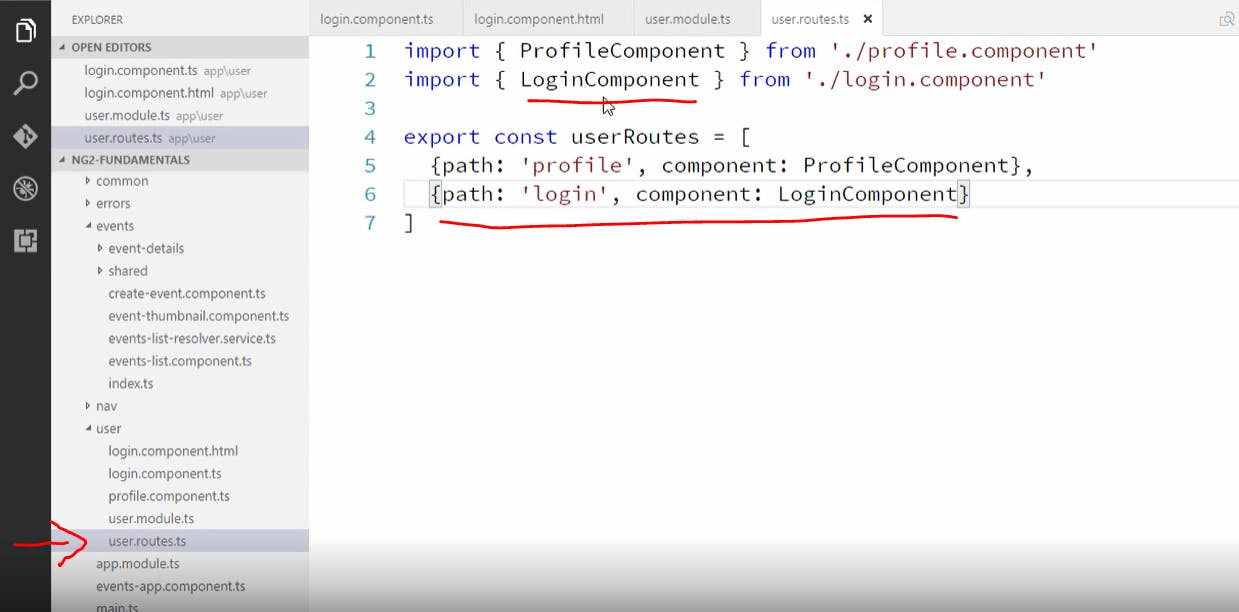
Now let's go add it in our module and also add routing to it as shown below
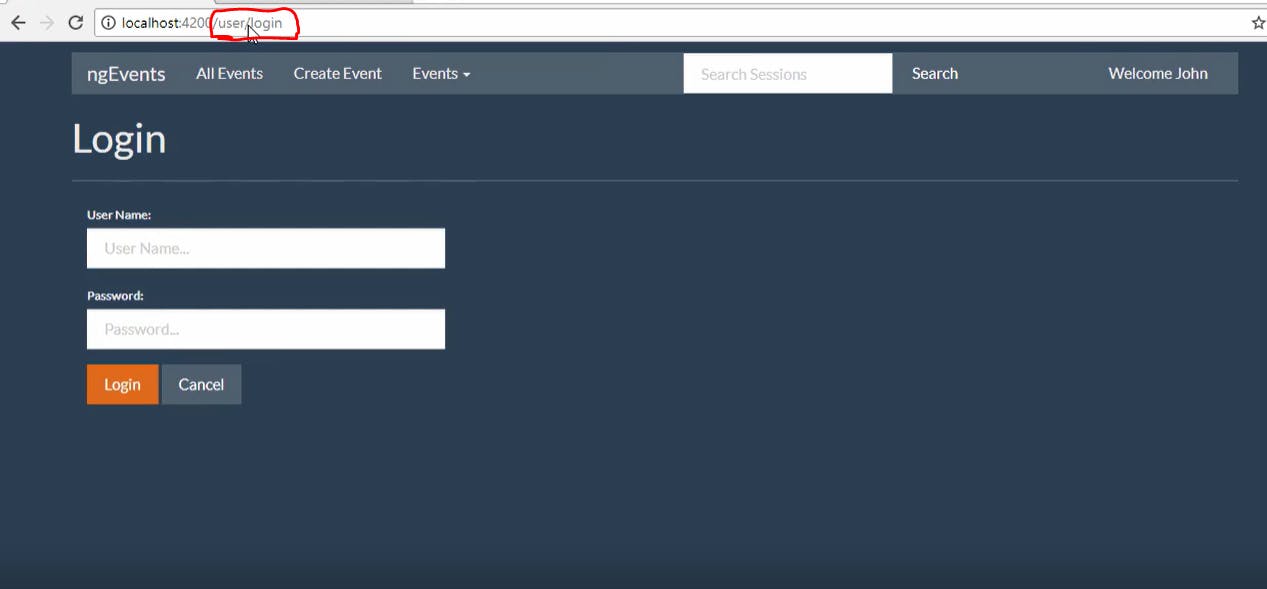
now if we change our url to user/login we should be able to see this(shown below)
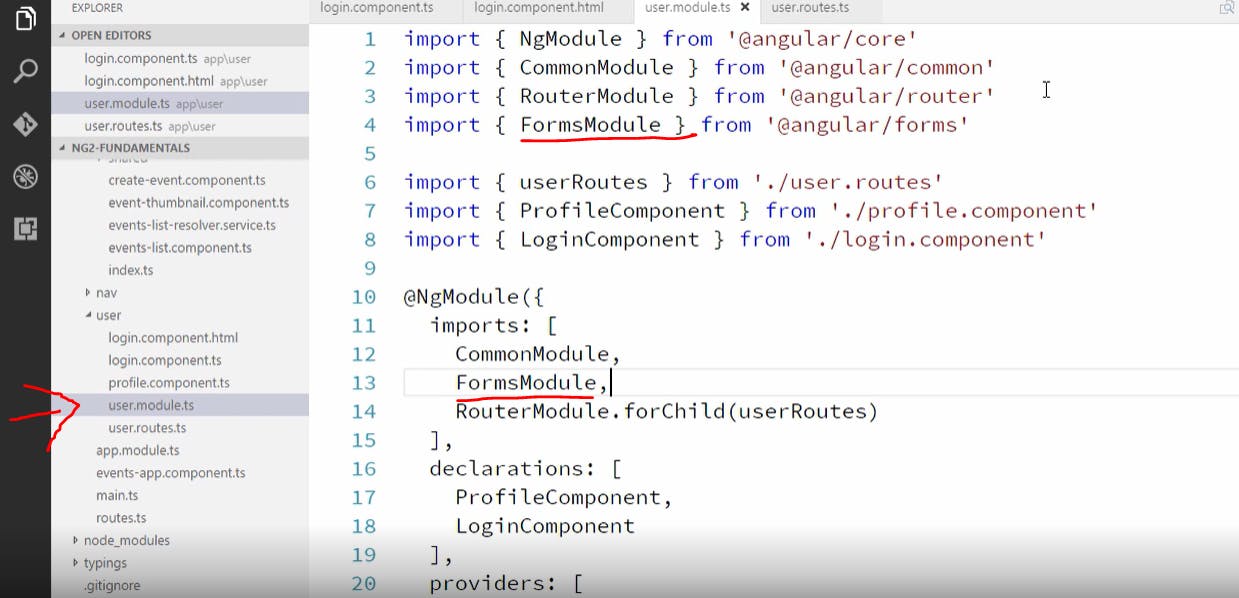
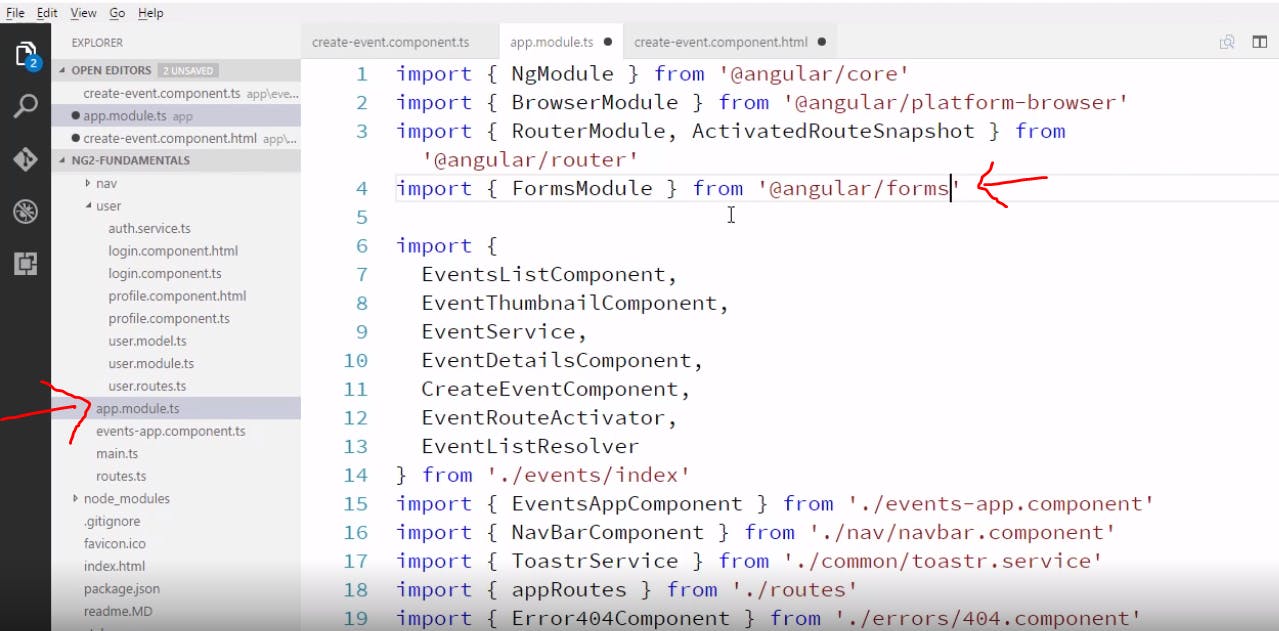
now we have to wire up this form. We will be using few "Forms" related directives so we need to import "FormsModule" as shown below
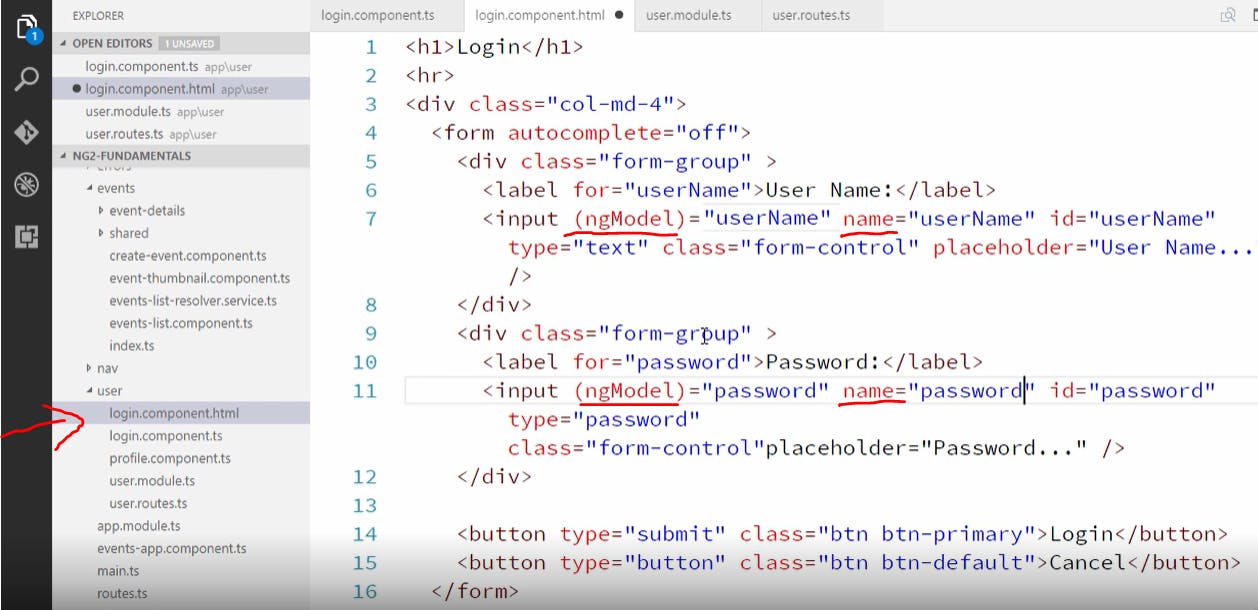
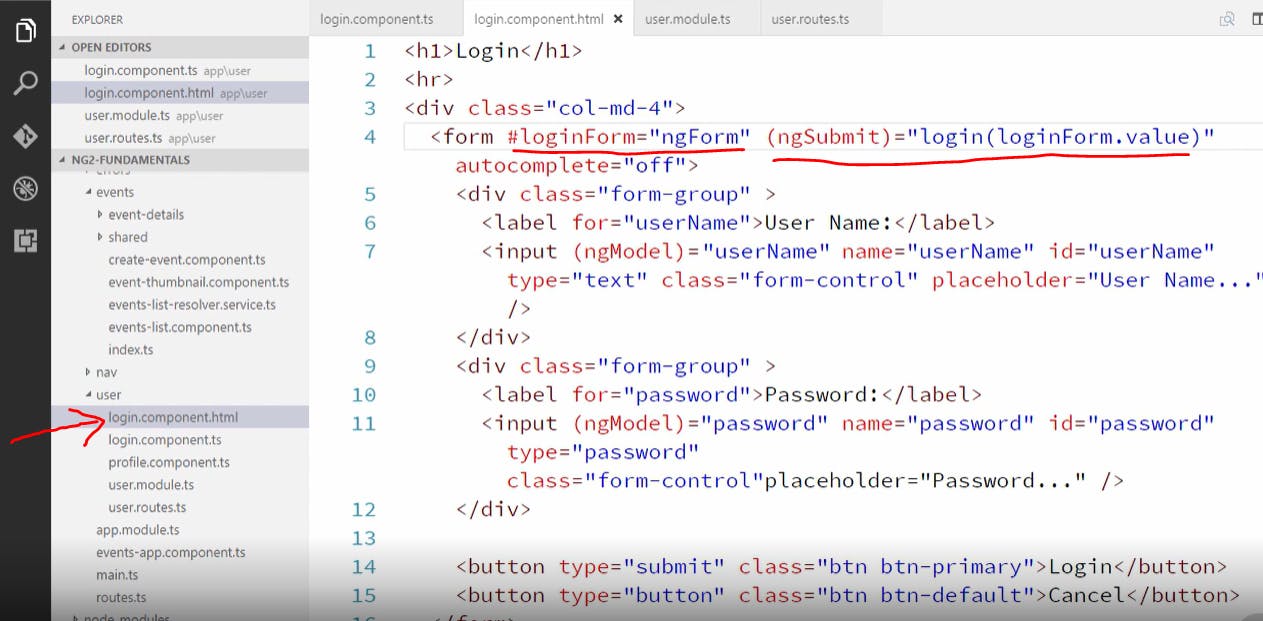
in the below picture we are using ngmodel so that when user enters data in those fields we want to get that data into our components so that we can use it.
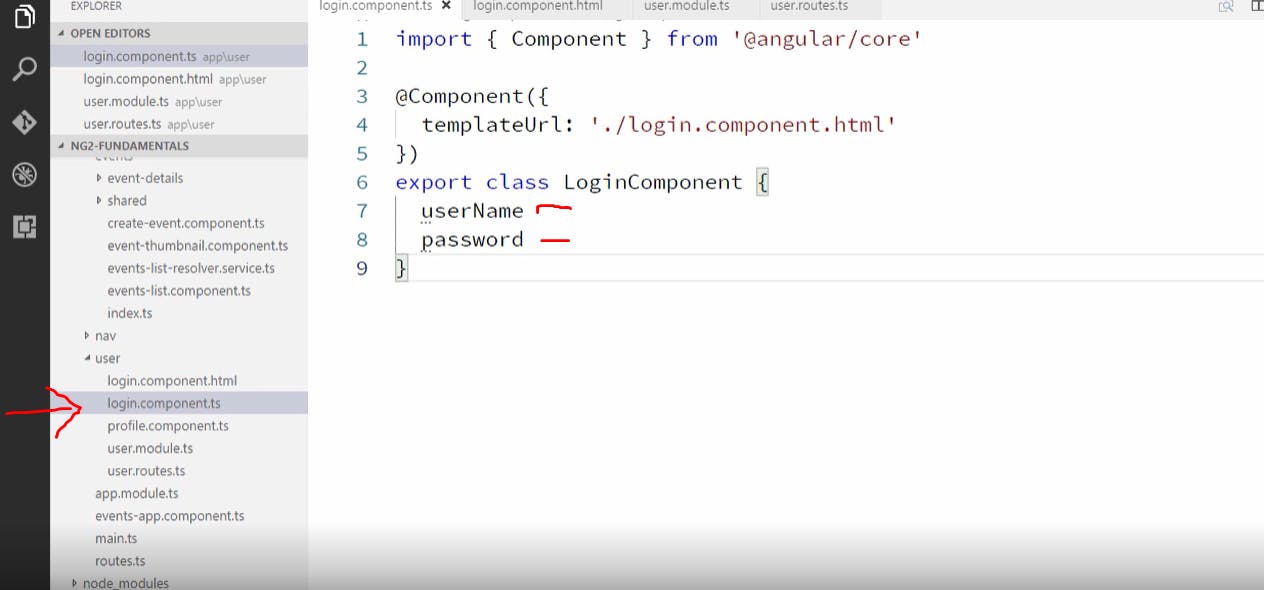
now let's add the username and password property in our login component as shown below
instead of using these fields directly we are gonna access them using the submitted form and we can do that by adding local variable on the form element as shown below we are also using ngsubmit since its best to use this binding on a form and we are saying we are just interested in the values passed and nothing else
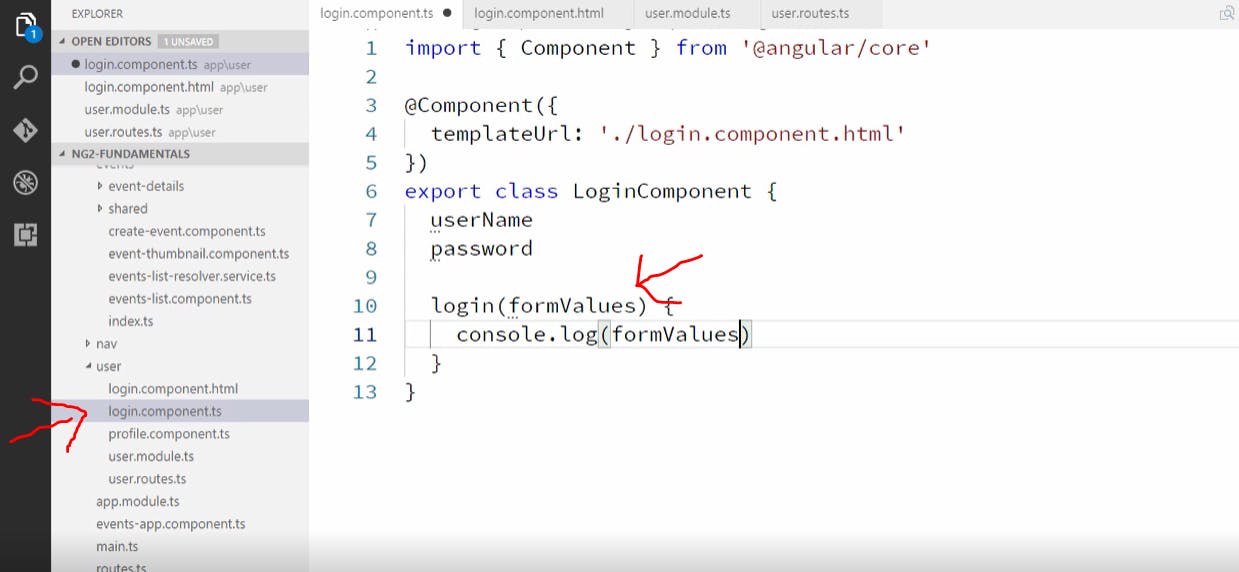
now let's go add this login method in our component as shown below and we will just look at how this looks like
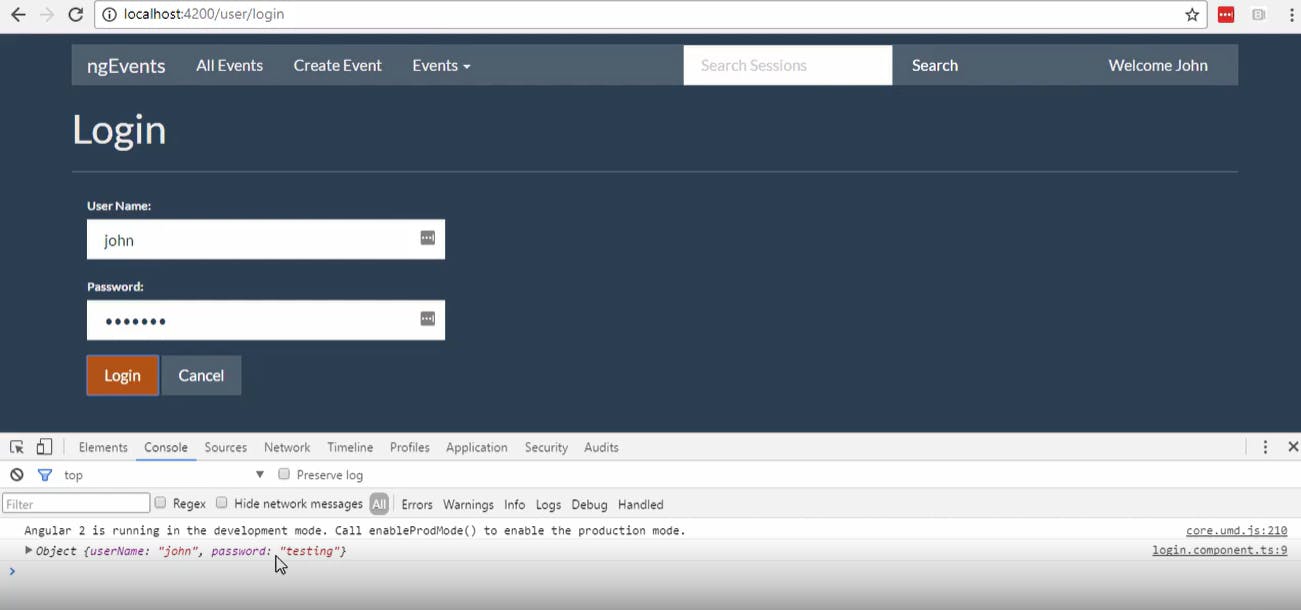
let's see what this looks like in the browser
Using data from your template based form
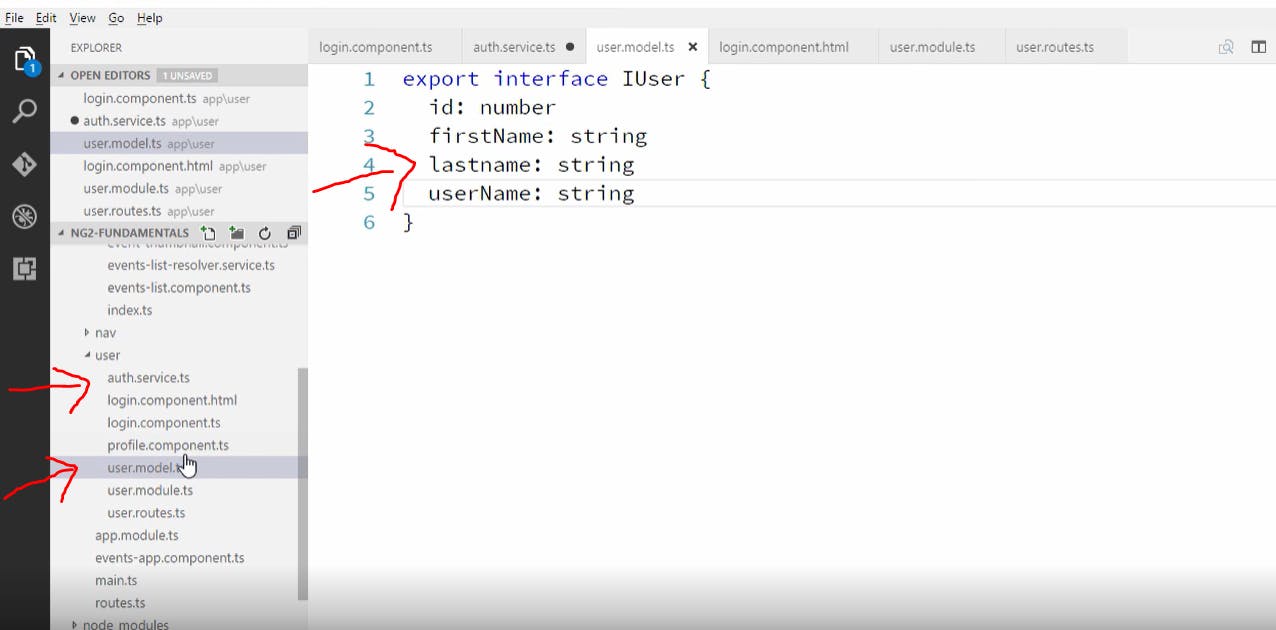
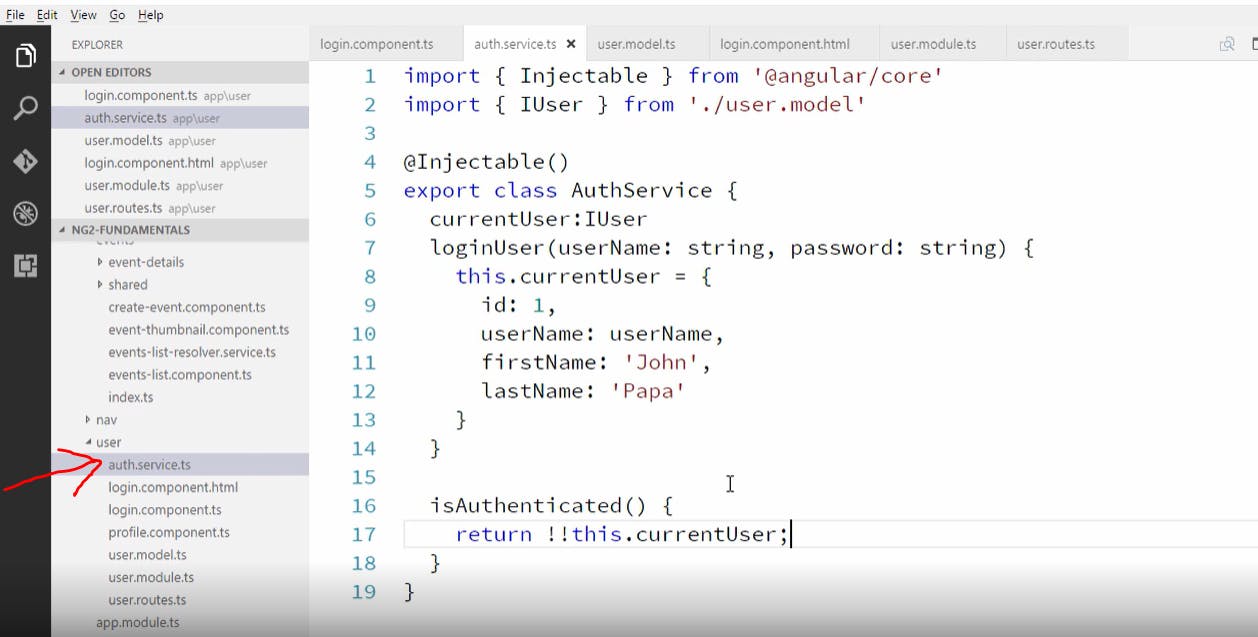
now our login form is providing the data that we need so let's use that data to log the user in. First we'll create a service that will do that job for us. Let's create an Auth service as shown below. This service will keep track of the current user so we'll also create a user model (NOTE: the attribute lastname should be "lastName")(shown below)
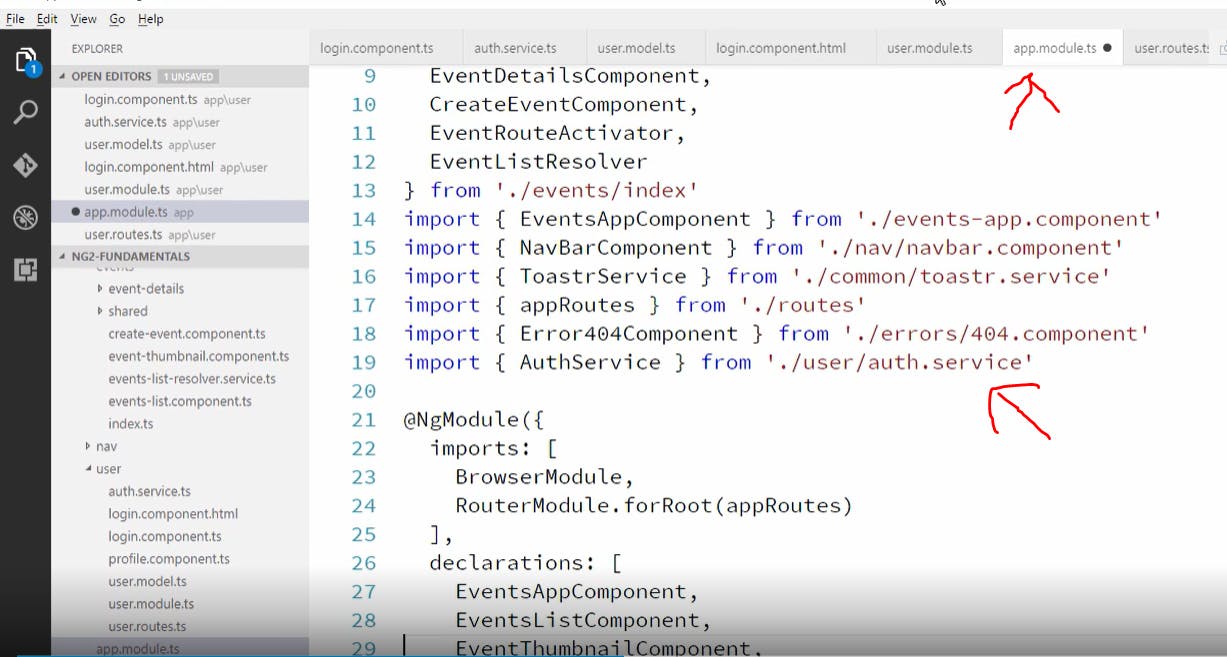
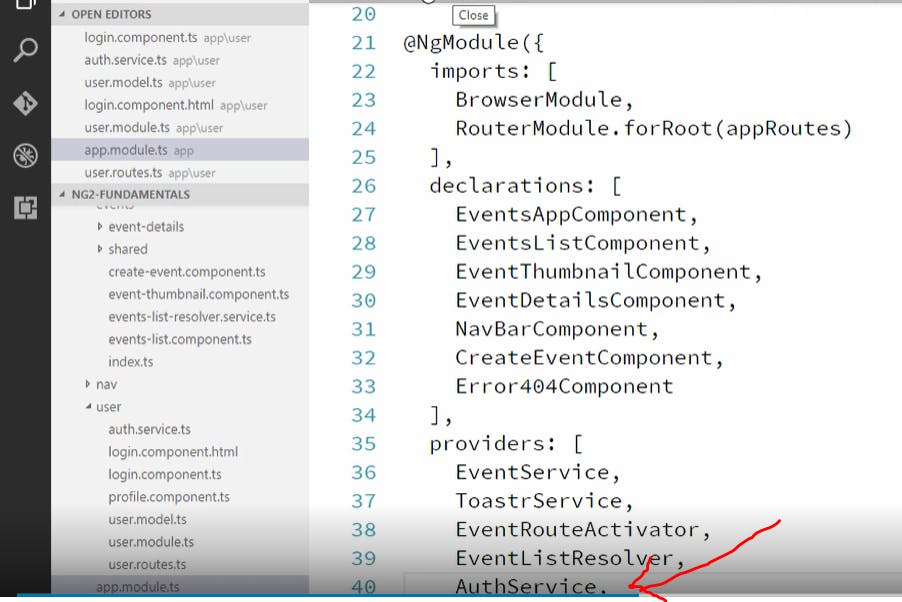
we will create an Auth service which logs in the user(user is hard coded for now) and we will also create a method isAuthenticated() which returns true if user is set and then we have register this service in our app module(shown below).
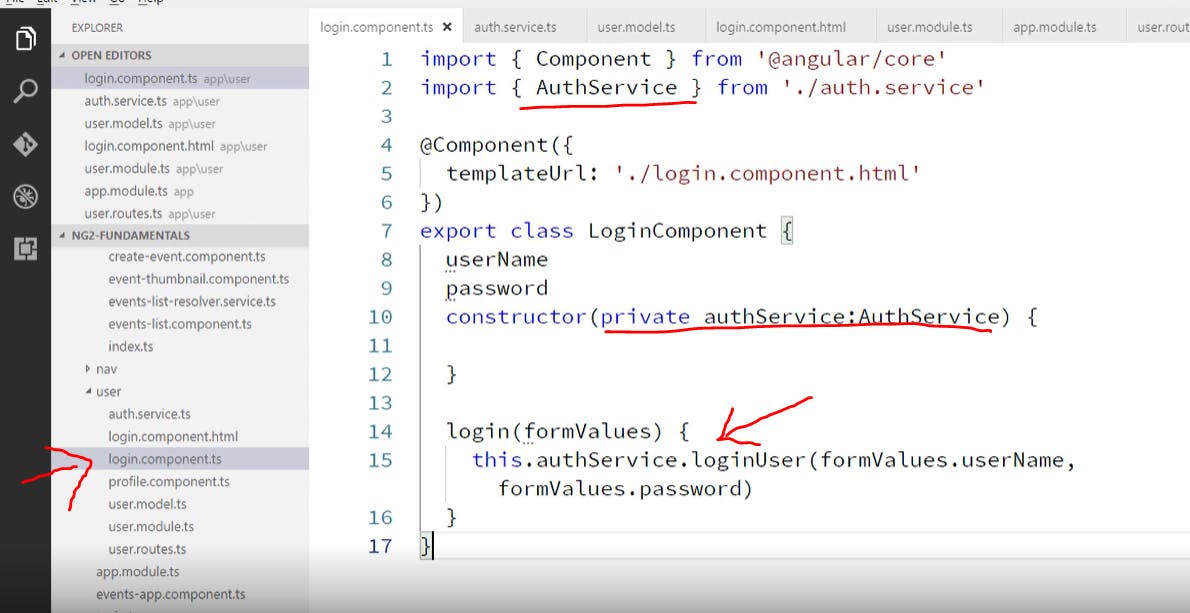
now in our login component.ts file we will call this service when the login method is called as shown below
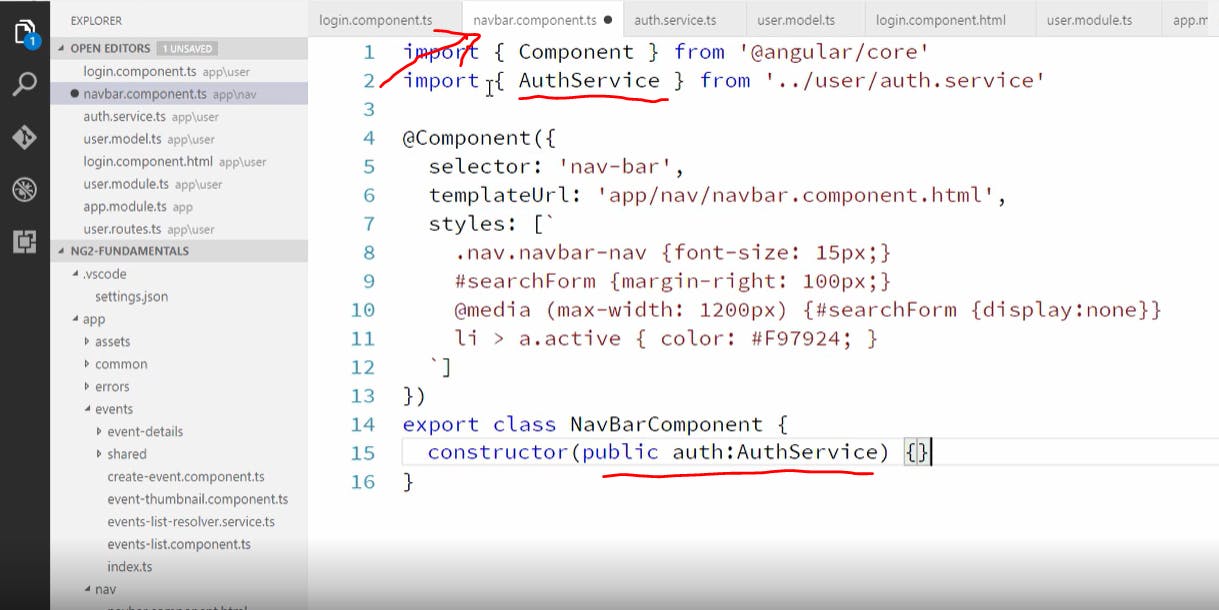
now in our navbar component lets show login link if user is not authenticated and if user is authenticated then we will show welcome + username. To do that first let's import our Auth service and inject it in the constructor(shown below).
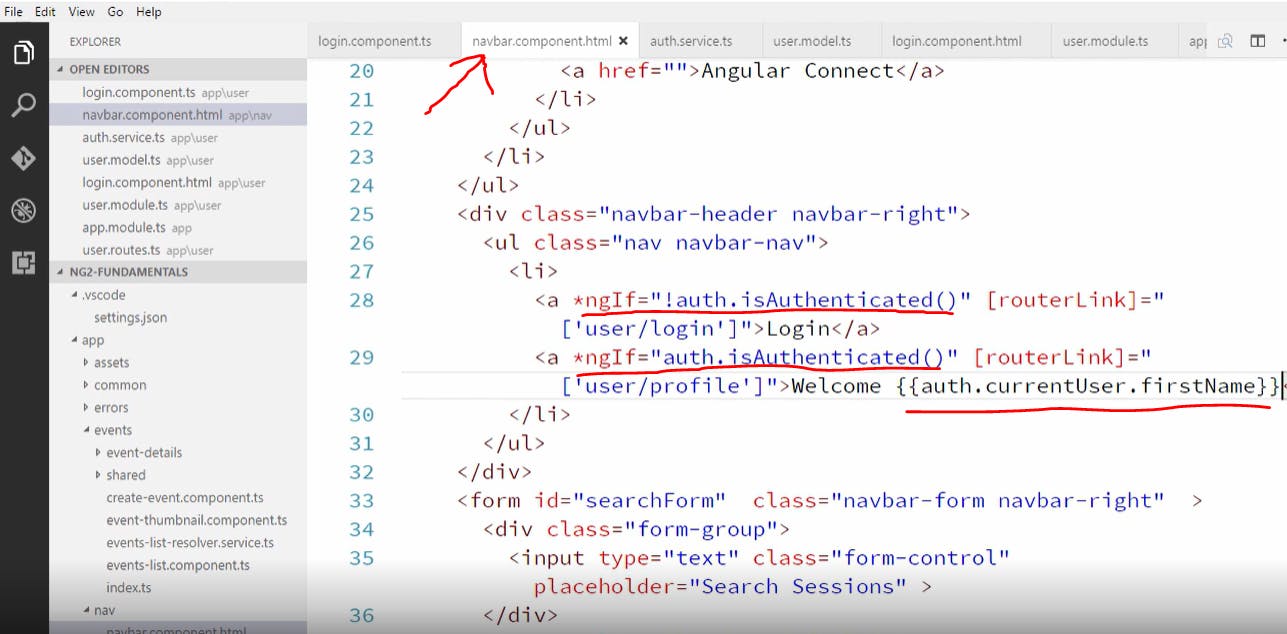
now to show login if user is not authenticated and welcome+username if user is authenticated(shown below).
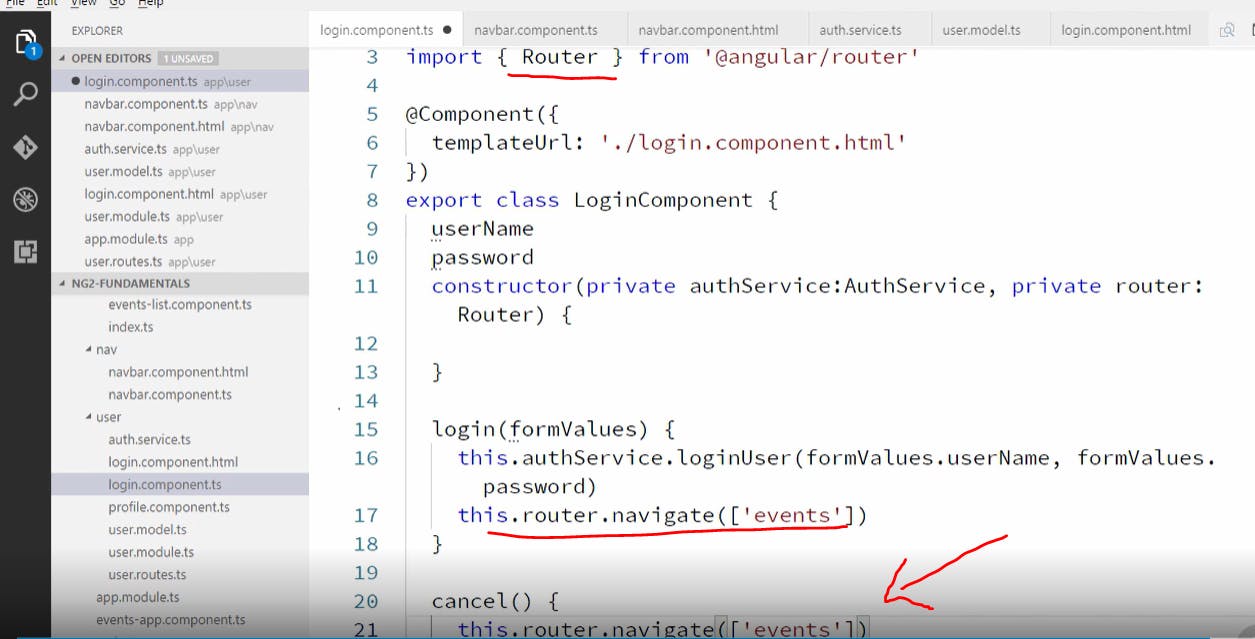
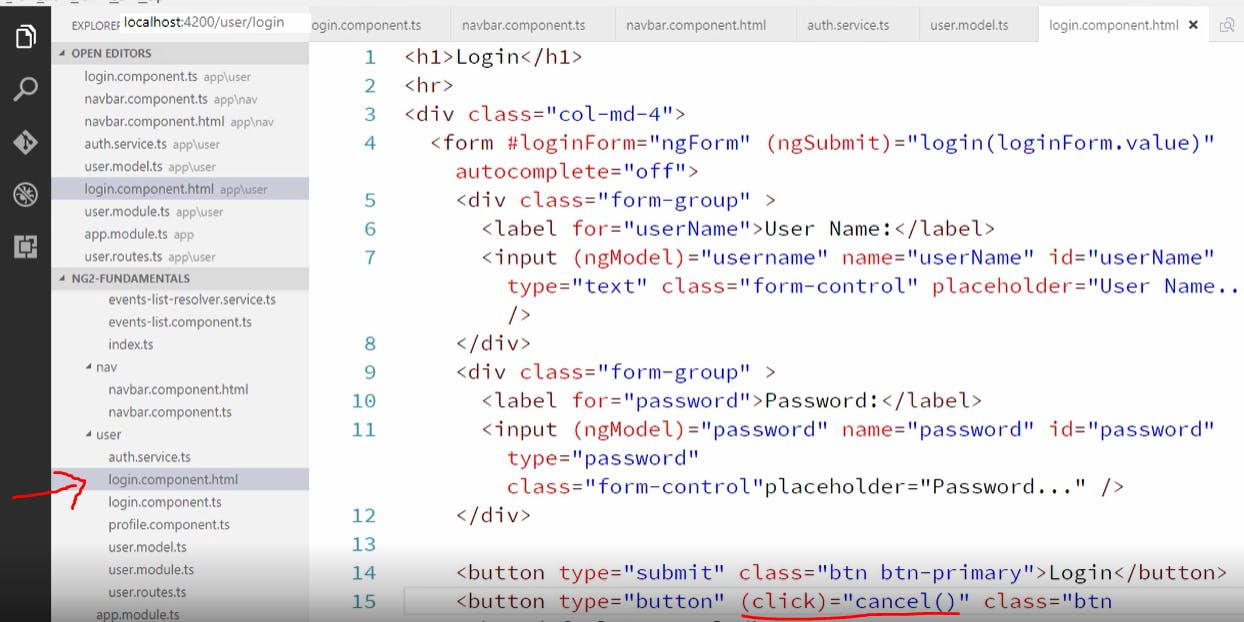
now let's make it so that when user clicks login or cancel he should be directed to the events page and also we'll wire up the cancel method to cancel button. This can be done as shown below
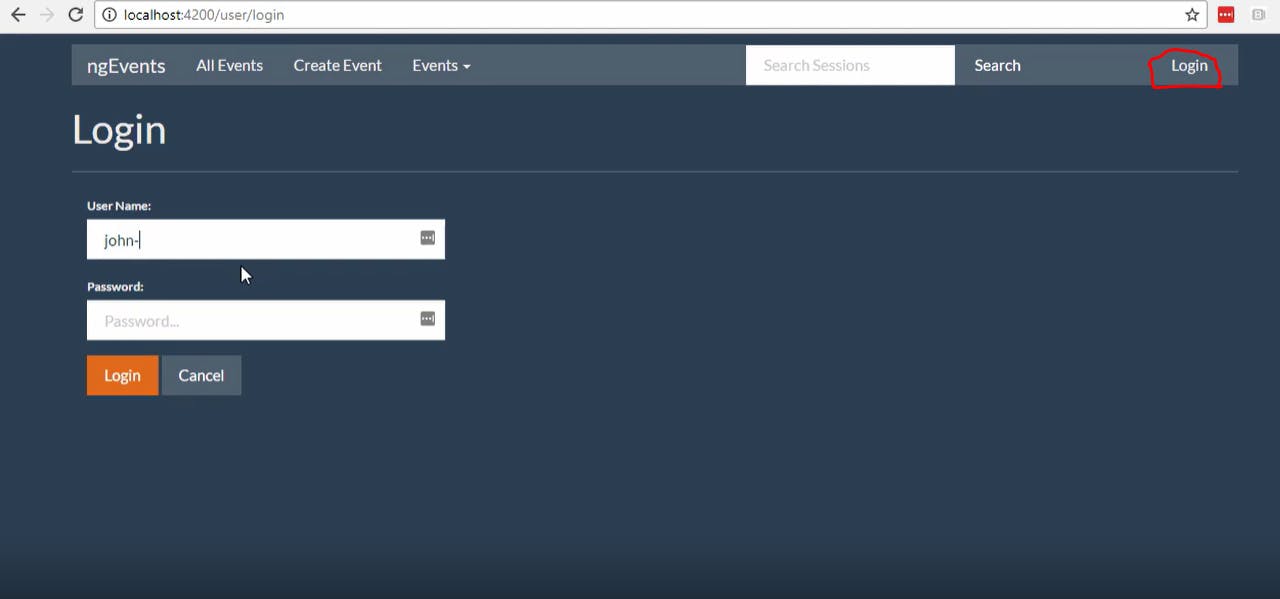
Now the browser should look something like this before user logs in(shown below)
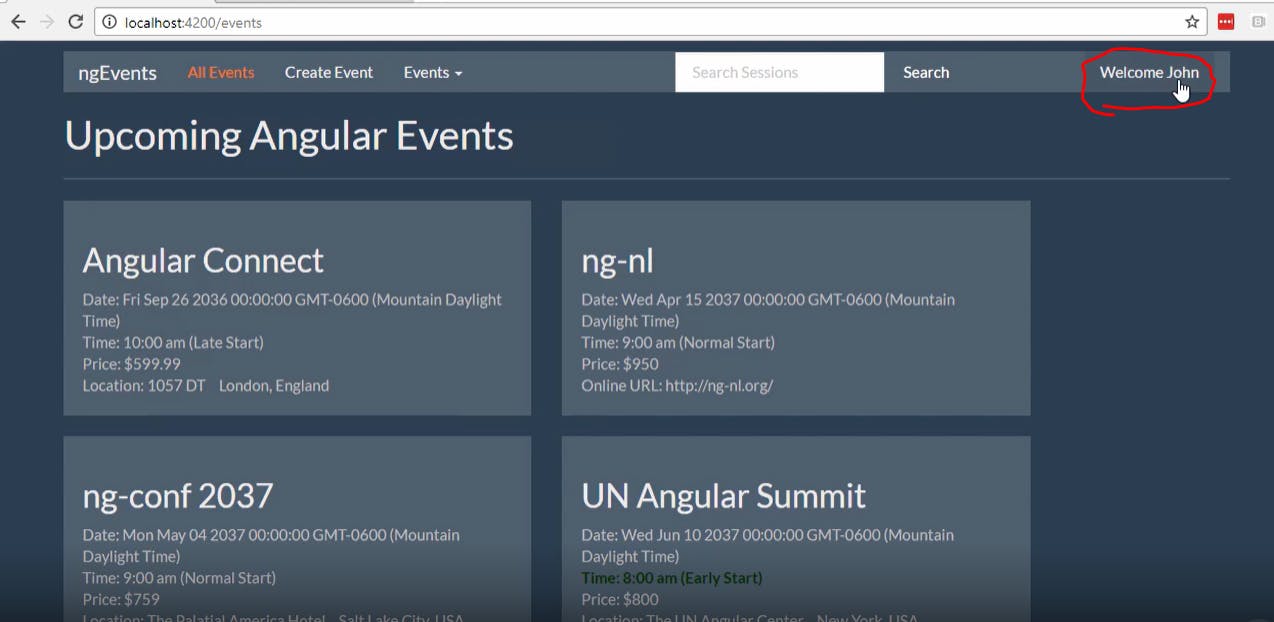
after logging in it would look something like below
Validating template based forms
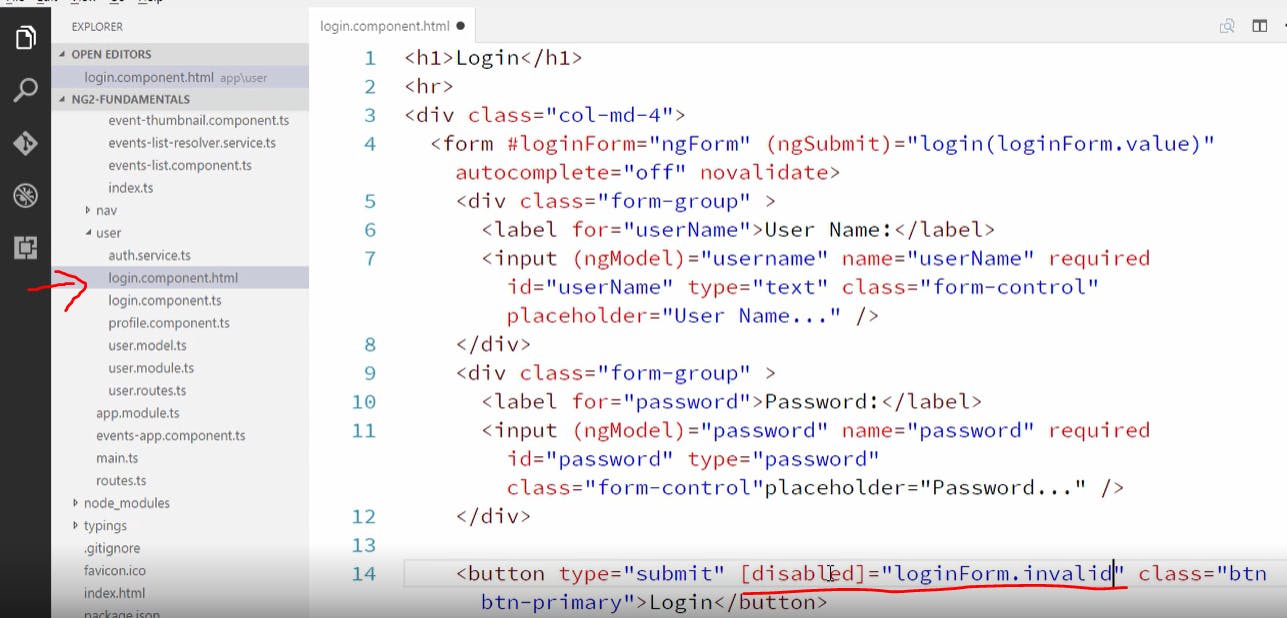
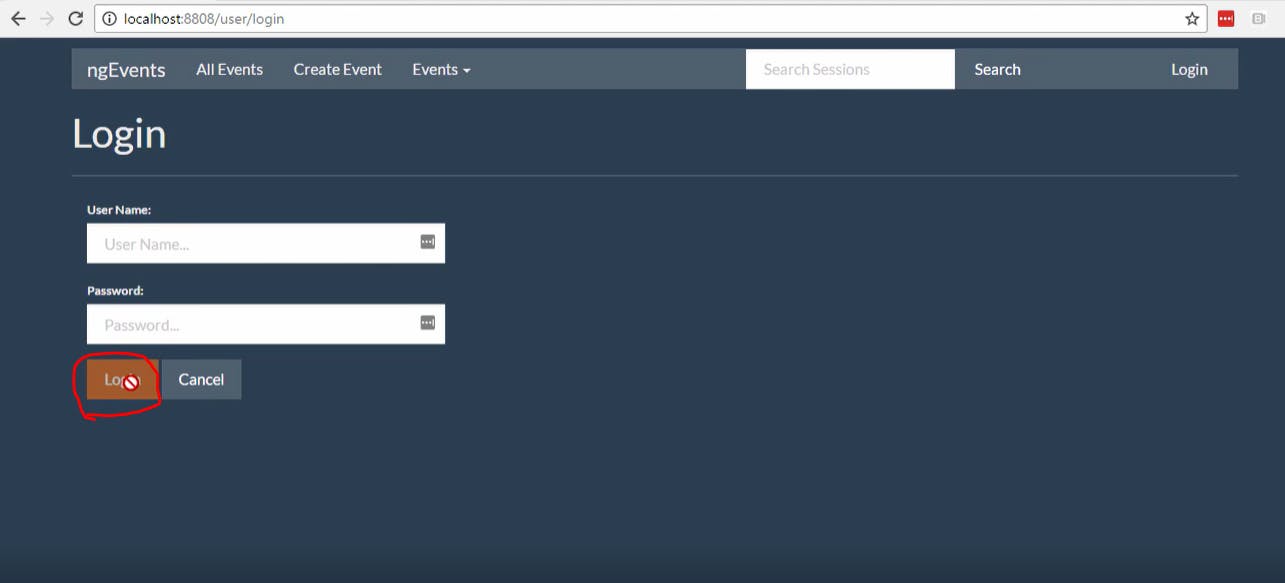
Let's make it such a way that user cannot login if he doesn't enter username and password fields in login component. Now lets' disable the login button if the login form is invalid(shown below).
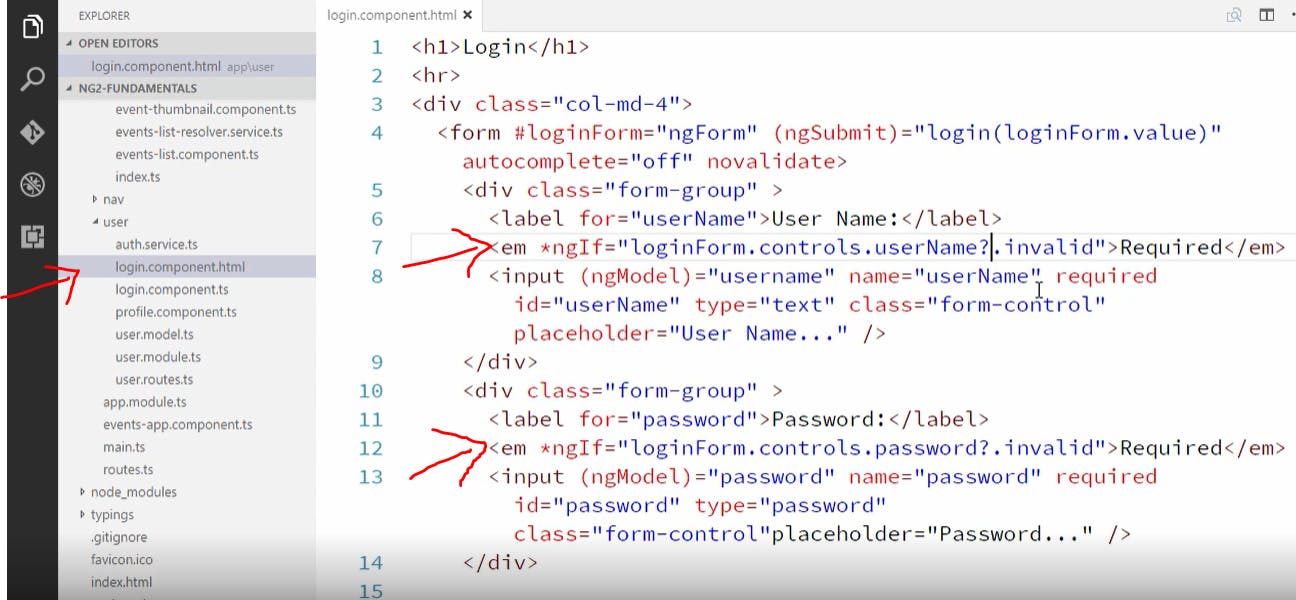
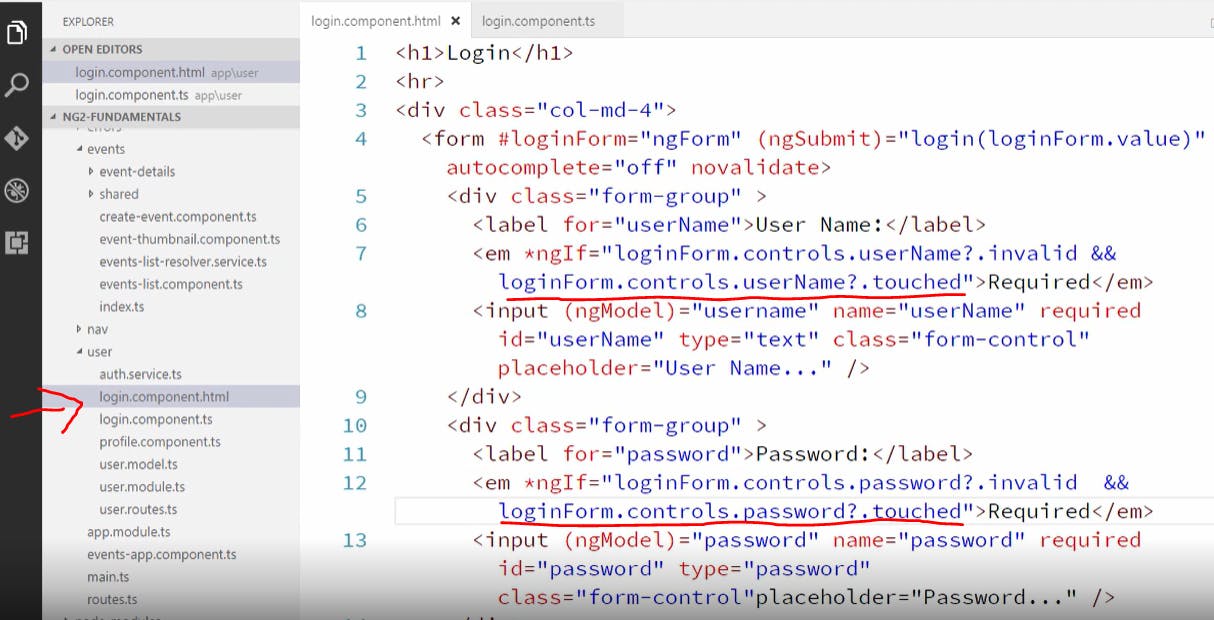
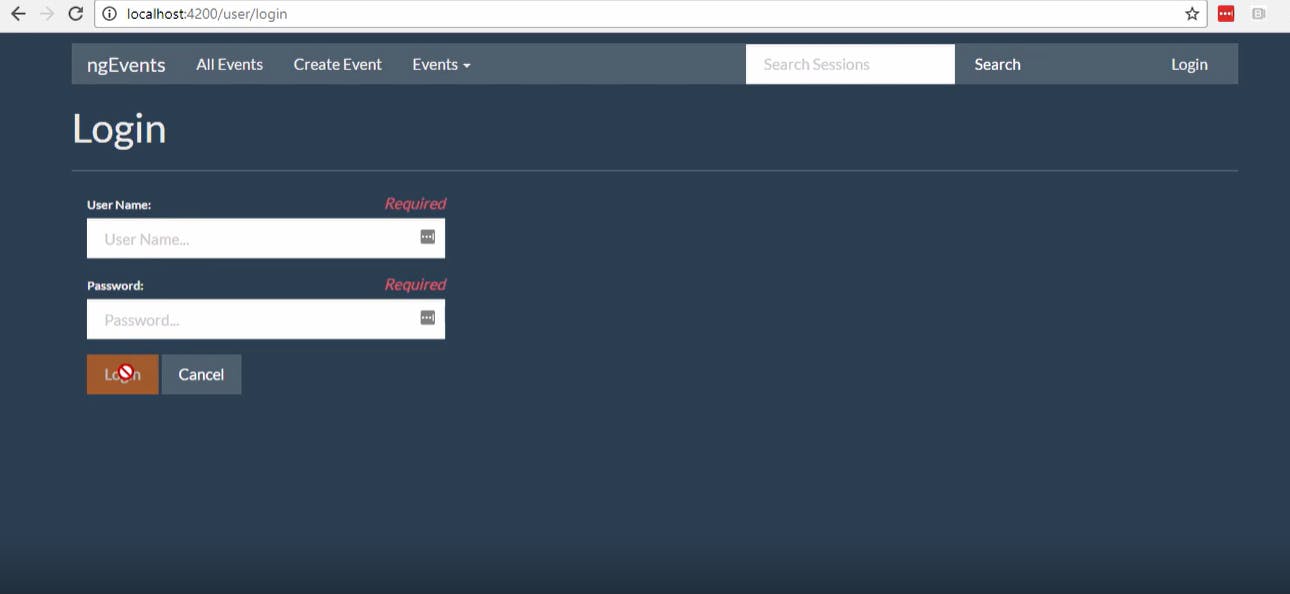
But we want to give the user more details as to why they cannot submit the form. So let's add some validation message that shows up right after the labels. So we'll just add little emphasis element as shown below and we would only want to show this if the fields are invalid.
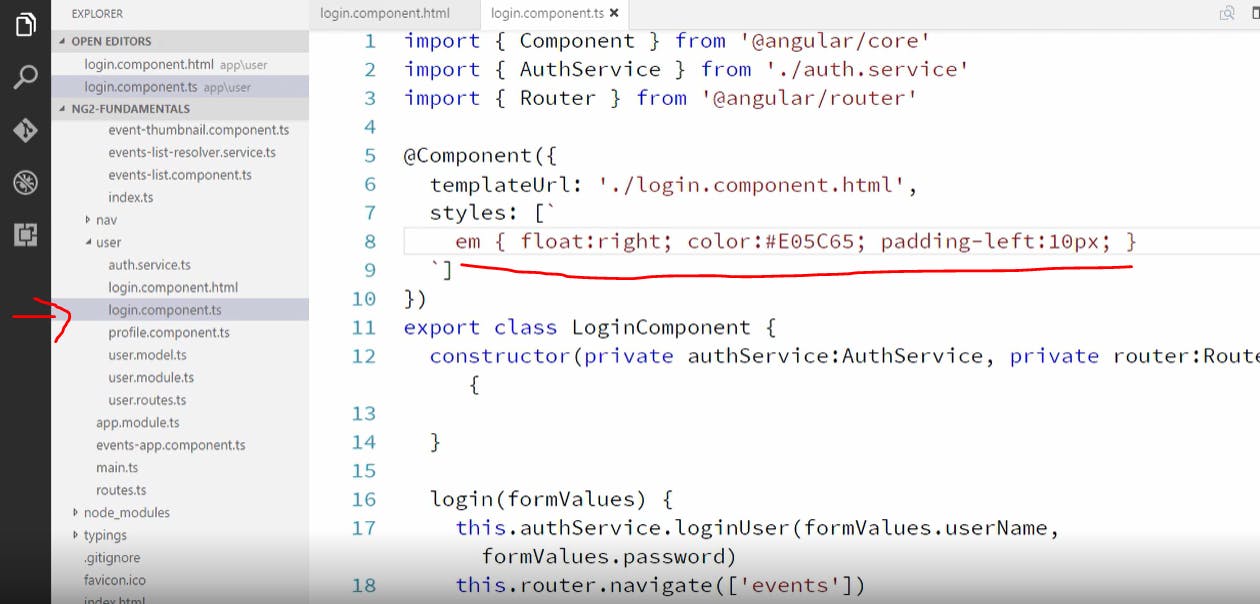
let's add some styling to these error messages(shown below).
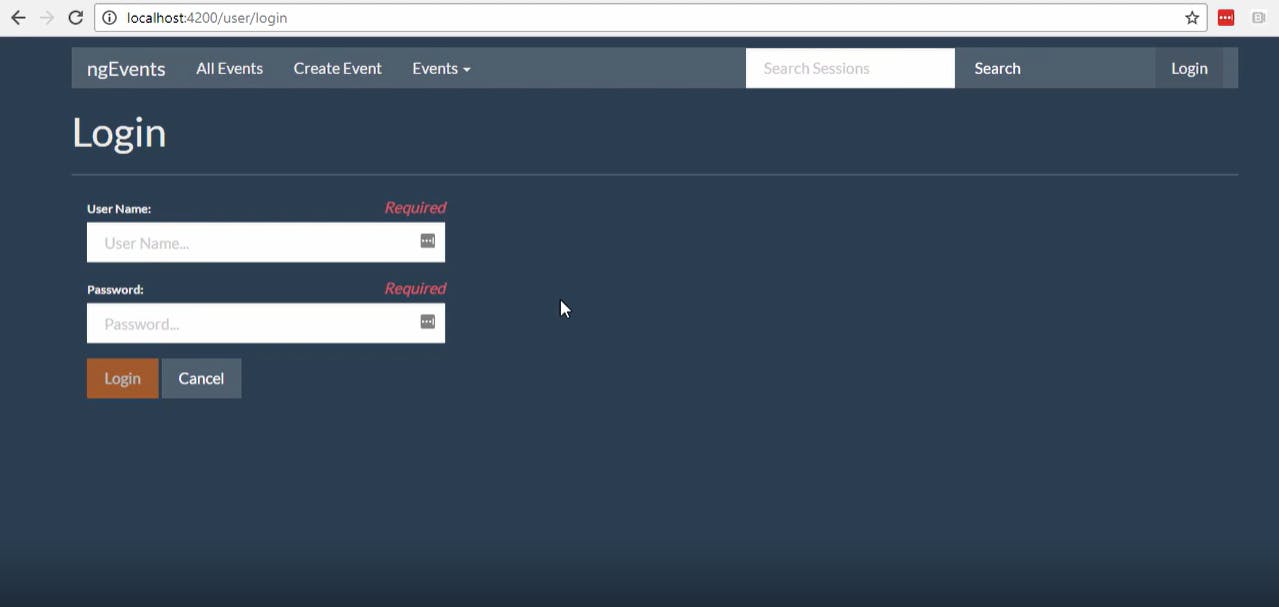
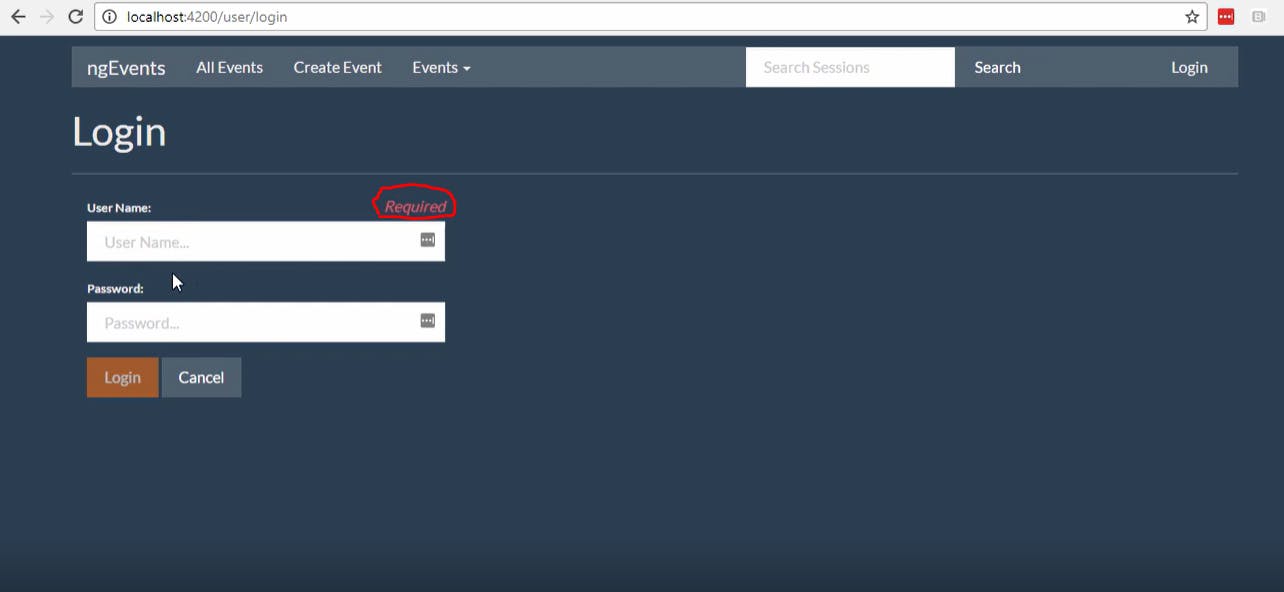
let's see how this looks in the browser as shown below
Let's show these error messages only if the fields are touched and we do that as shown below
now we can see that if we touch the field and go to the next field without entering valid credentials the error message would show up as shown below.
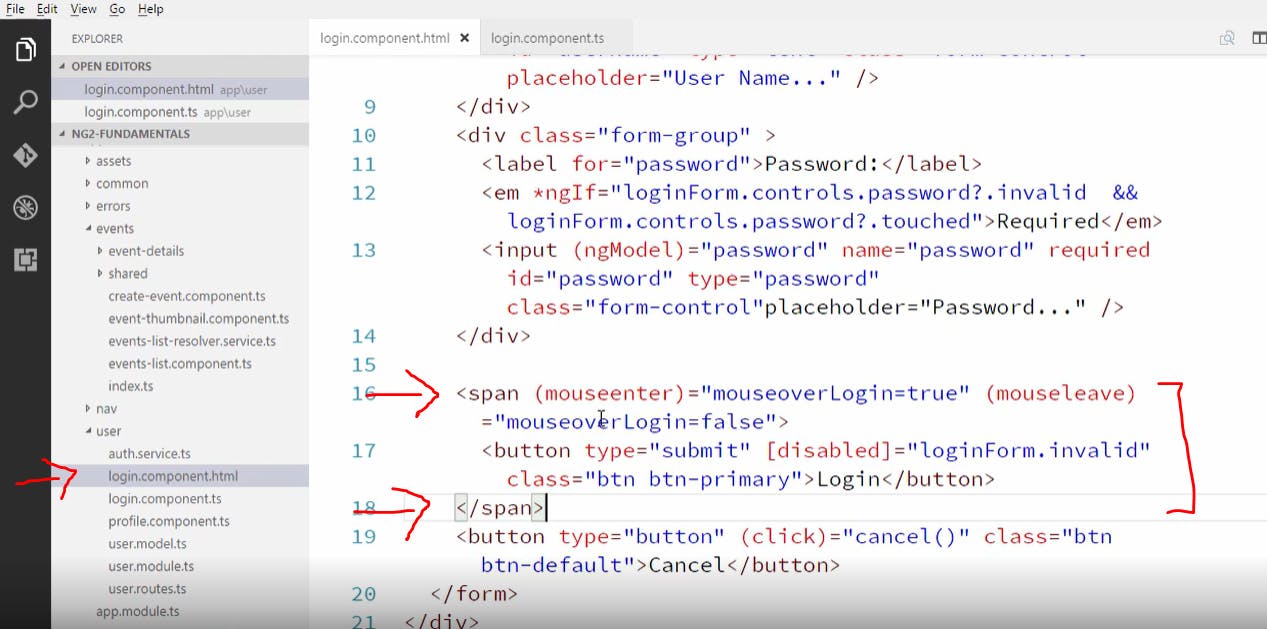
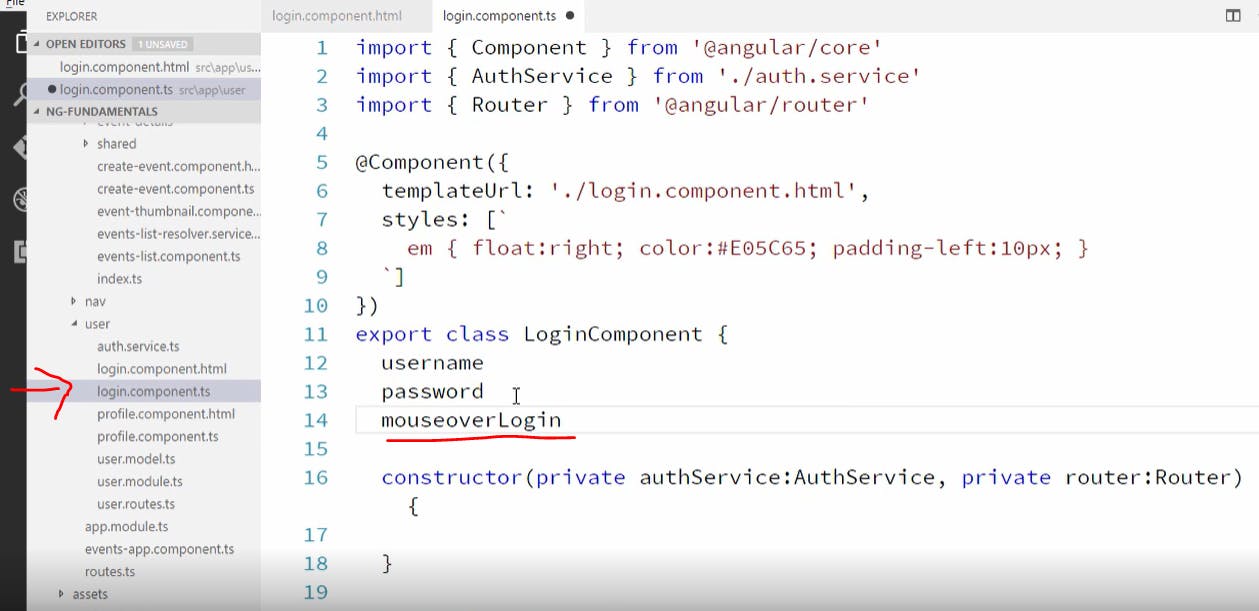
Let's add a mouseover handler on the login button and when user's mouse is over the login button it should show the error messages. We'll have to rap the login button in a span since it has disabled property and we say when mouseenter event is fired we set mouseoverlogin to true and when mouseleave event is fired we set mouseoverlogin to false(shown below)
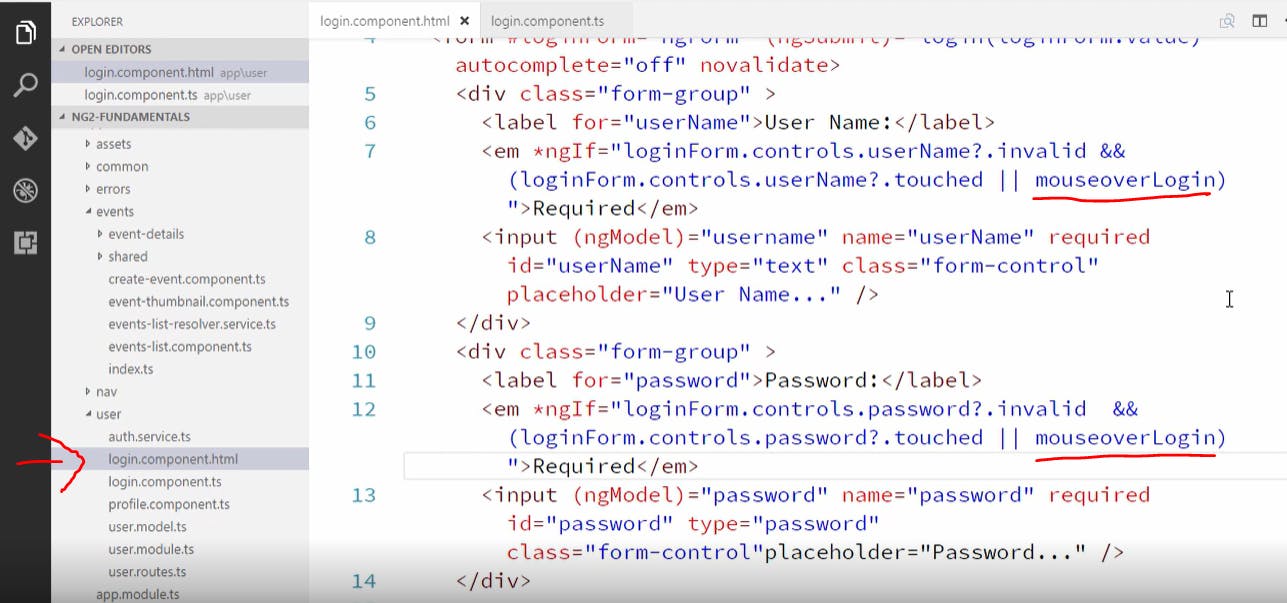
now on our error message which is inside the "em" tag we say that show this error message when field is invalid, touched or if the user is mousing over the login button as shown below
now we have to declare this mouseoverlogin property as shown below
now if we hover over the login button it should look something like this(shown below).
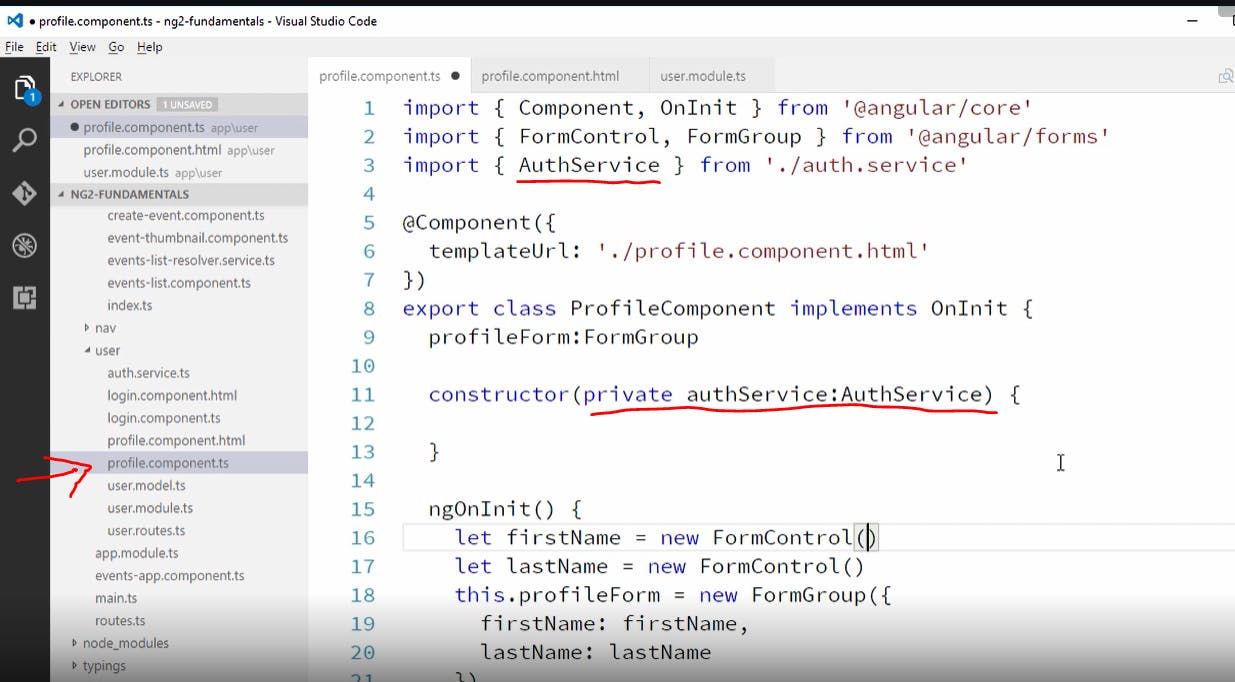
Creating our first reactive Form Let's create a reactive form for our edit profile component which is shown below
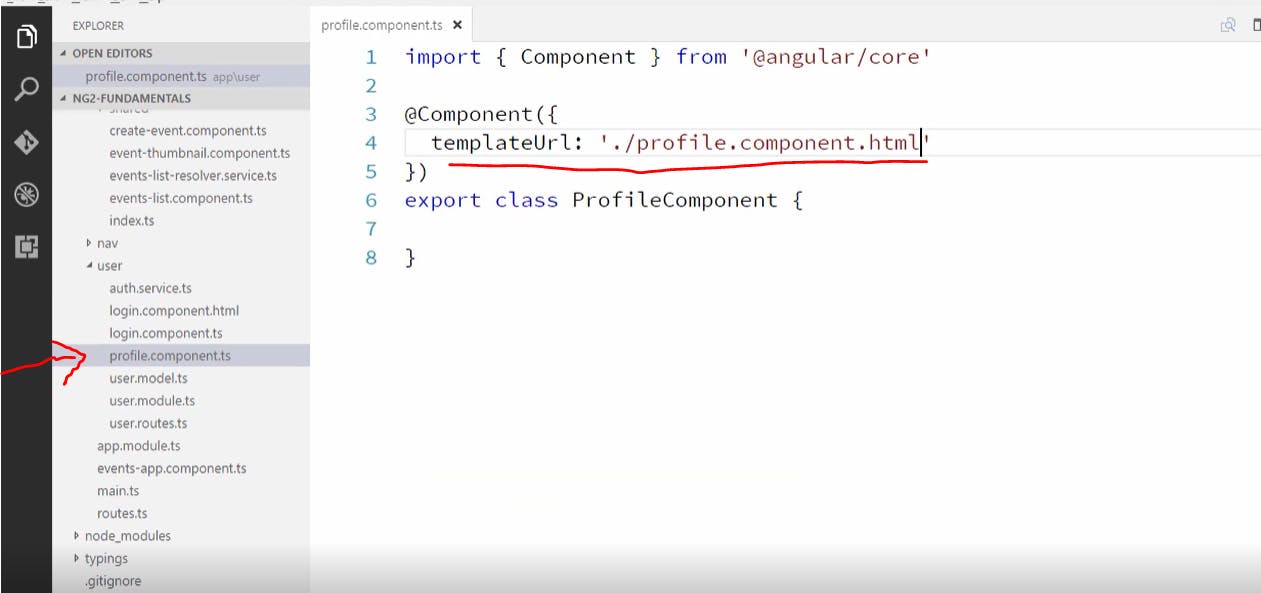
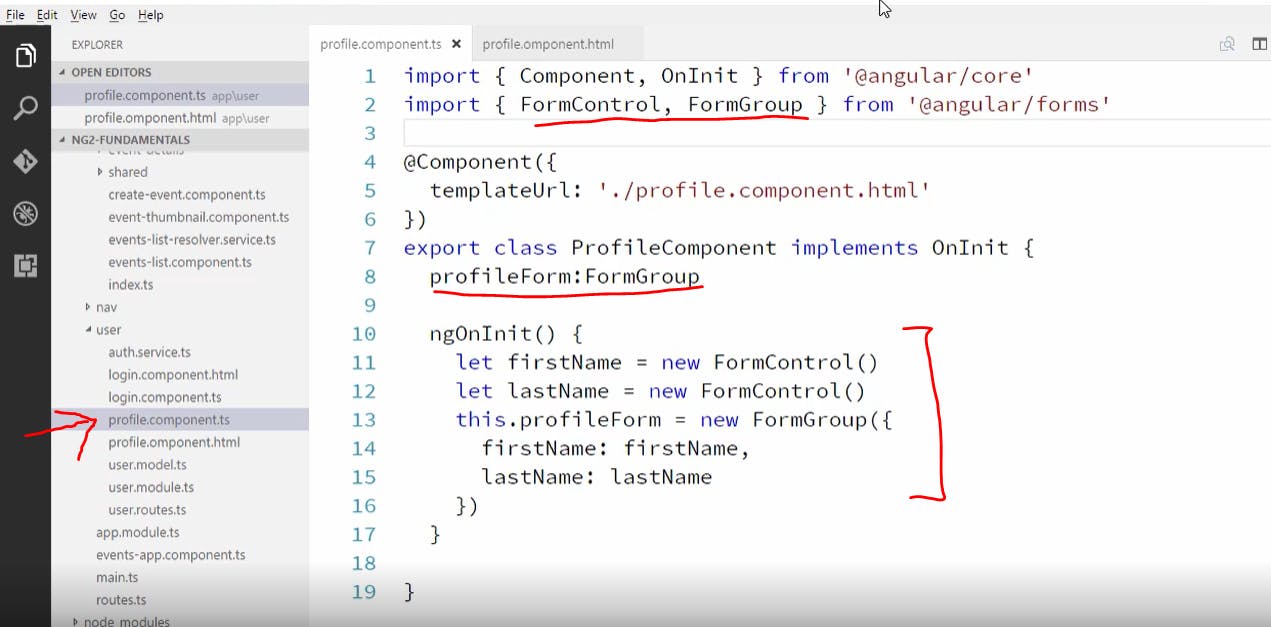
now change the profile component.ts file as shown below
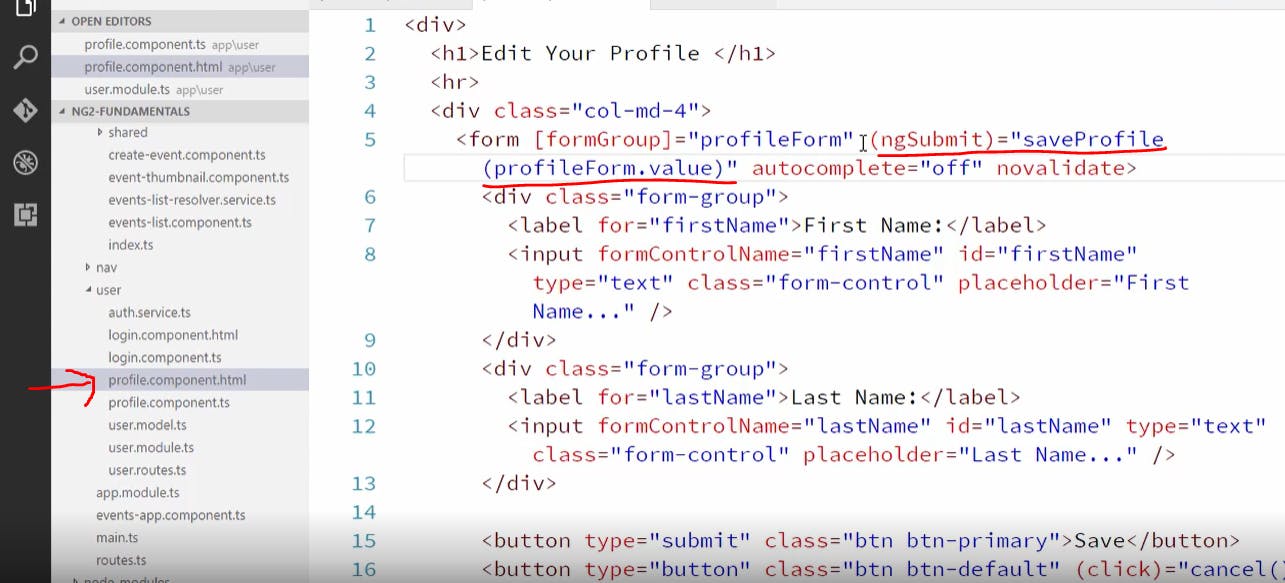
now let's create profile component html file as shown below
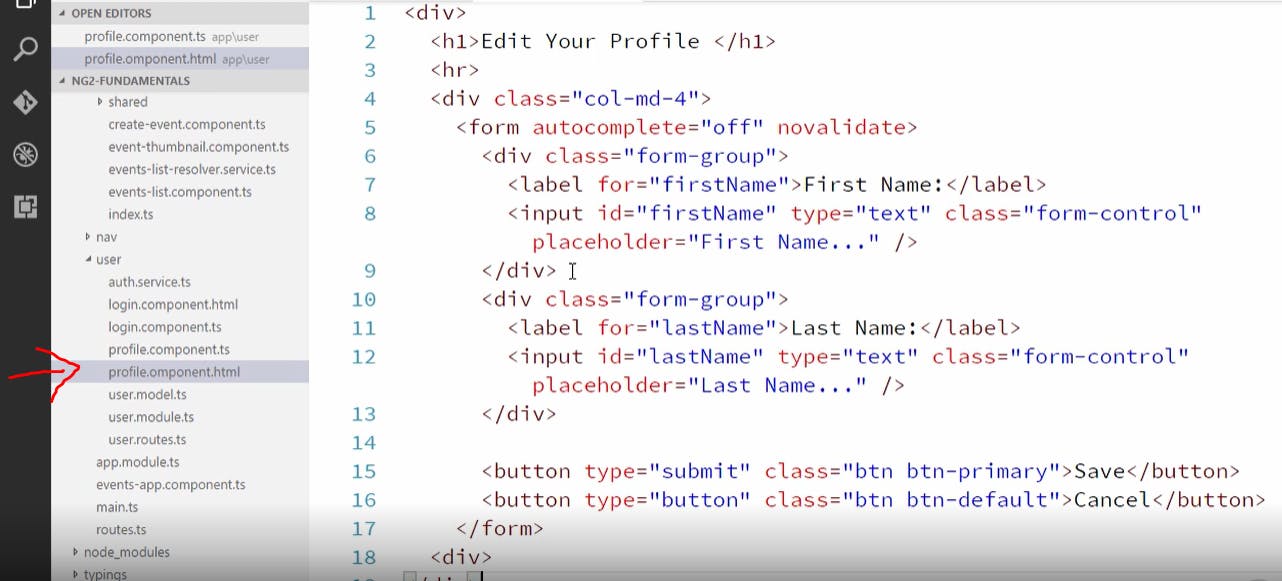
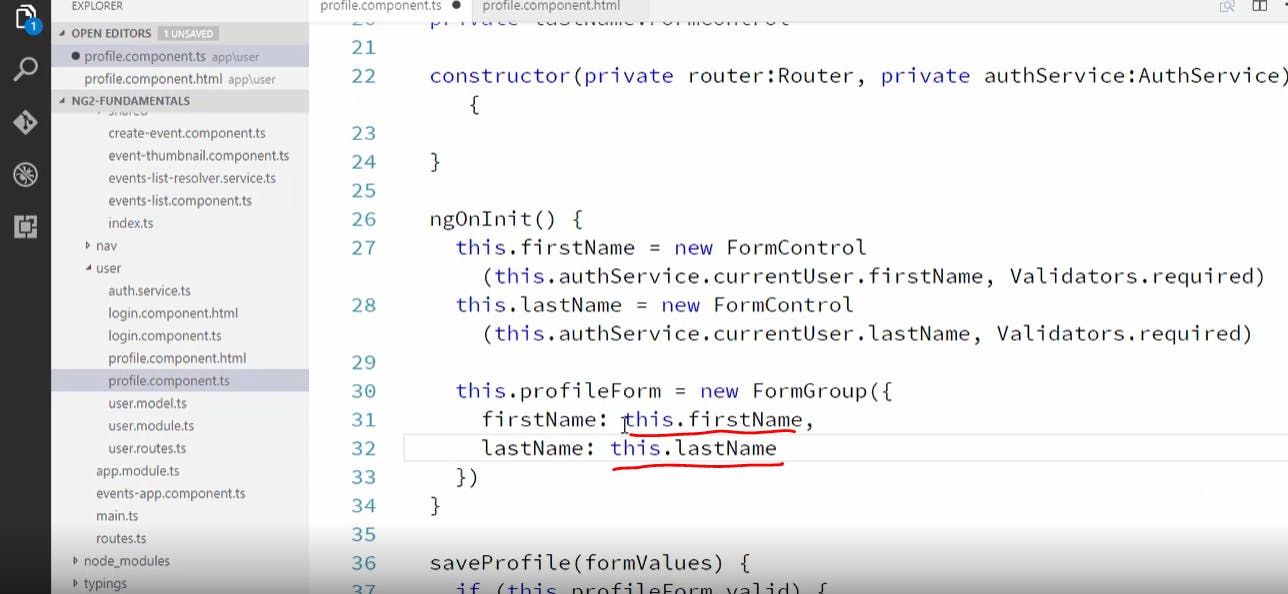
no we will create FormControls to each of our fields(Firstname and Lastname)and then we need to add these controls to a form and we use FormGroup for that. We will create a profileForm property and set that to new FormGroup and we set properties on this for each of the controls as shown below
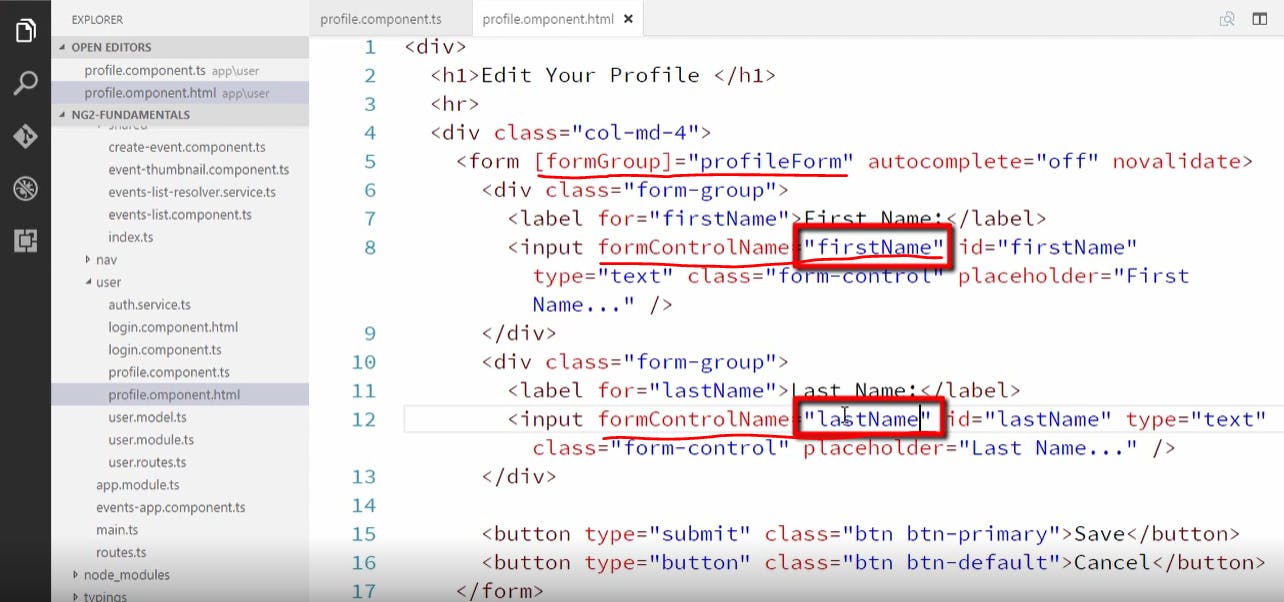
now we need to tell angular which html elements these corresponds to. Now let's go our html and first bind our form element to the profile form as shown below([formgroup]="profileform"). Then we need to specify for each of our input elements the property on that profile form that they should be bound to.
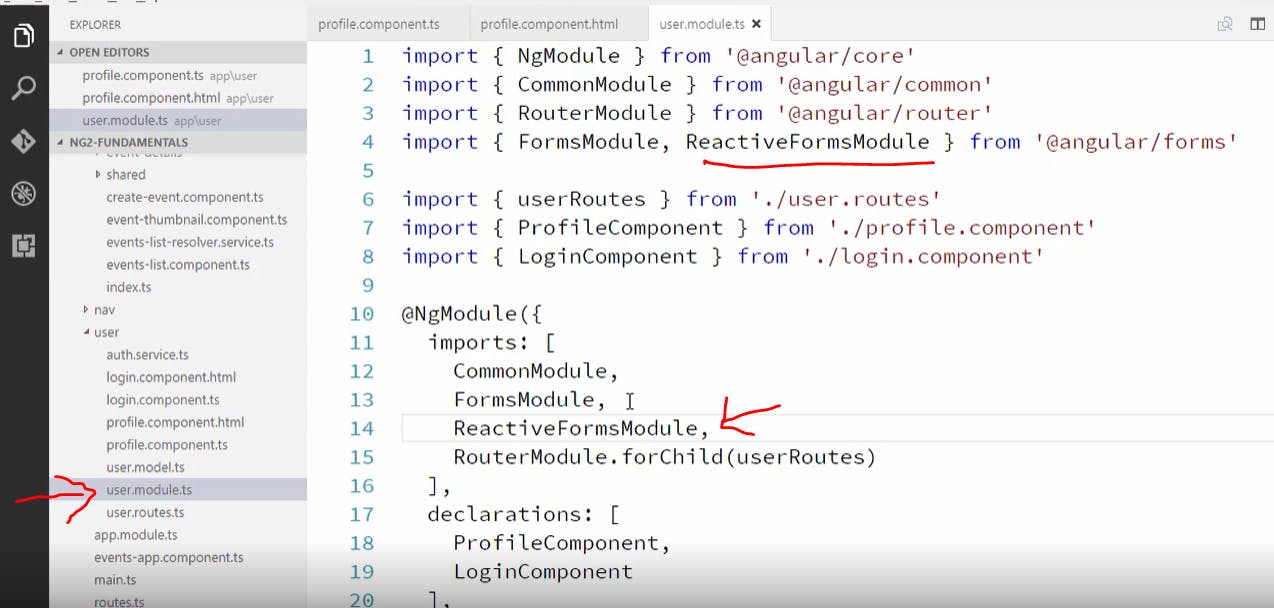
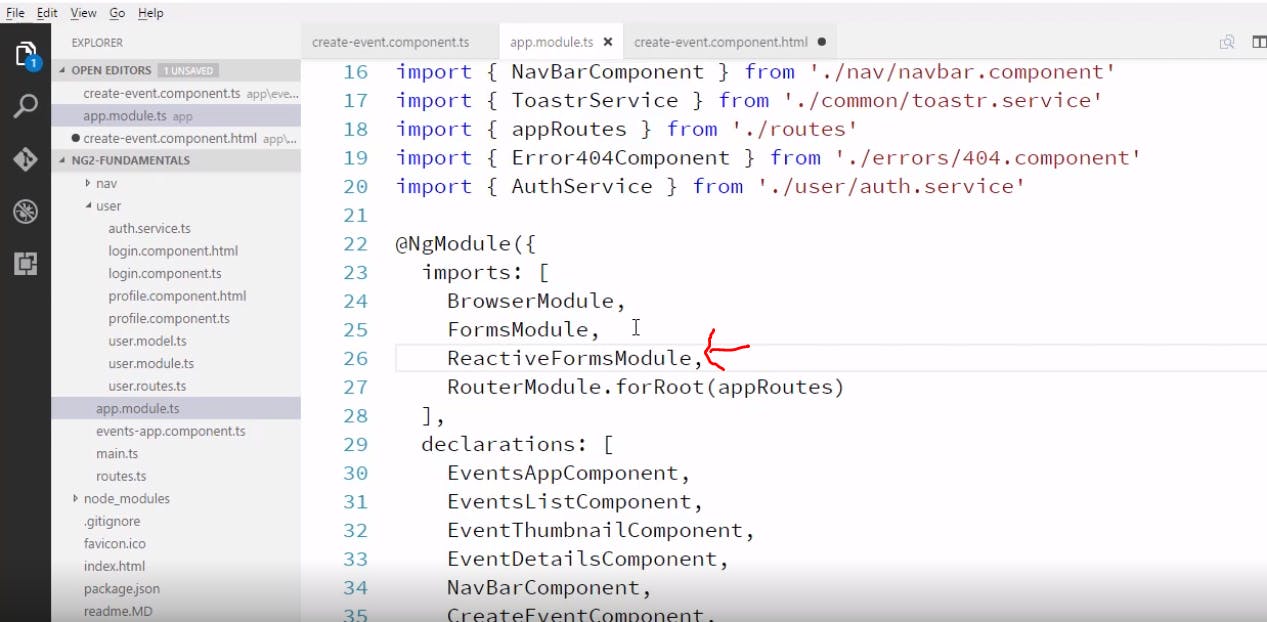
for reactive forms we need to import ReactiveFormsModule shown below
this is how this form would look in the web browser(shown below)

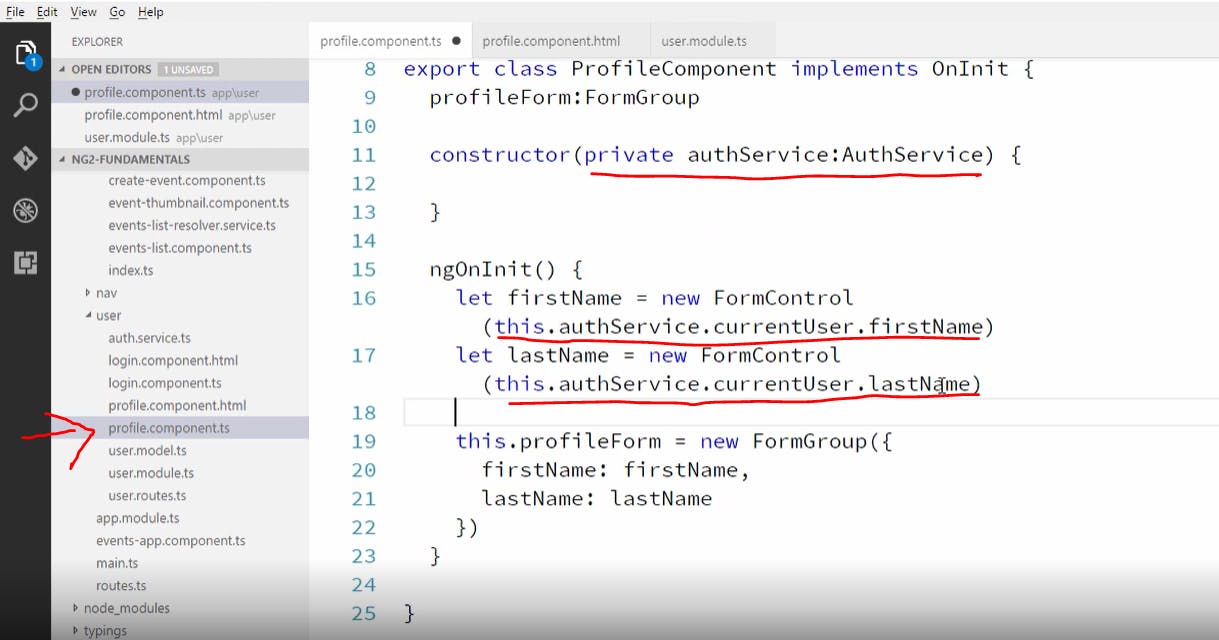
now since we are logged in we would want the fields to be filled or pre-populated by our credentials when we open that form and we will also wire the save and cancel method. we get the current user details from our Auth service so we import it and inject it in the constructor as shown below
now we can get the current user's firstname and lastname and pass them in our form control as shown below.
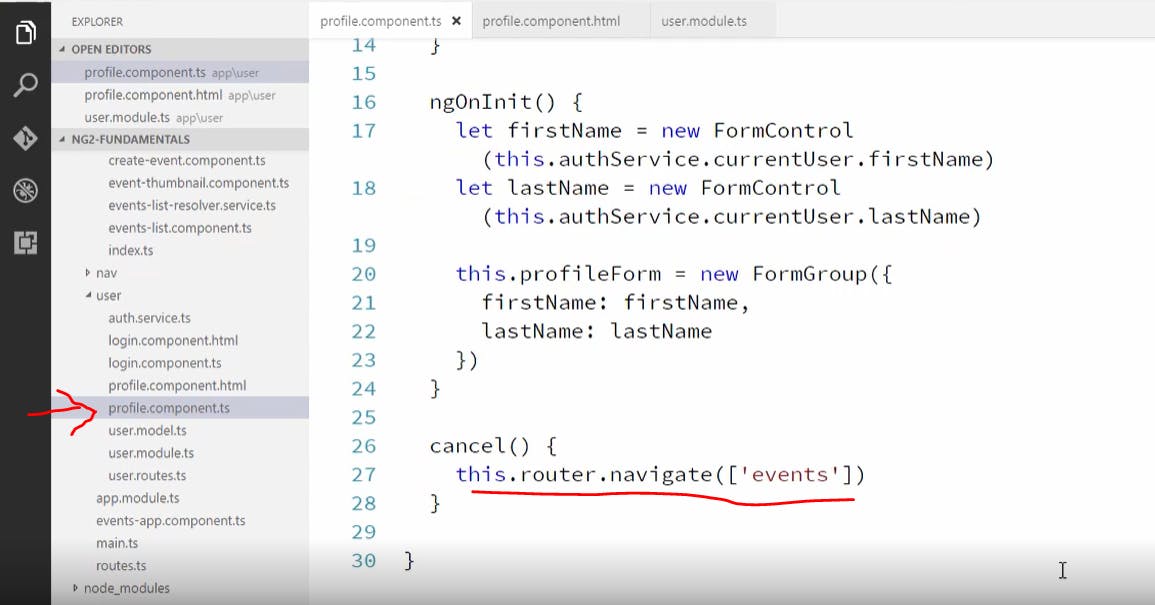
now let's wire up our cancel and save buttons. We will create a cancel method for our cancel button which would navigate back to events page as shown below(don't forget to import the router module and inject router in the constructor)
now to wire up our save button we use "ngSubmit" which calls "save profile method" with profileform values as shown below
now let's create our saveProfile method which takes the fromvalues as shown below
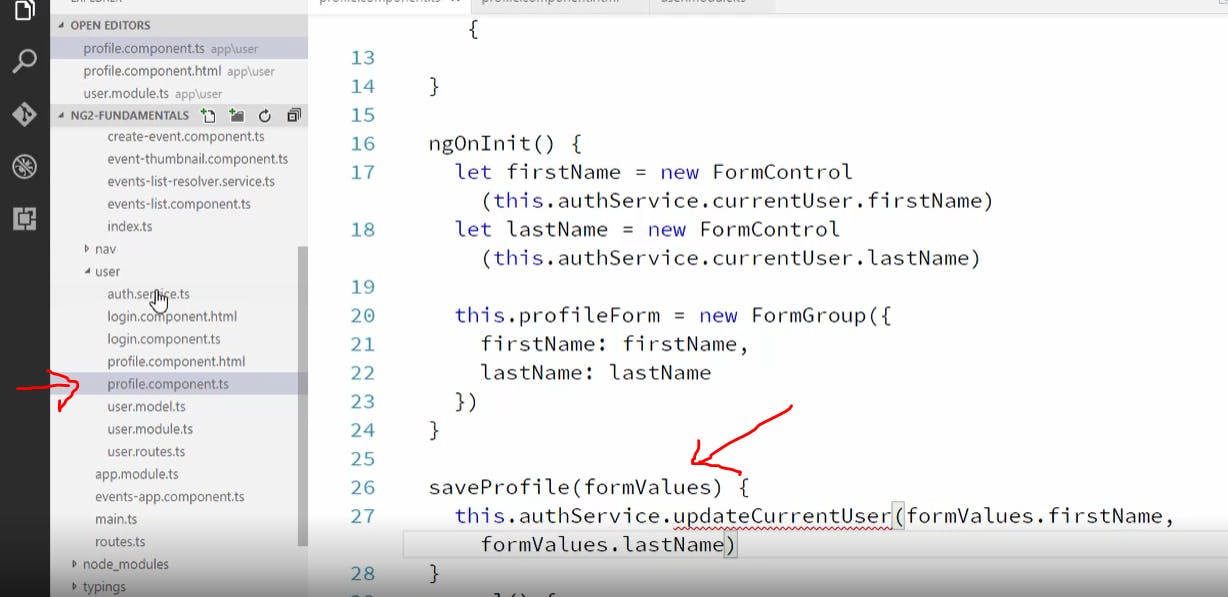
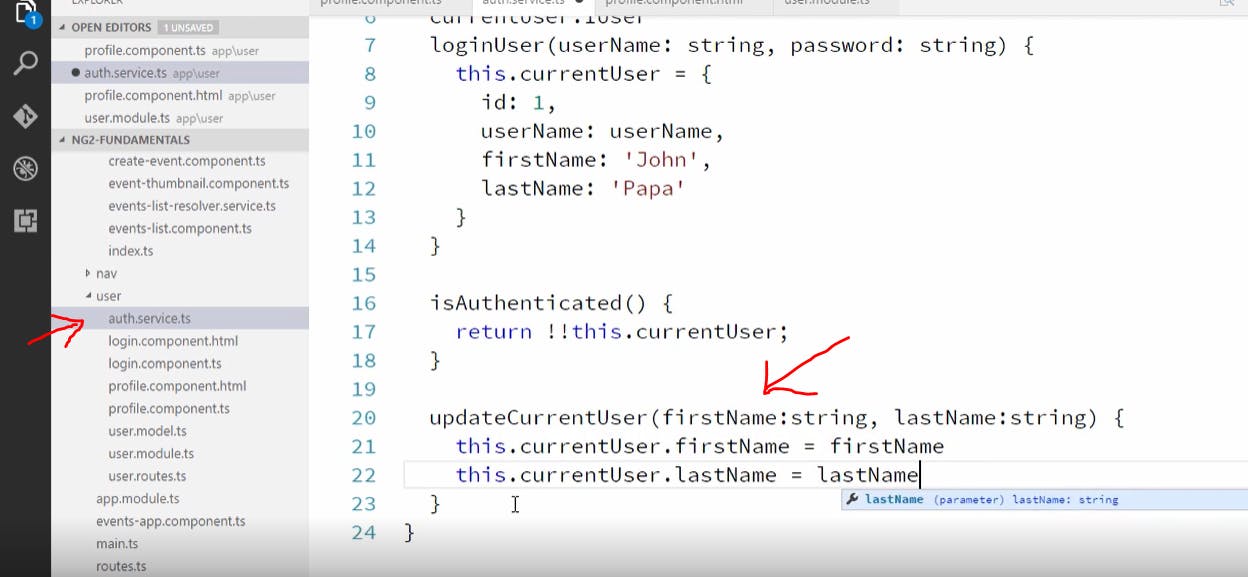
now let's create updateCurrentUser method in our Auth service
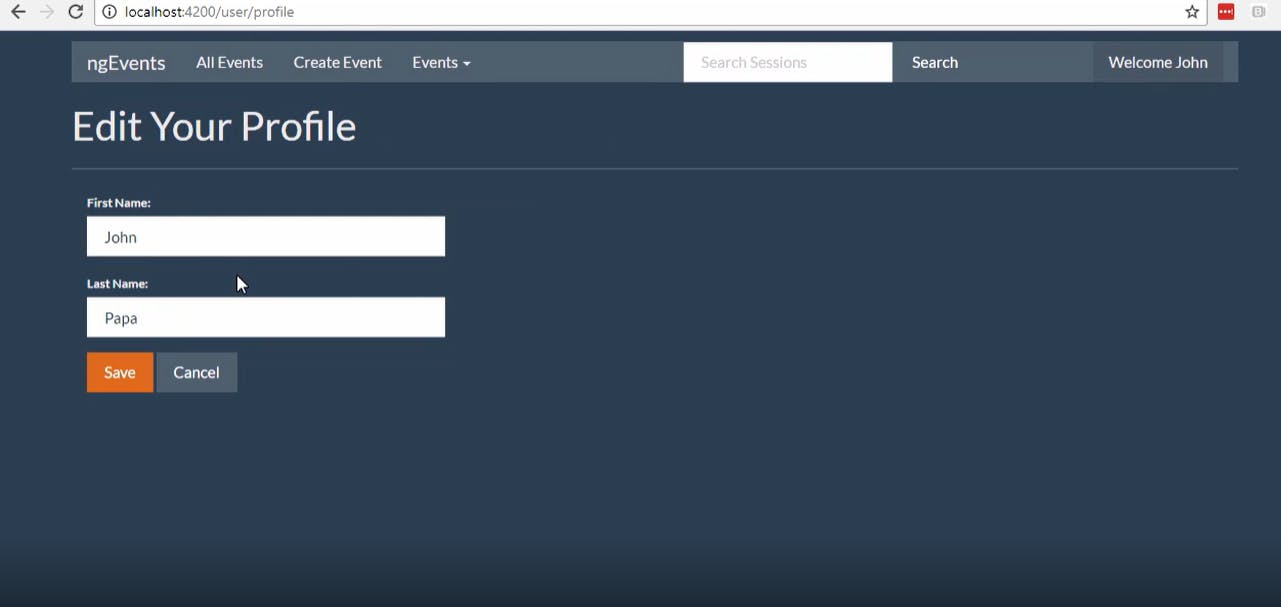
And this is how your profile page should look with pre-populated fields in the browser
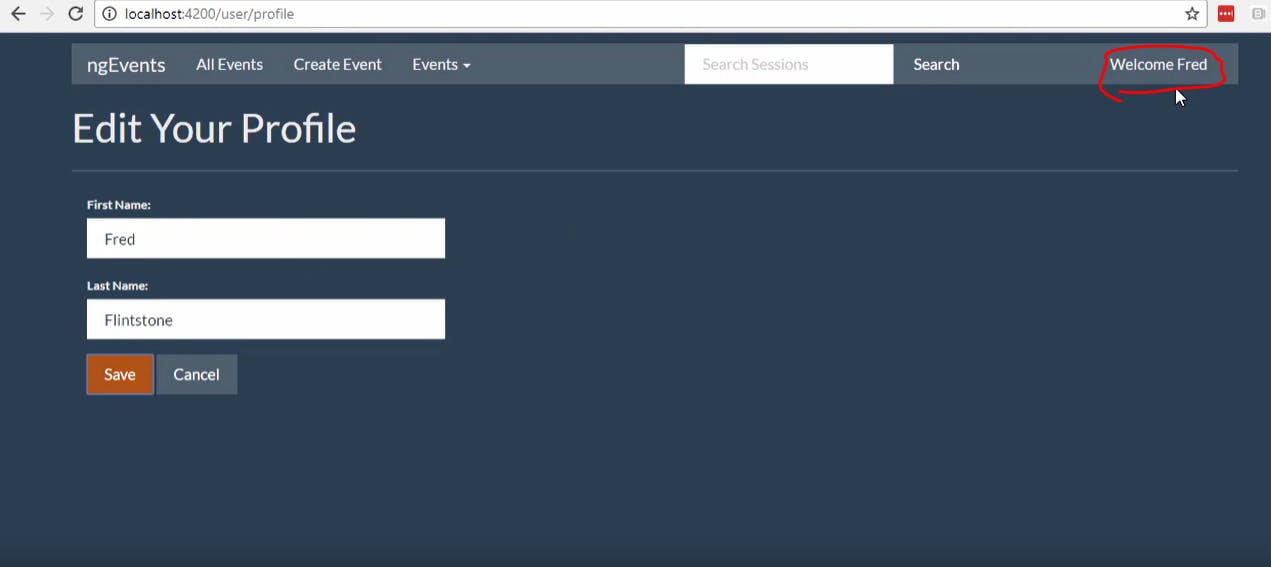
If we update the user our browser should say something like this
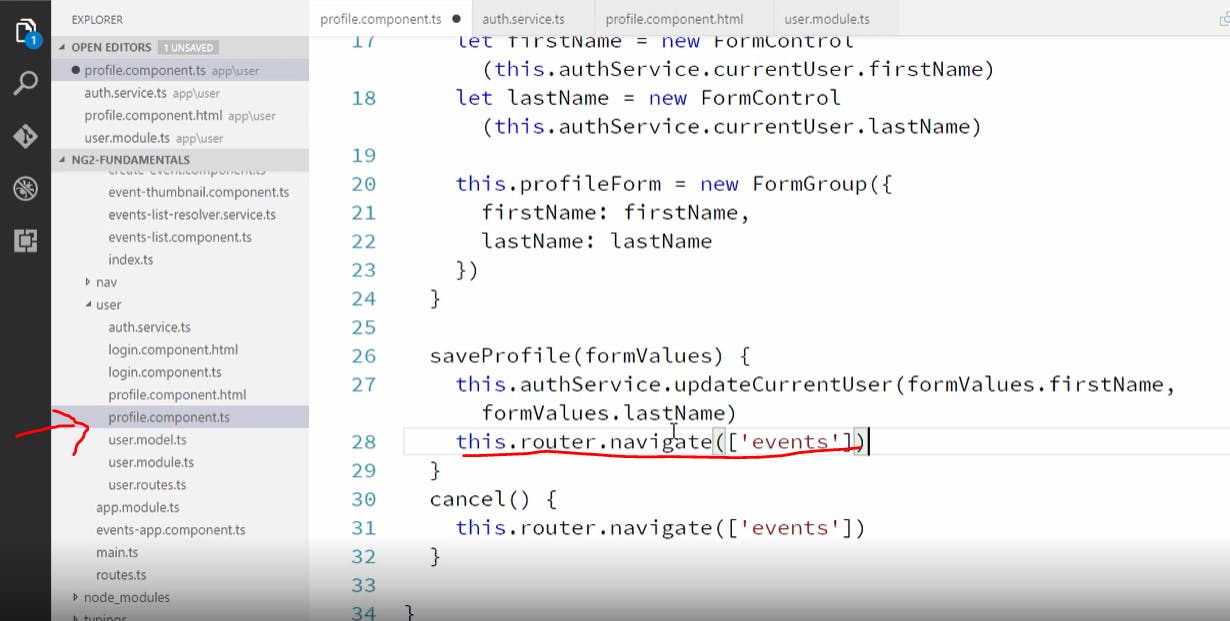
After we click on save we want to navigate back to the events page with our updated name so we use router as shown below
Validating Reactive Forms
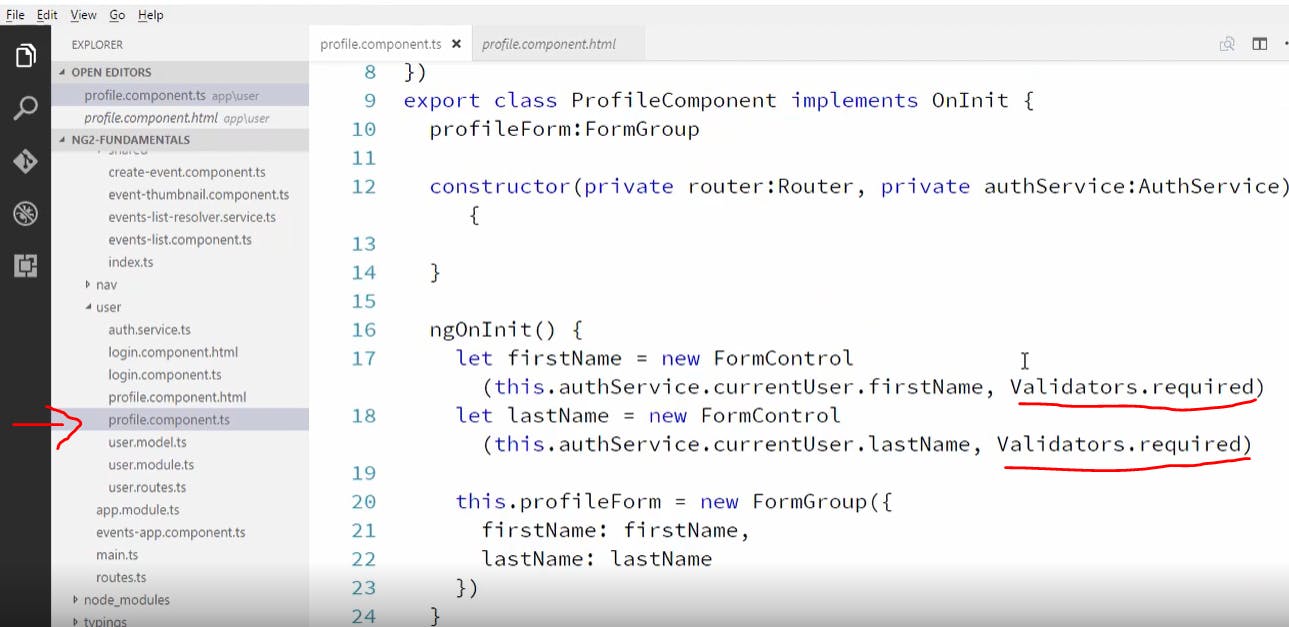
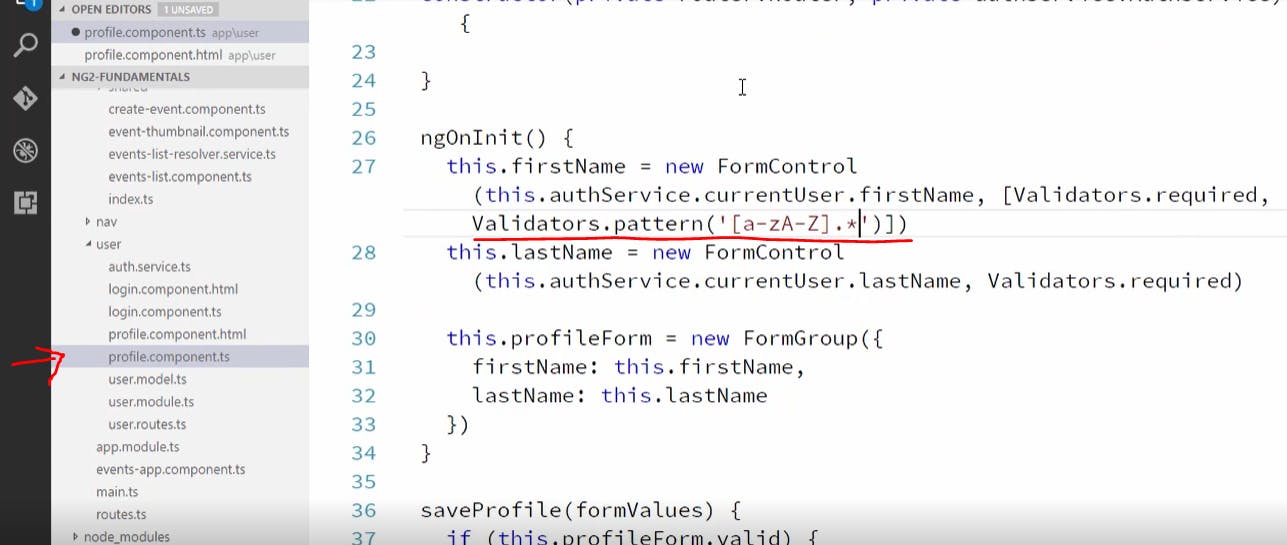
Validators are passed in as a second parameter of the form control. Let's make the fields required and we will need to import validators from forms as well as shown below

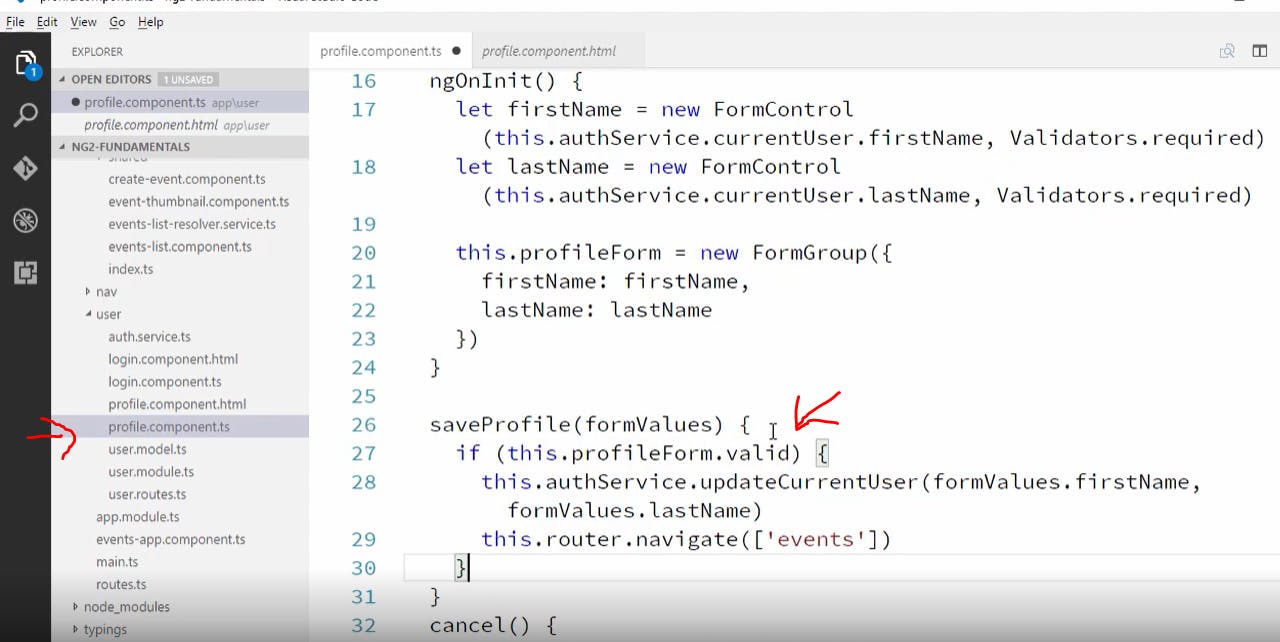
now we will save the form if it's valid and else we won't do anything. We do that by adding an if condition in our saveProfile method as shown below
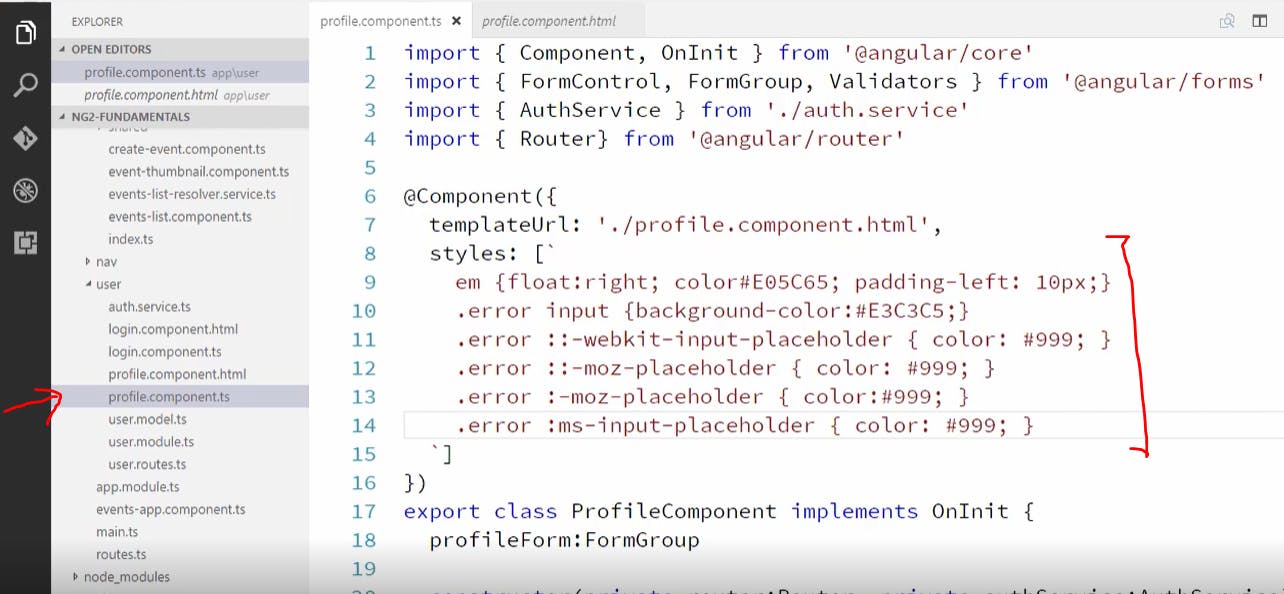
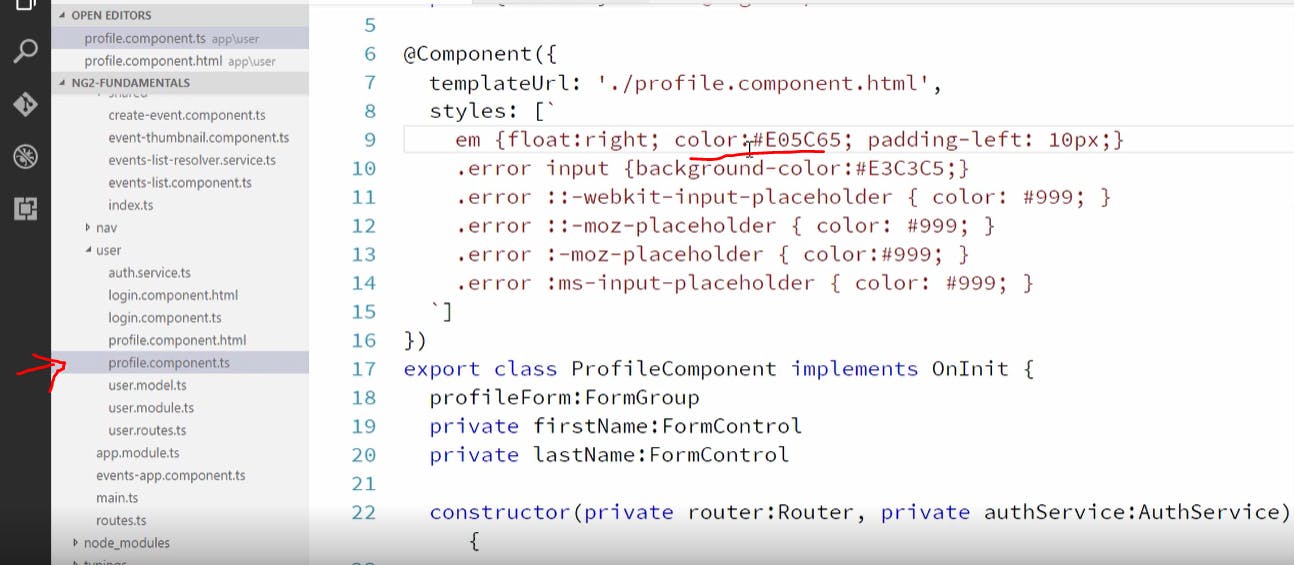
Now let's add some styling for our "em" tag and also for our error message class as shown below
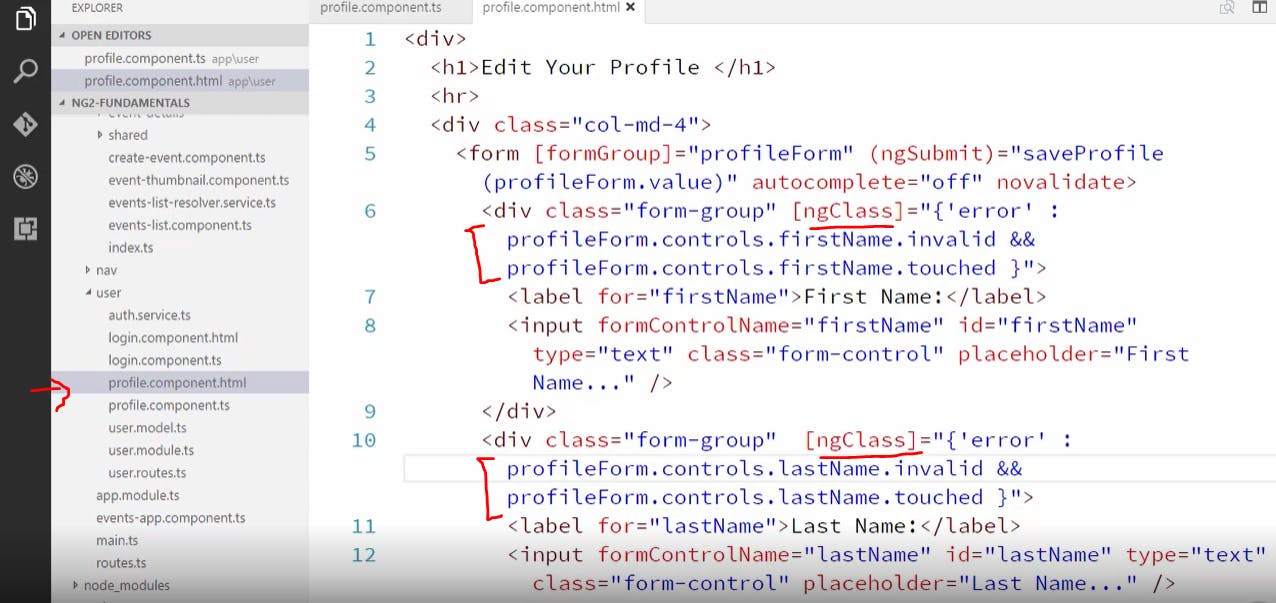
we are gonna use ngClass to style our error. We are basically saying use the error styling class if user firstname is invalid or touched and the same applies to the lastname field too as shown below
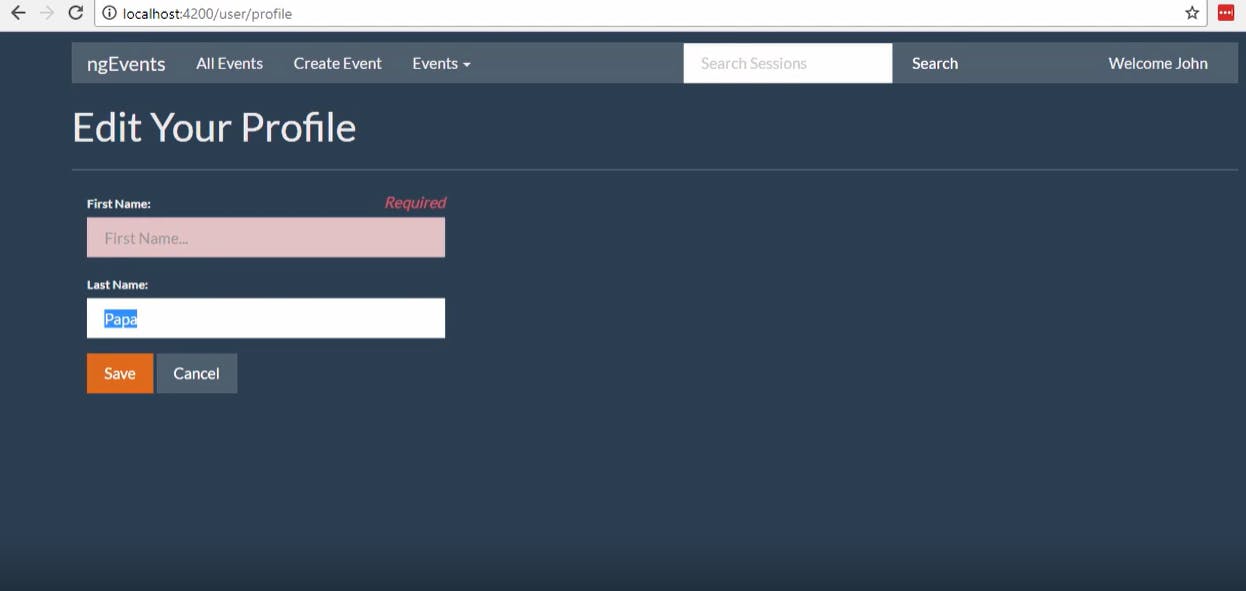
Now let's see how this is working in our browser

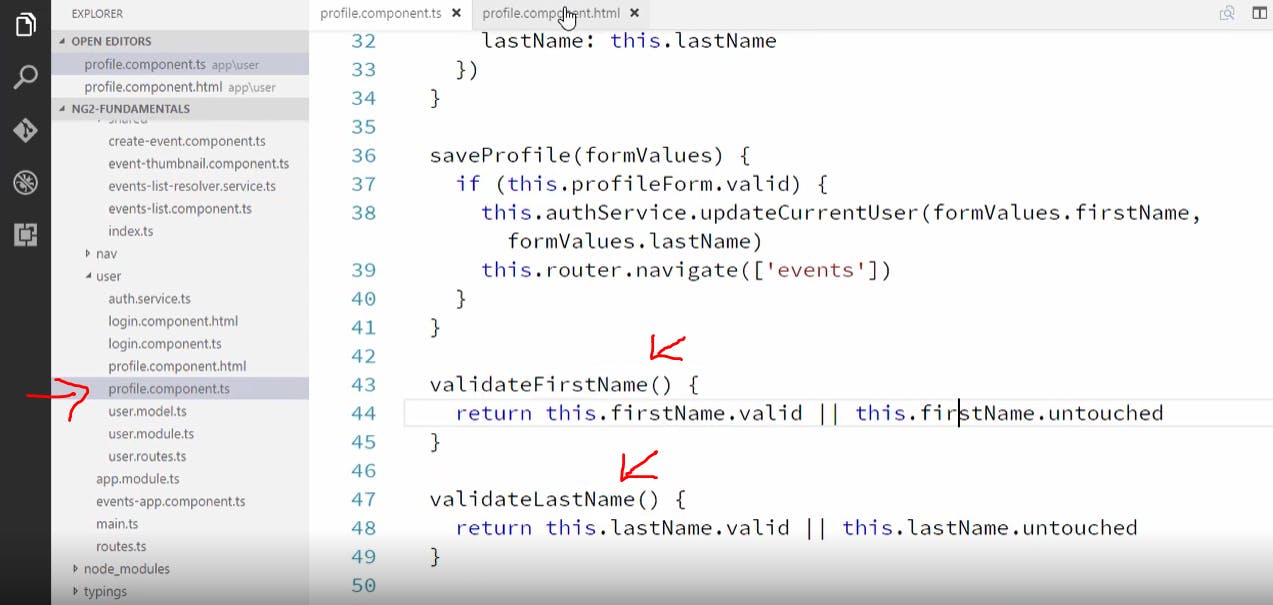
Now we need an error message to be displayed. We will create two methods validateFirstName and validateLastName and if these two methods return false then we would like to display the error class(shown below).
now let's go create these two methods. let's make few changes in our .ts file so we can get easier access to our fields for our methods as shown below
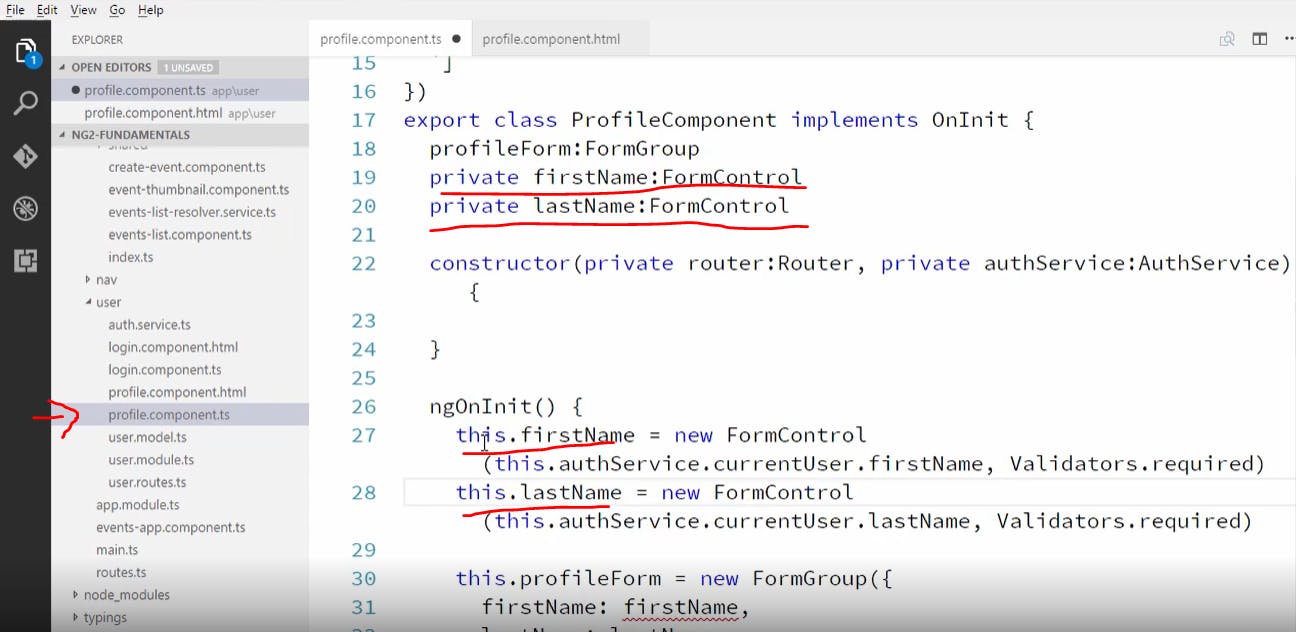
in our methods we will return true if field is valid or untouched as shown below
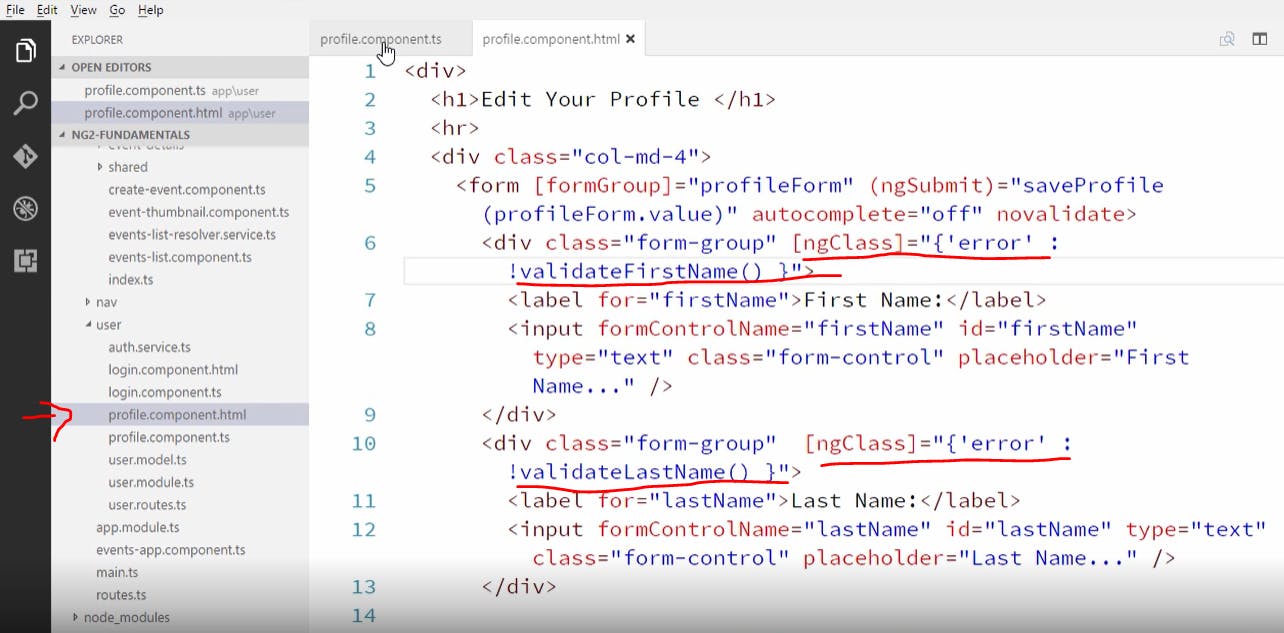
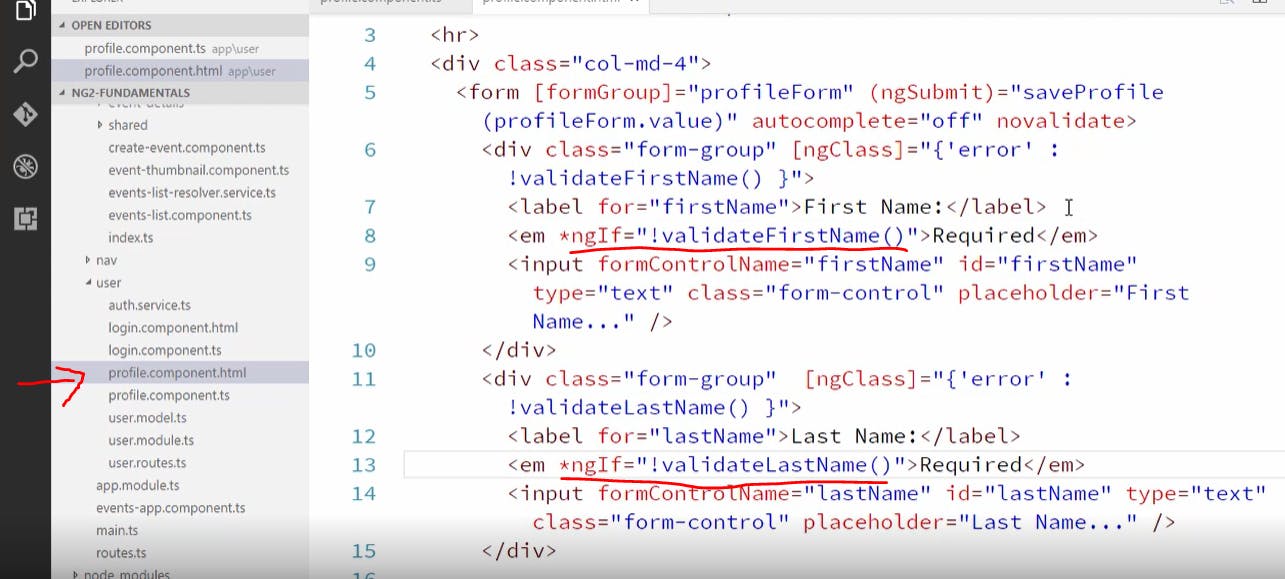
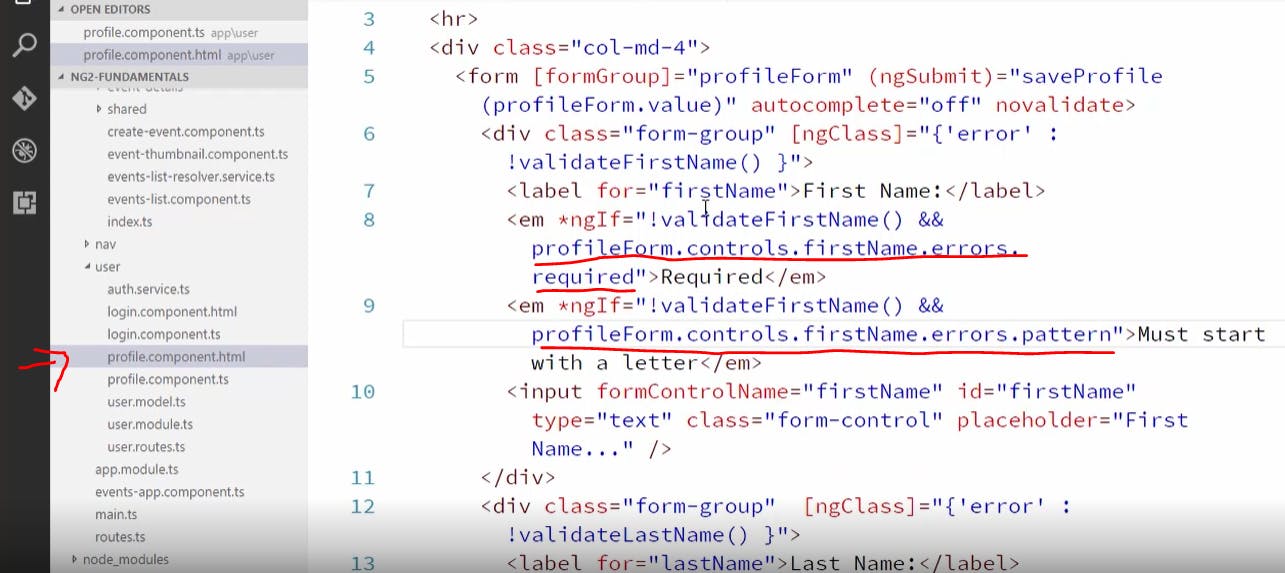
now let's wire up our error message in the "em" tag as shown below. we are using ngIf and saying if first name or second name is not valid then display required message above the field (shown below).
we had missed a colon here after color. We would want to display the required message in red so after this it would look something like this in the browser(shown below).
Using Multiple Validators in our Reactive Forms
We can pass multiple validators using an array. Let's say we want the first name to start with a letter and if user starts with a number then we would like to display other message than required(error message we had before).
"required" message is set to true when there is a required error and "must start with a letter" message is set to true if there is pattern error as shown below

Let's create our create event from
now let's do some changes here
now let's create our html file and add our html
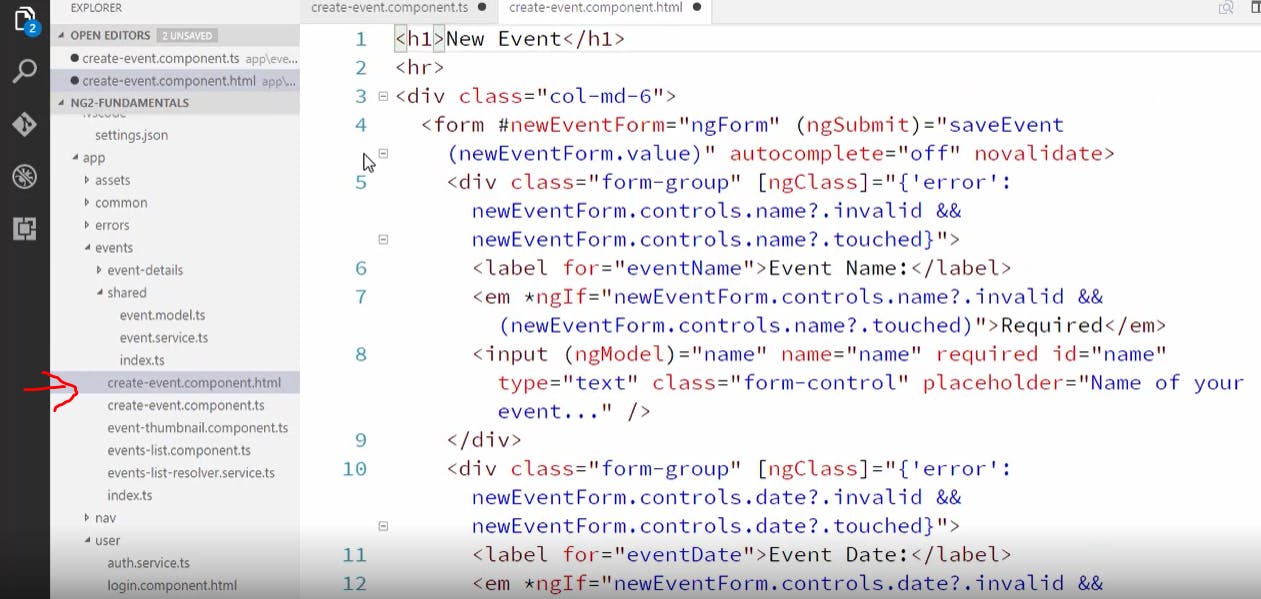
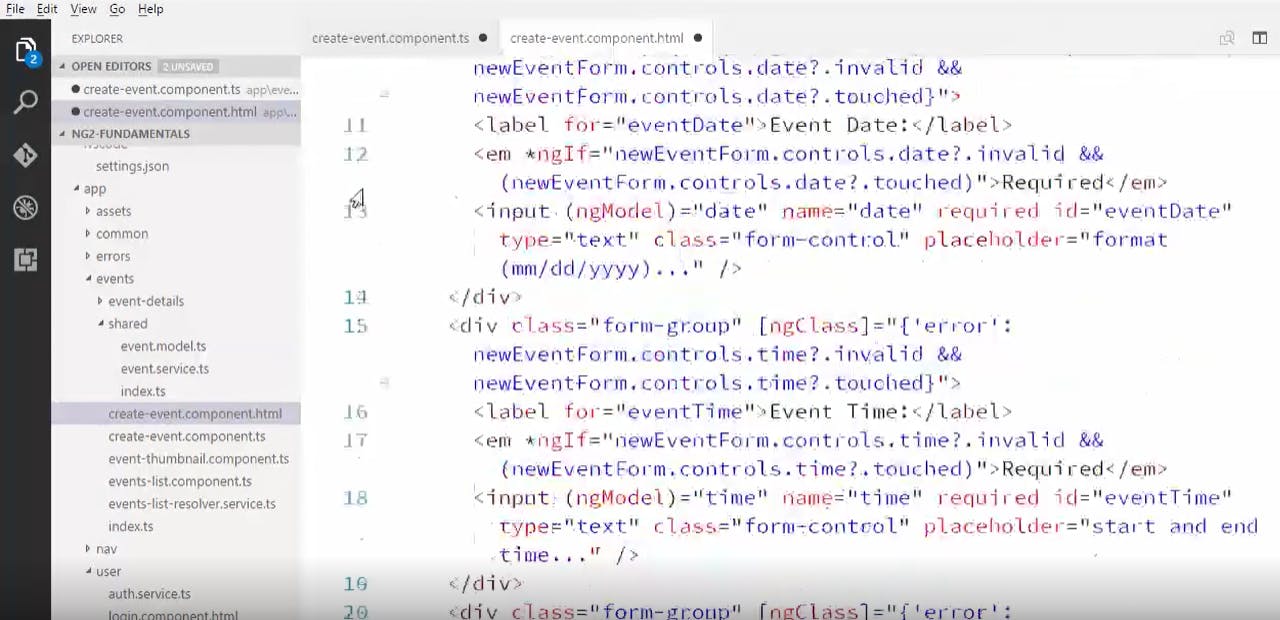
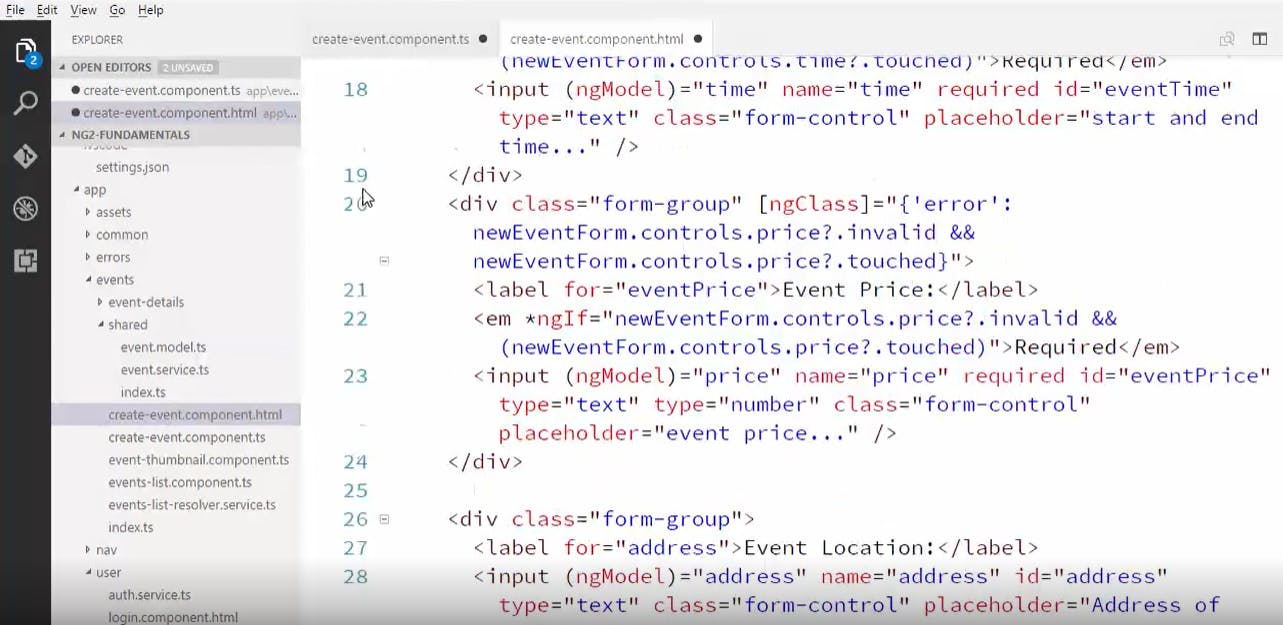
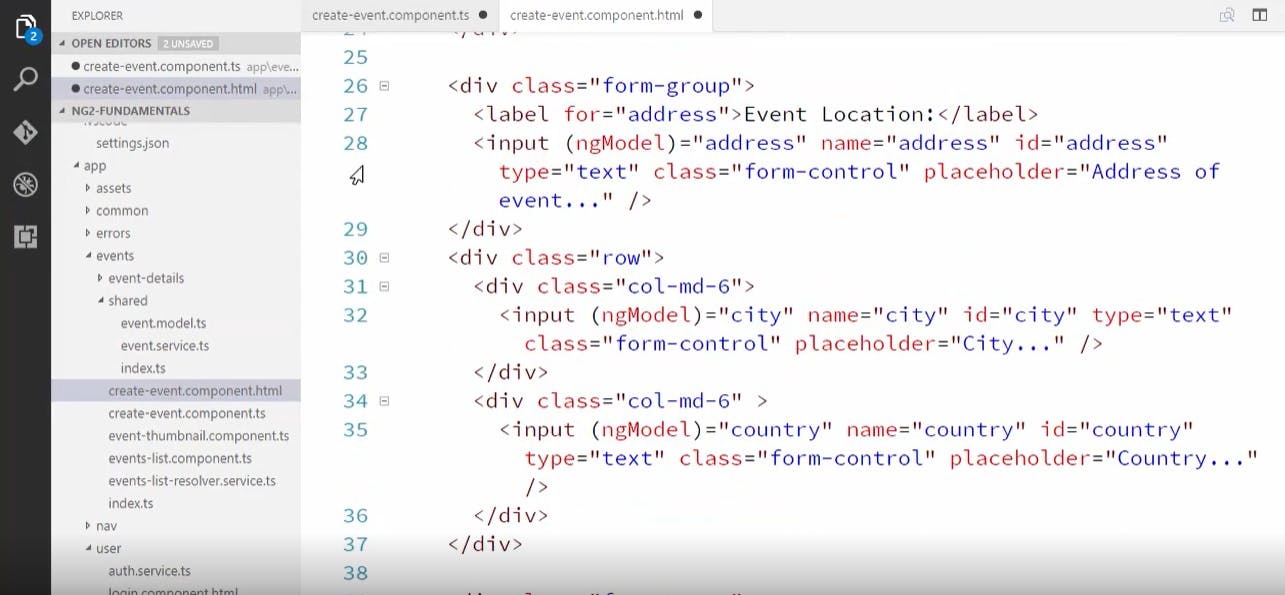
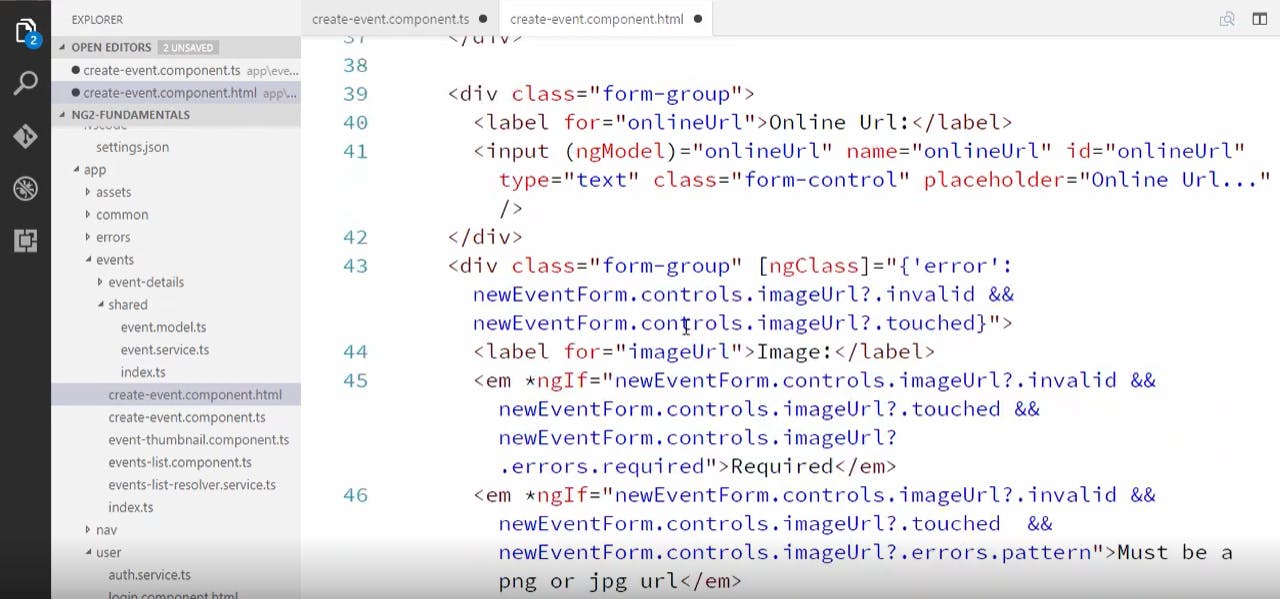
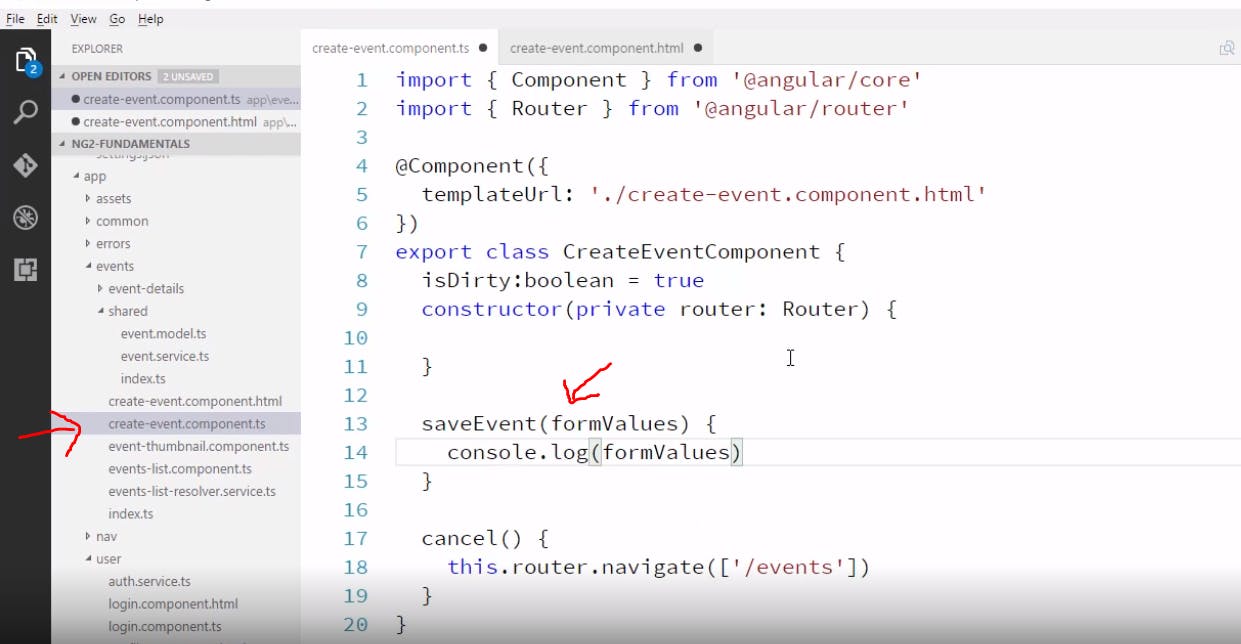
we haven't added any validation for the address(location) and online url fields in the above pictures we'll talk about this later in the blog. Let's go create our save event method now and let's just log out the form values for now as shown below
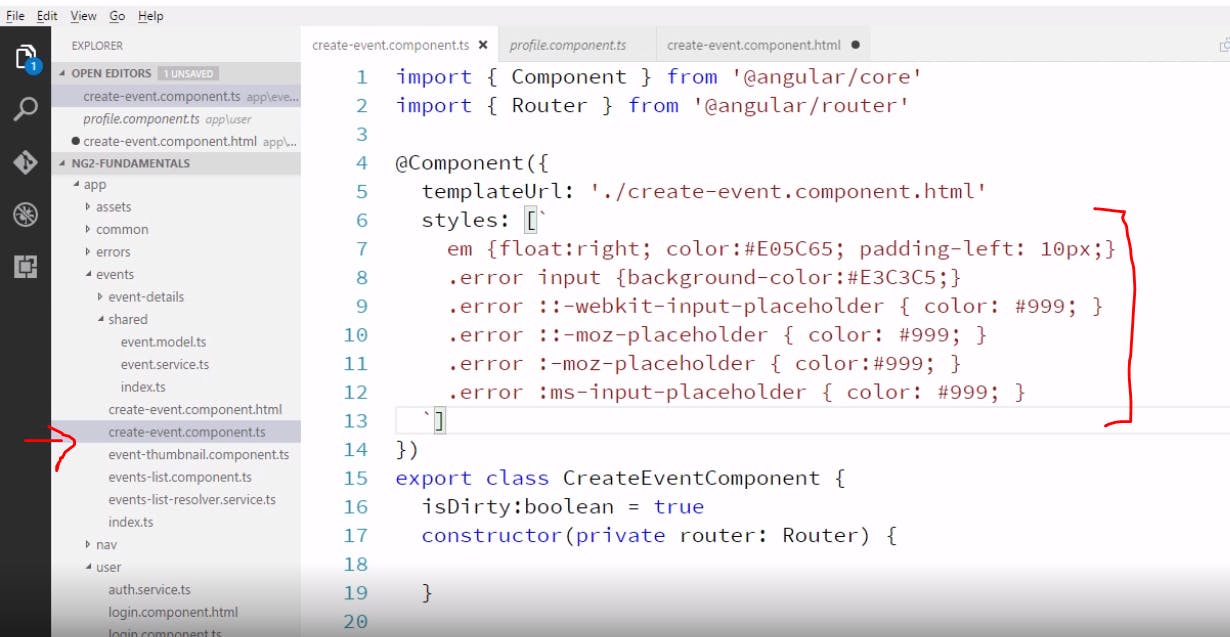
Let's add some styling to our validation messages so we'll just copy paste the styling we did in our profile component as shown below
in our template we have ngModel bindings to properties that don't exist and we have 8 or nine of these bindings and we don't want to clutter the component that much so we can avoid that by binding to properties on an object instead and we can do that to all the ngModel bindings as shown below (we added newEvent object to all our ngModel bindings in our html).
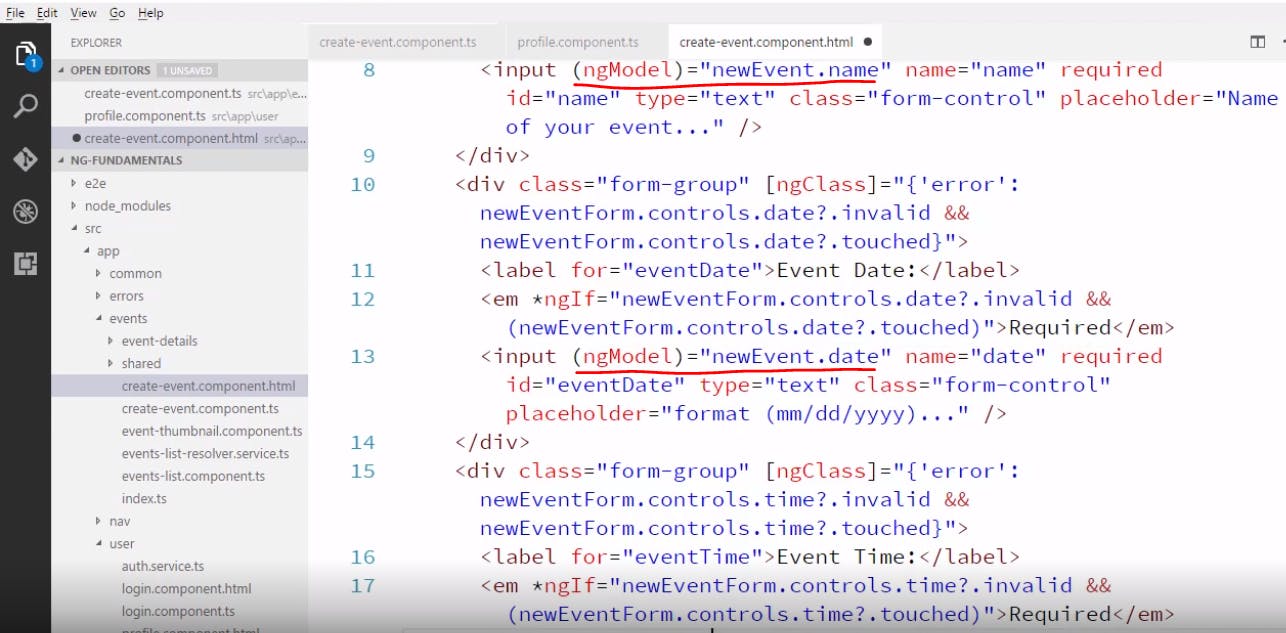
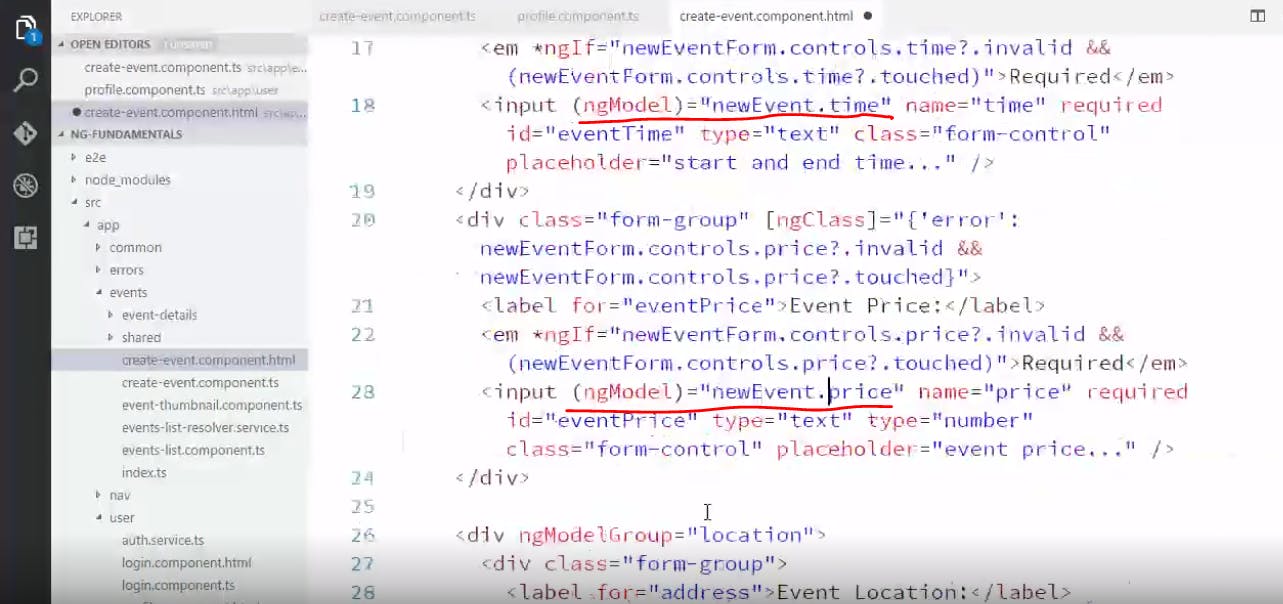
now let's make that new event object in our component as shown below
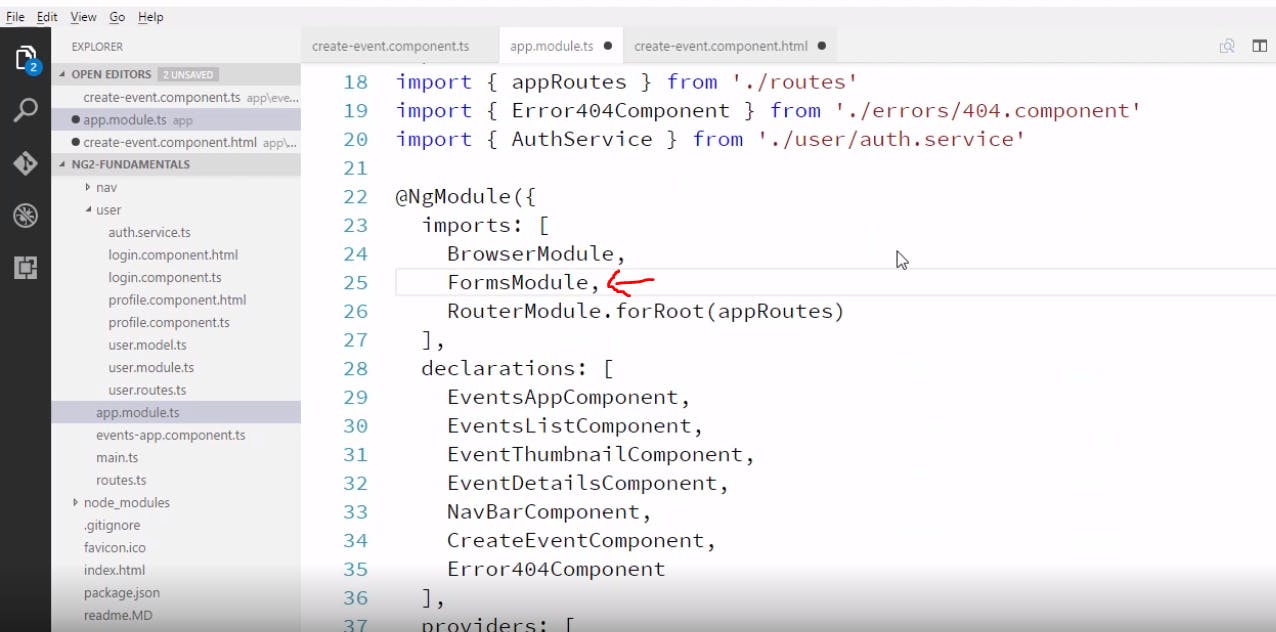
Now let's add forms module in our app module as shown below
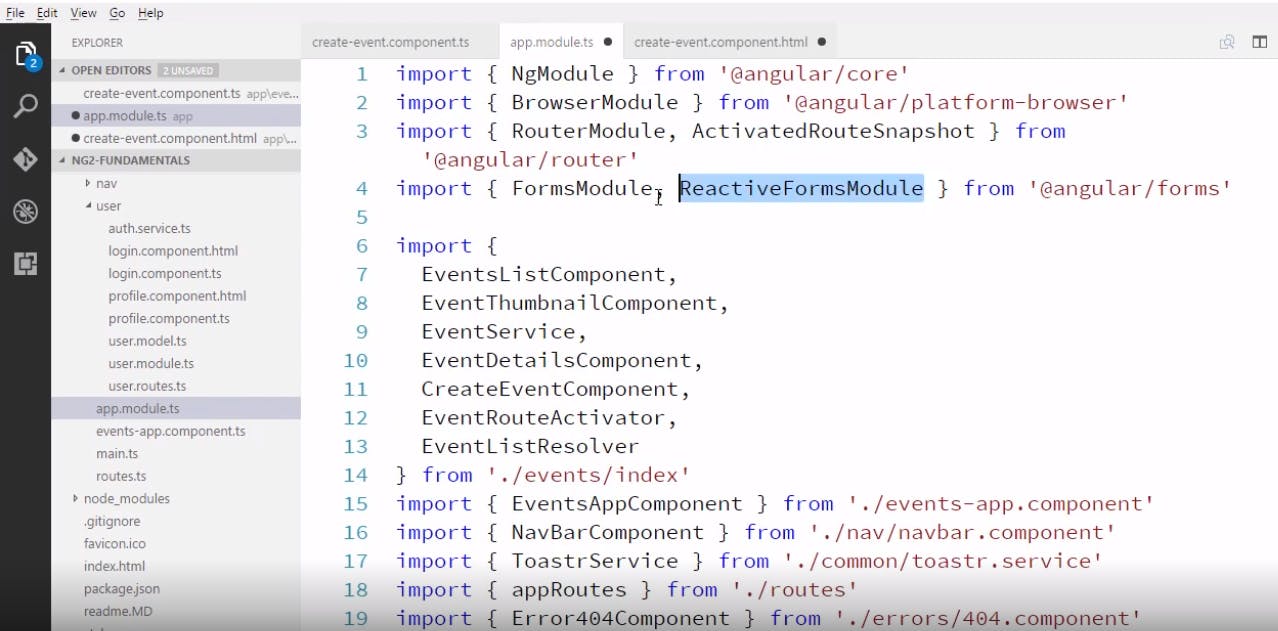
we will be using reactive modules too in the next few tasks so let's import it right now here in the app module as shown below
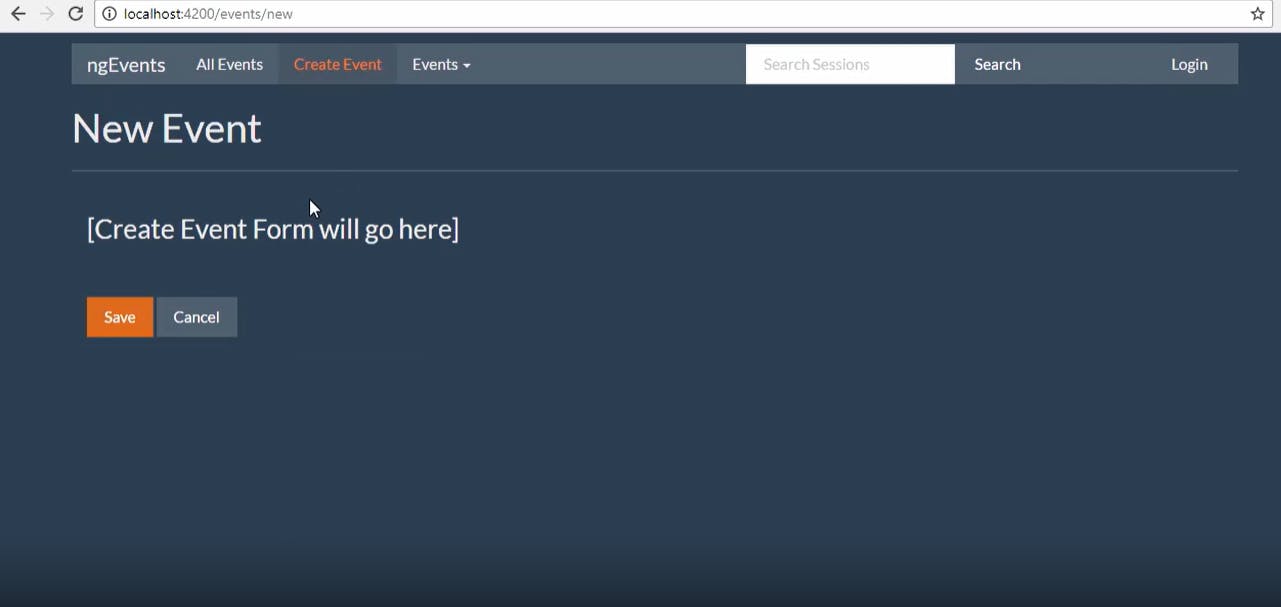
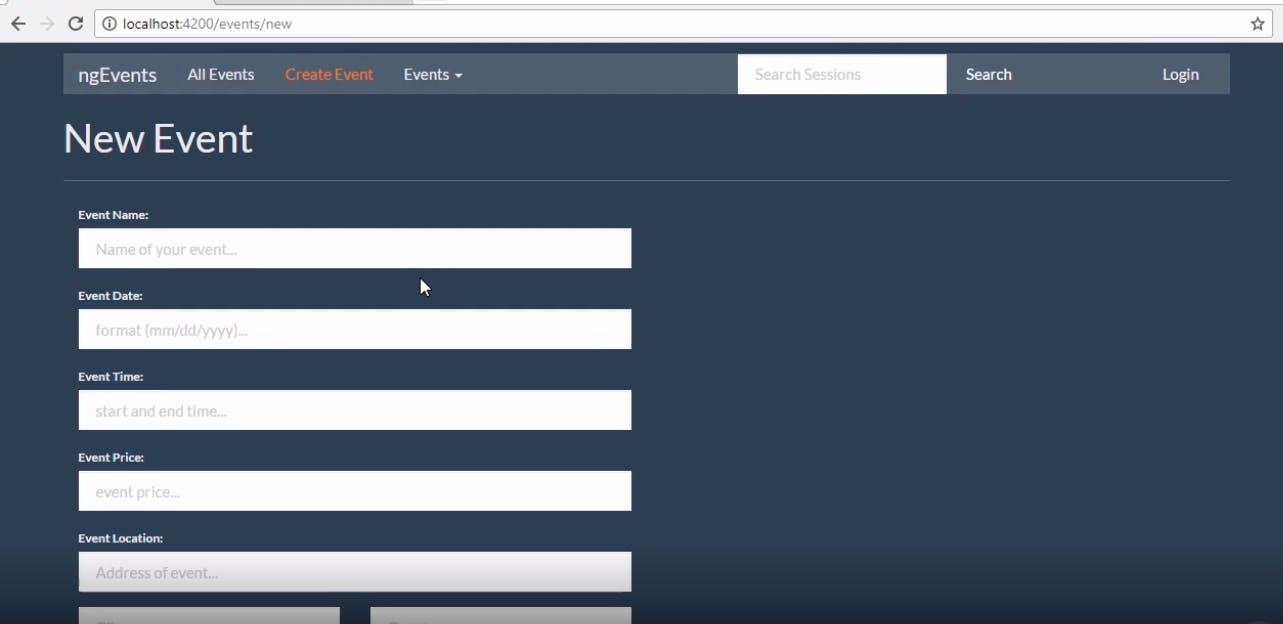
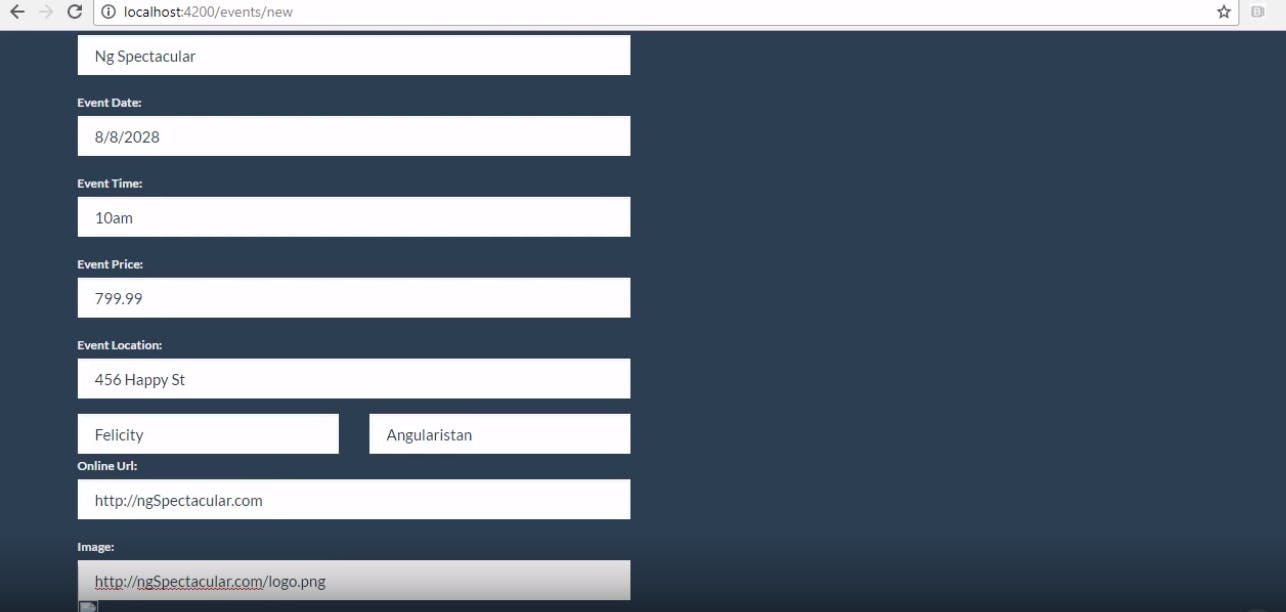
now let's take a look at how our form looks in the browser
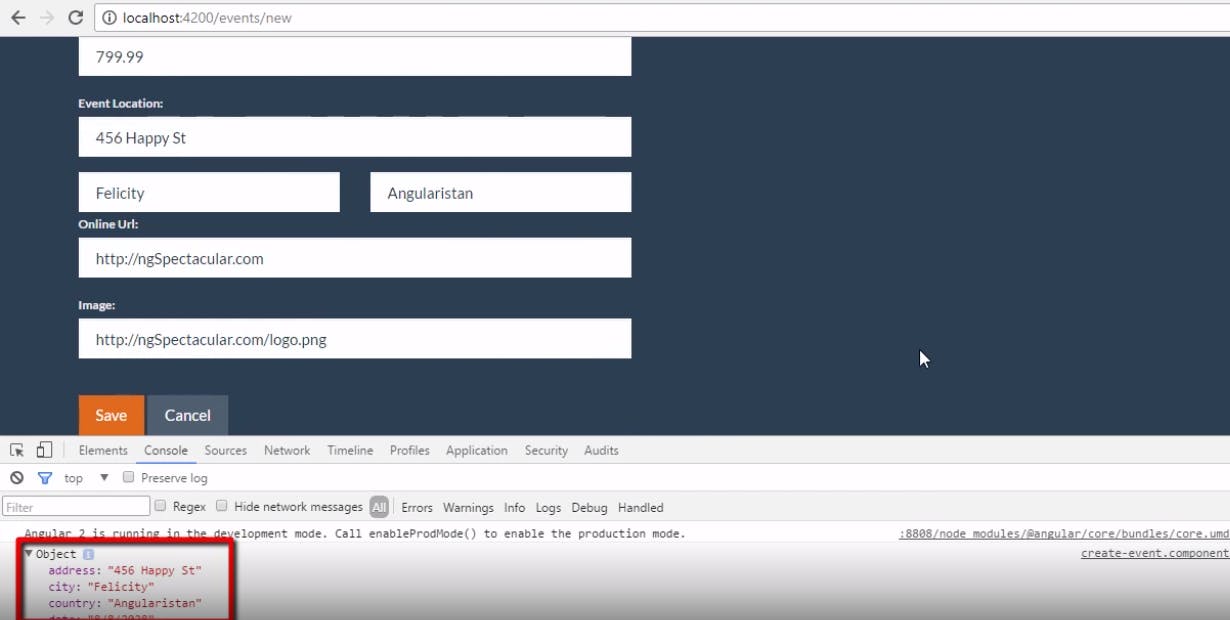
now if we fill up this from and click save this is what it should be showing(as shown below).
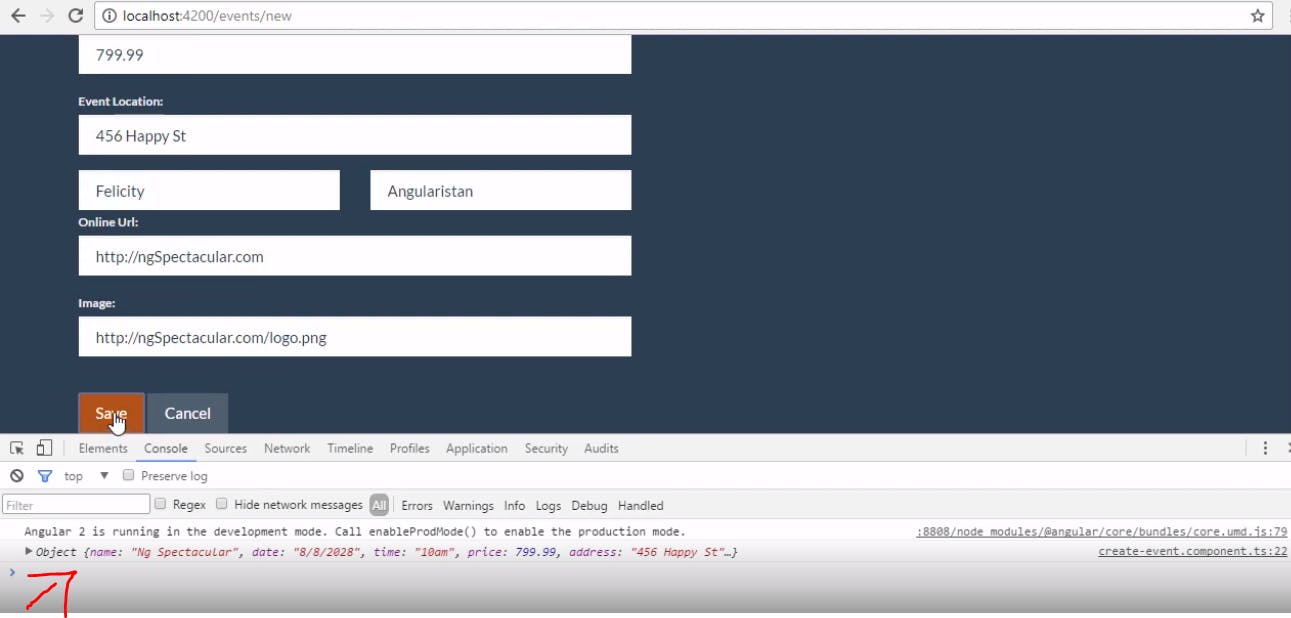
but here we have a small problem our data doesn't match the event model we can see that in our output as shown below
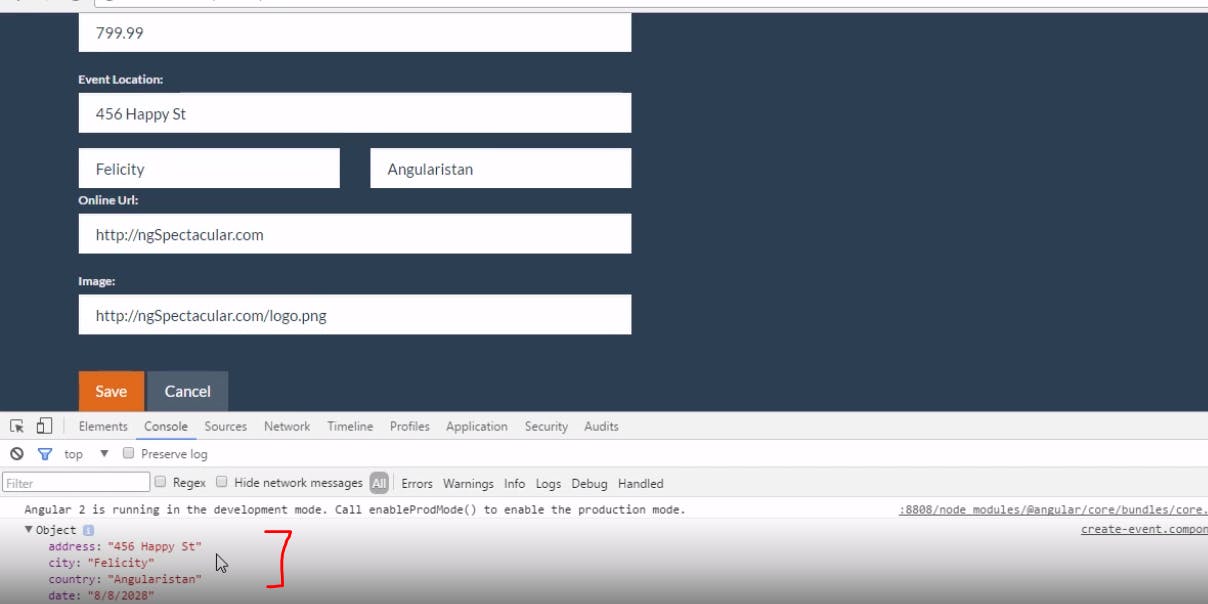
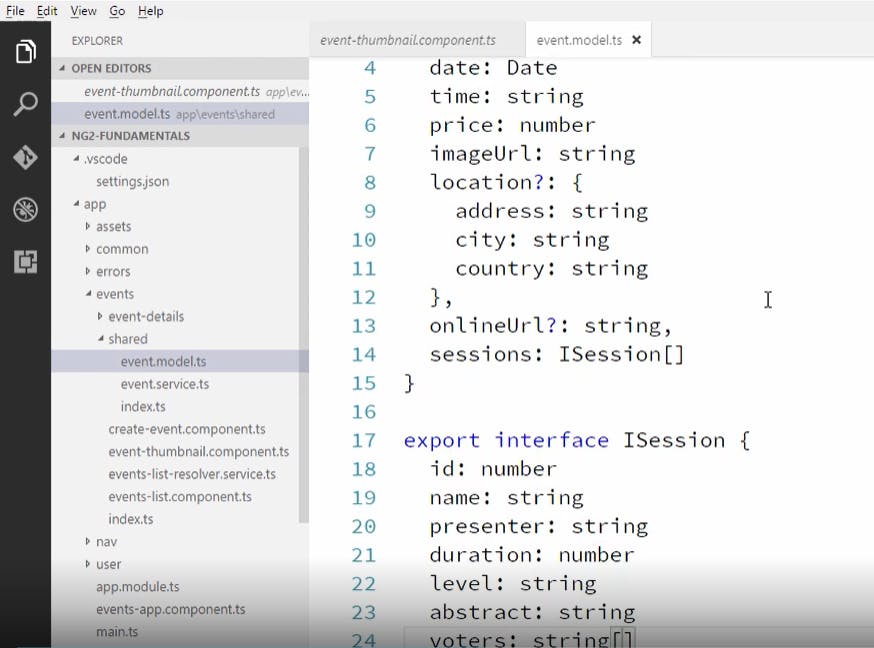
if we and take a look at our event module we can see that address, city and country are nested in our location object as shown below
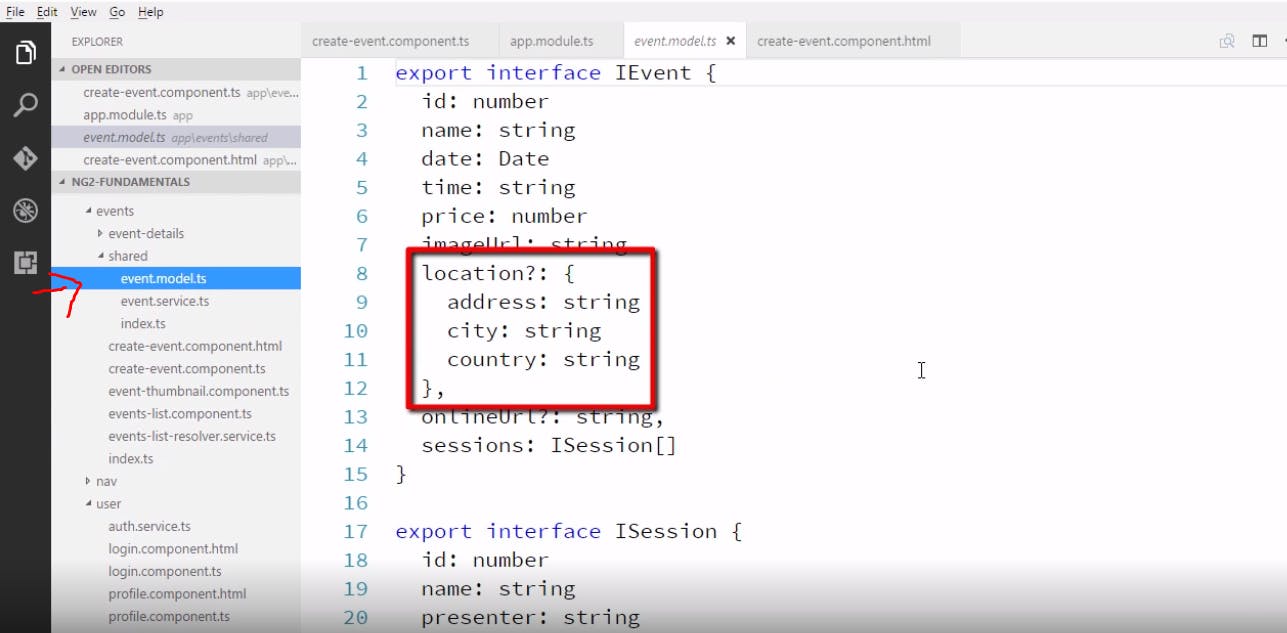
if we take a look at our output the address, city and country is not nested in a location object
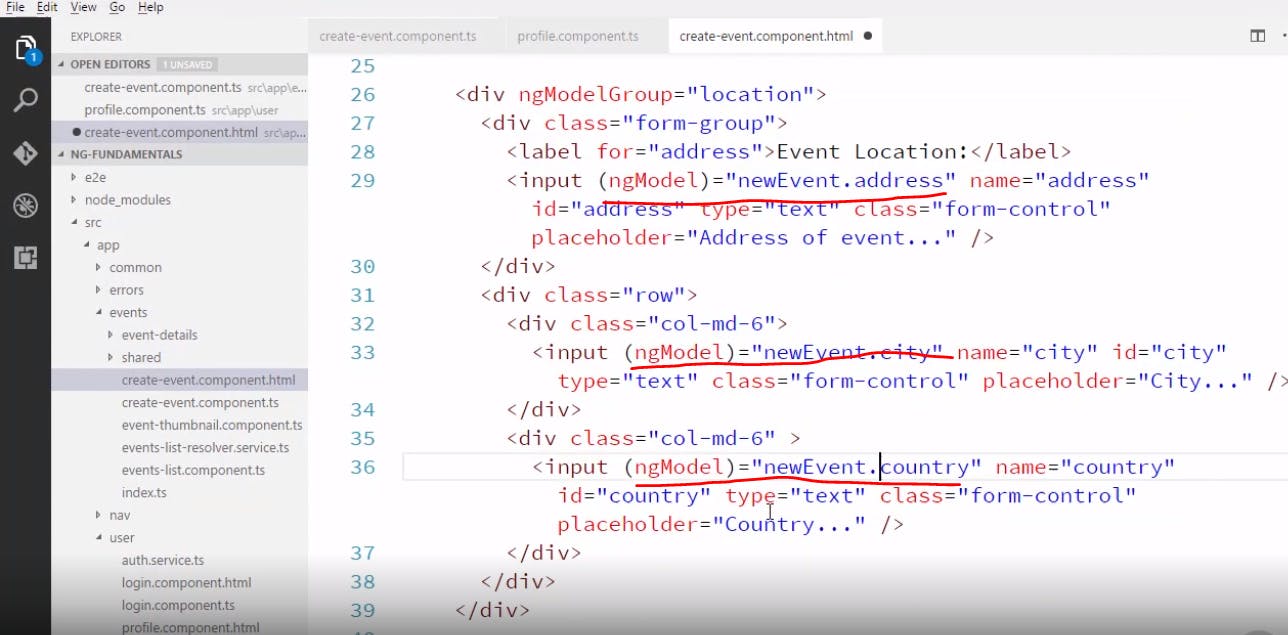
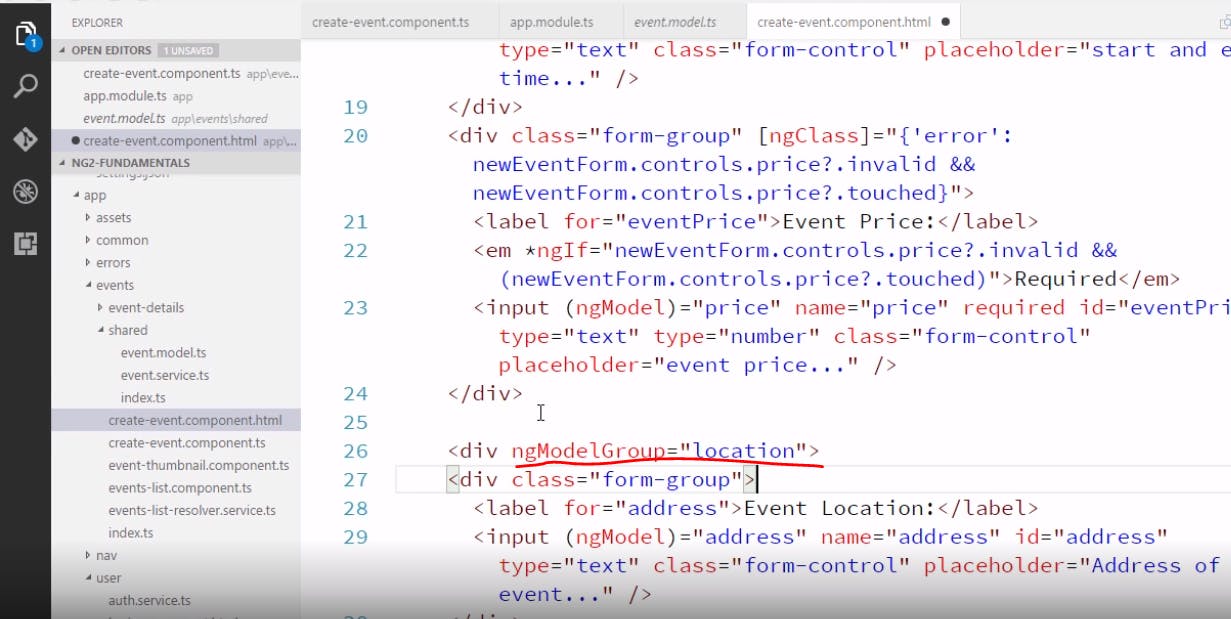
to fix that in a template based form we just wrap our location fields in an ngModel group and set that to the name of the property we would like these fields to be nested under and wrap these fields under that div as shown below
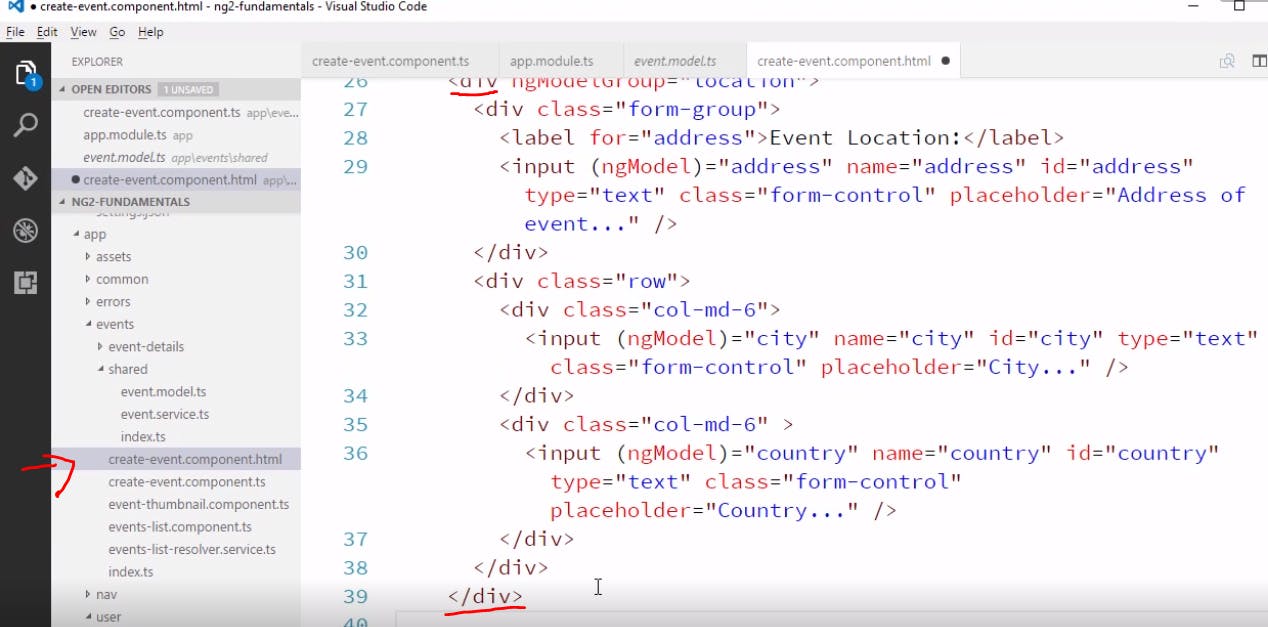
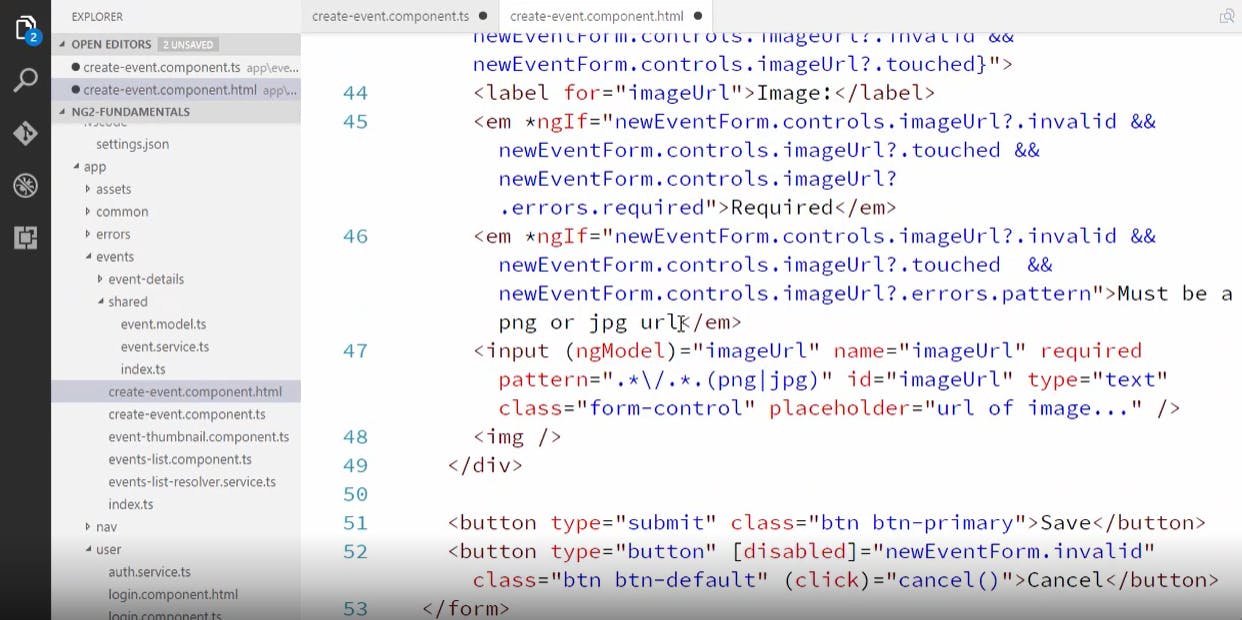
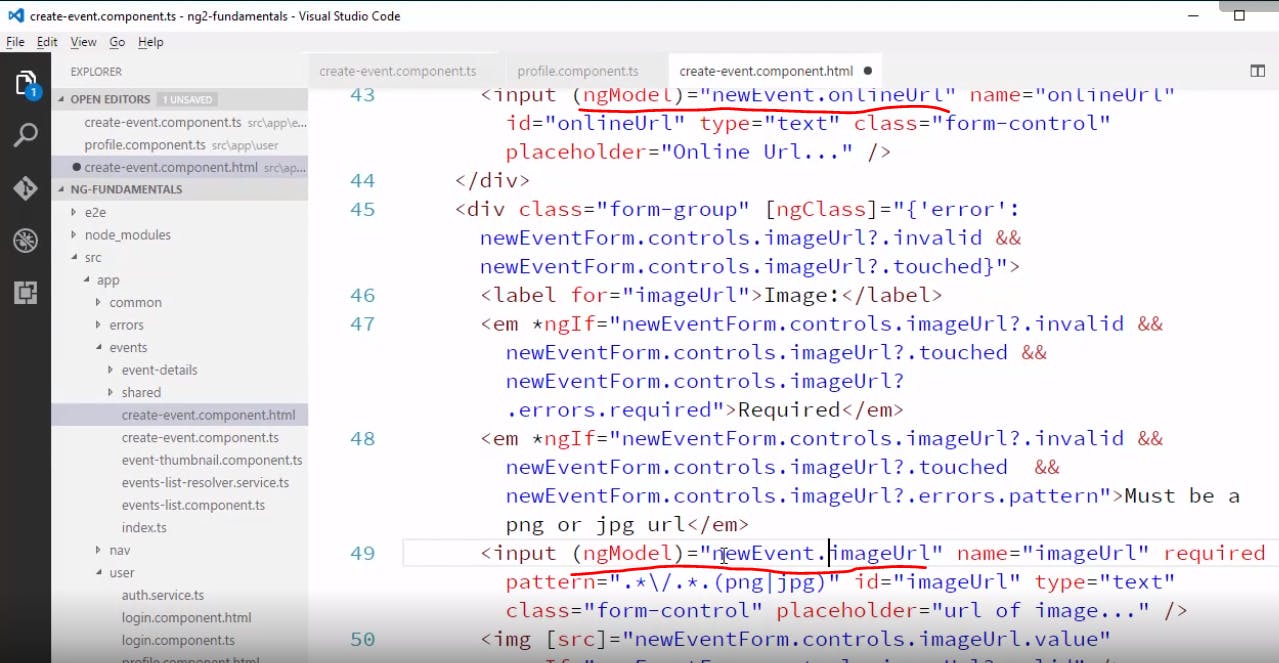
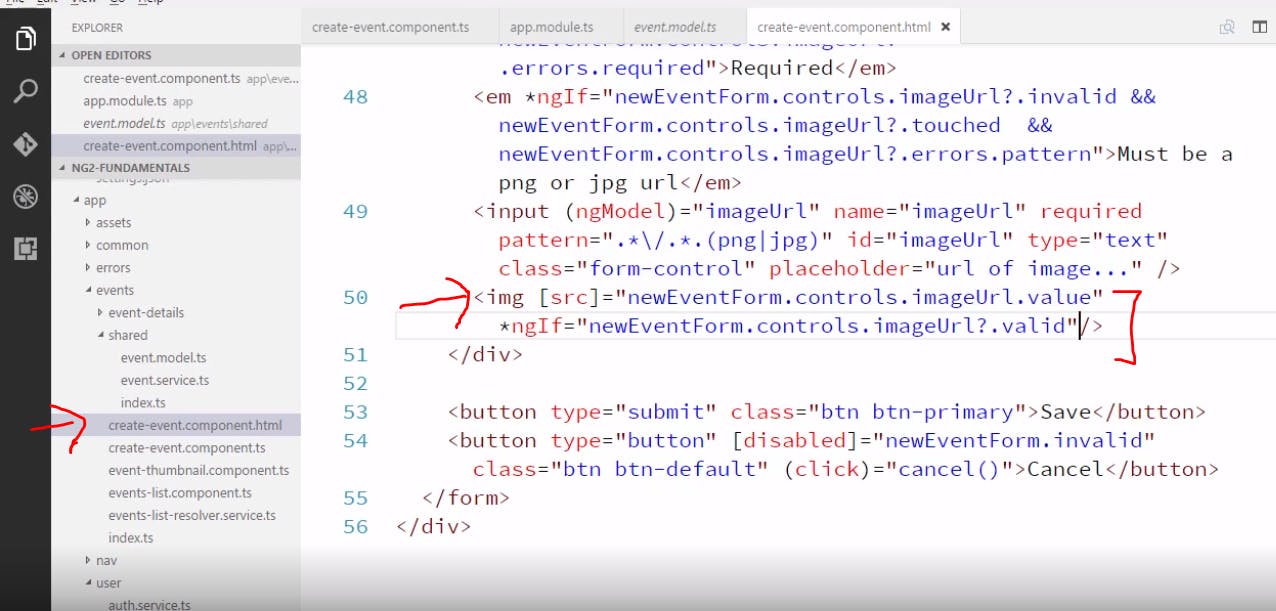
now if we put the data back and save our from we would get all these fields nested under location now let's add preview image tag so that user can view image when they type the image url in the image url field so what we are saying here is we dont want to preview the image until the form is valid(until the user has passed the image url dont show preview). We are binding it's(image tags) source property to the value of our image Url field as shown below.
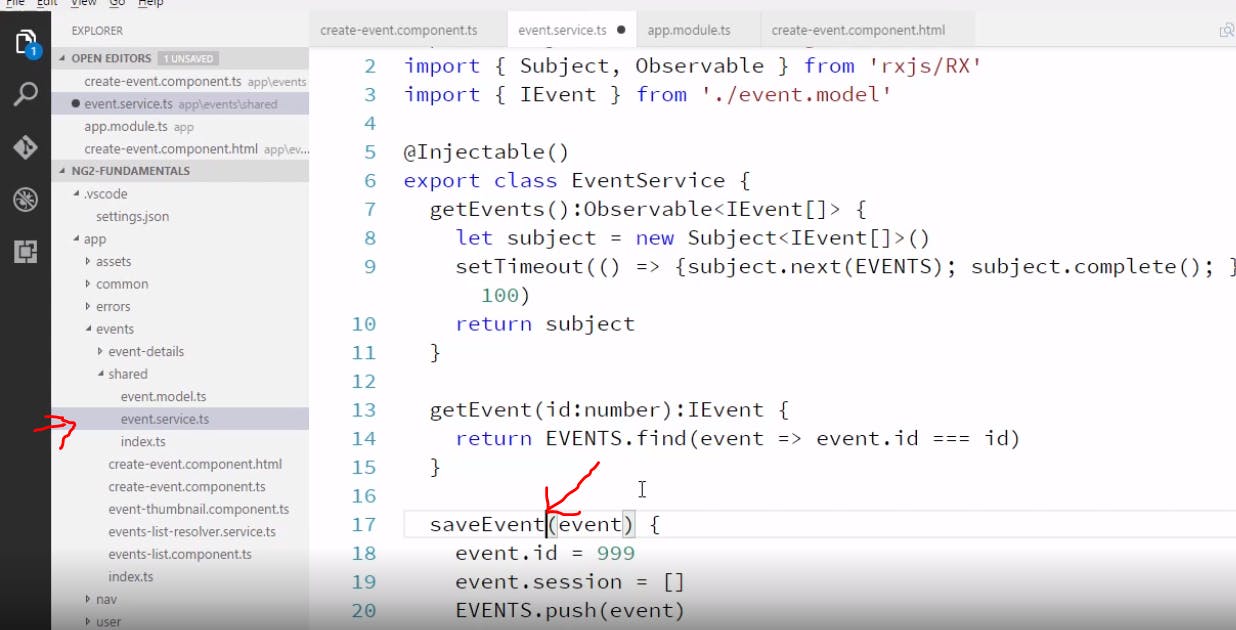
now we will fix our save event method as shown below
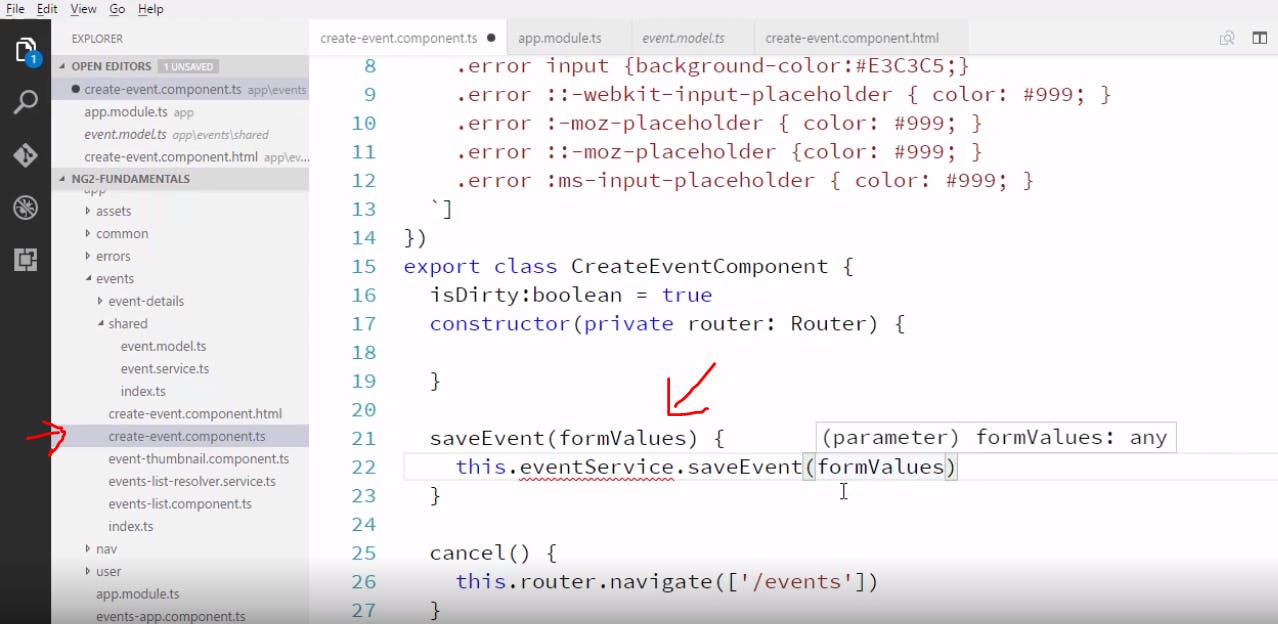
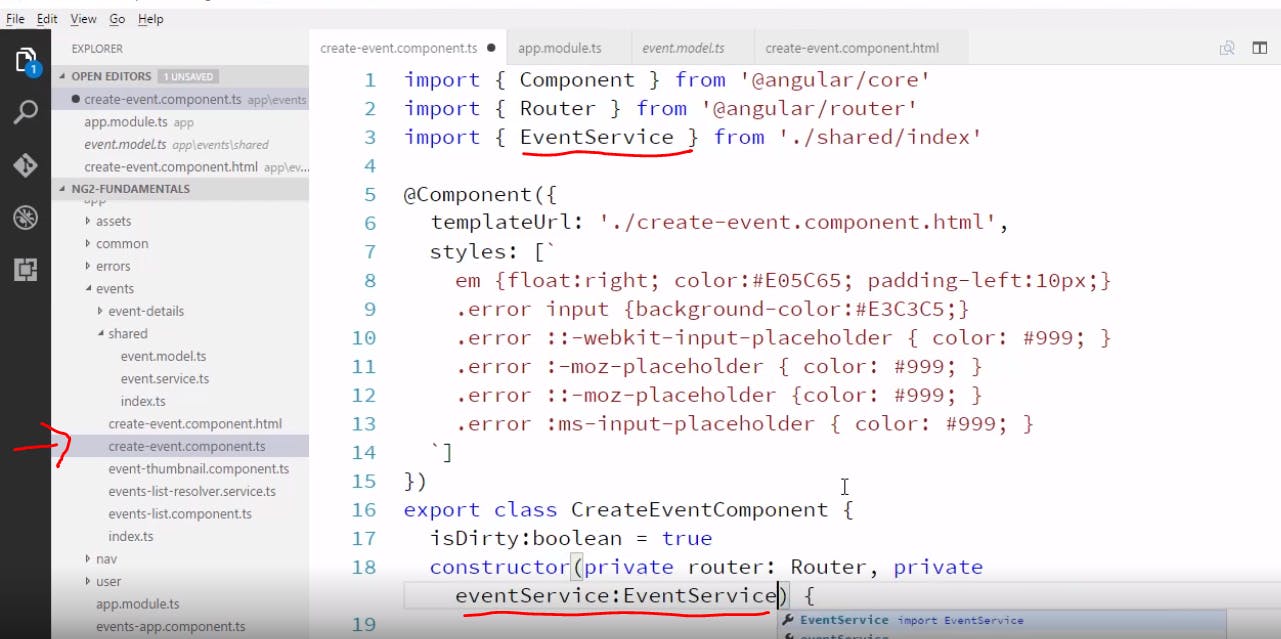
we have import ad inject our event service as shown below
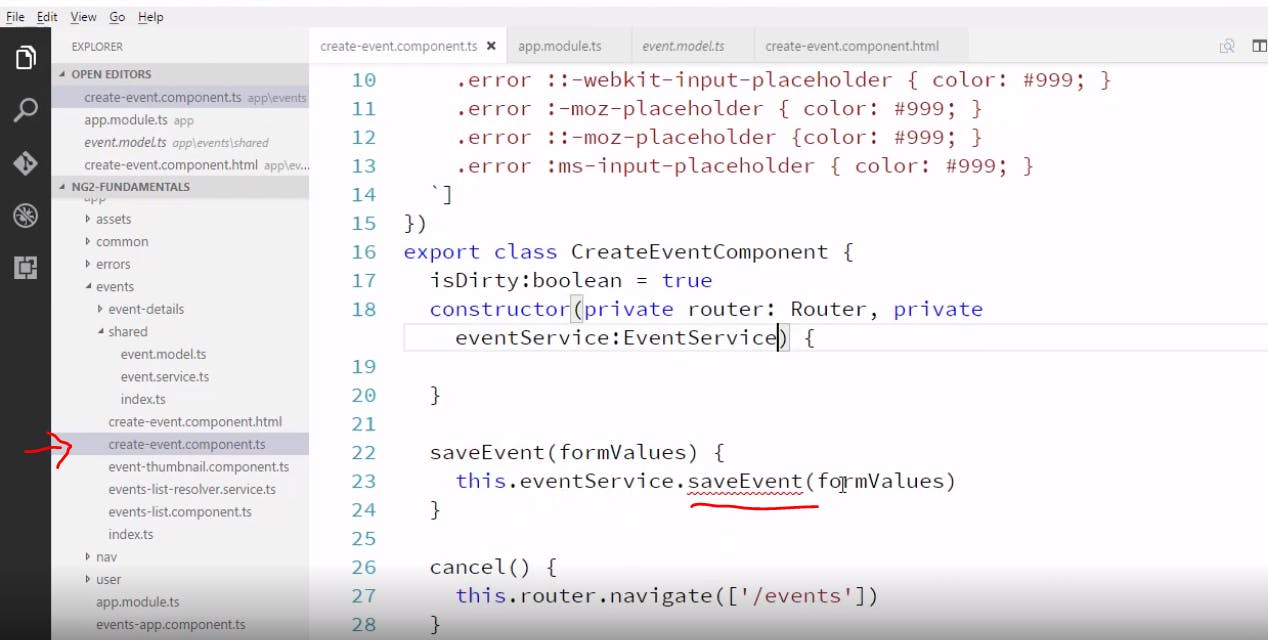
in the above picture we can see that there is an error because we don't have saveEvent method in our service so let's create saveEvent method in our service. We are gonna assign our event id to 999 for now this will allow us to add one new event without duplicate id's and we are also defaulting our sessions to an empty array and then we are pushing this to our array(shown below).
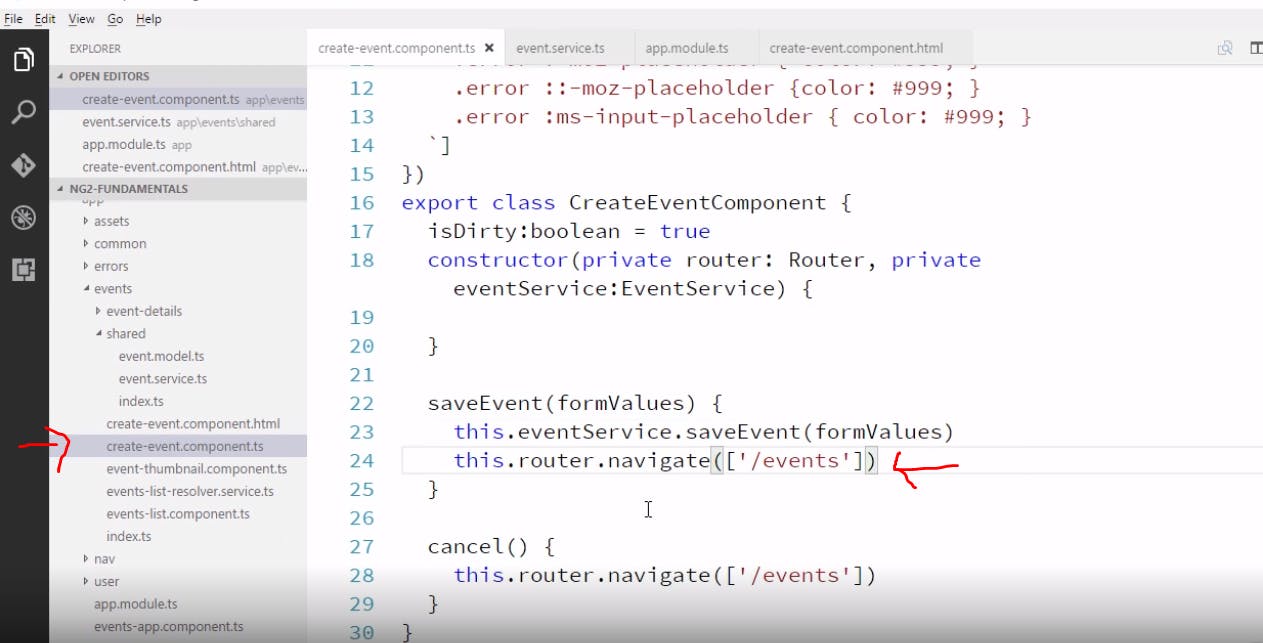
after we click on save we want to navigate our events page we do that by adding router as shown below
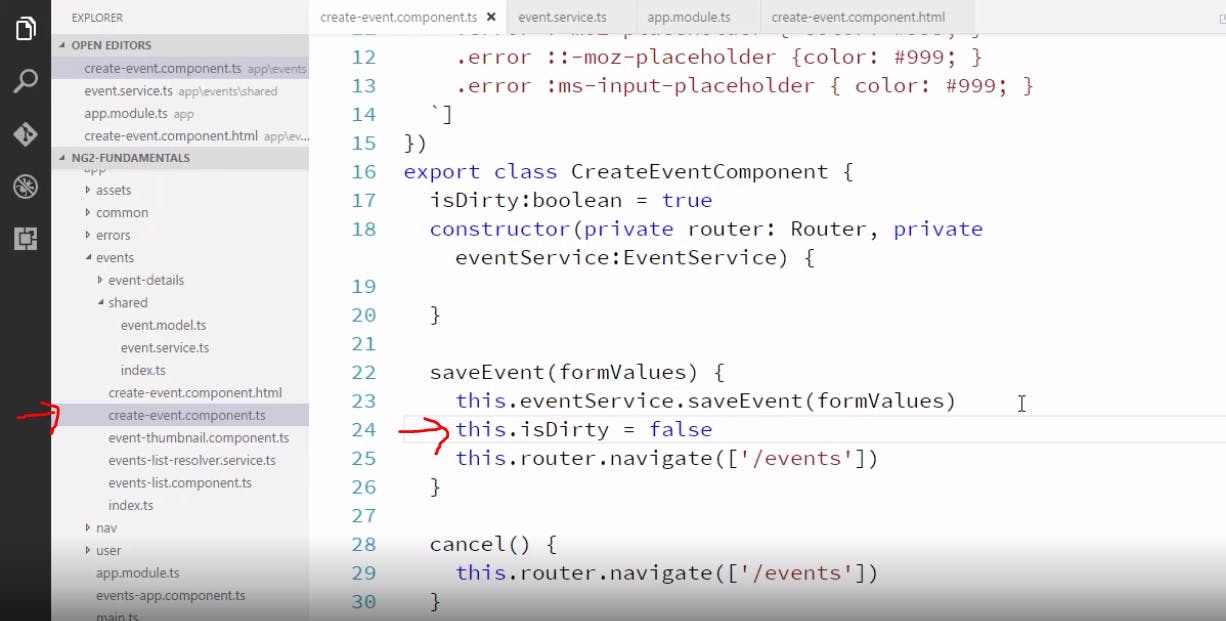
now you may remember we added a route guard to this component that looks at dirty flag this will prevent us from navigating after we save so we dirty as false as shown below
now if we create new event and click on save we should see the event added to our events list as shown below
now if we see our event details page it is not very well formatted and we would like to add sessions for each event so that attendees would know what would be taught in that event. Let's add a create sessions page using reactive forms. We have already defined our sessions model as shown below

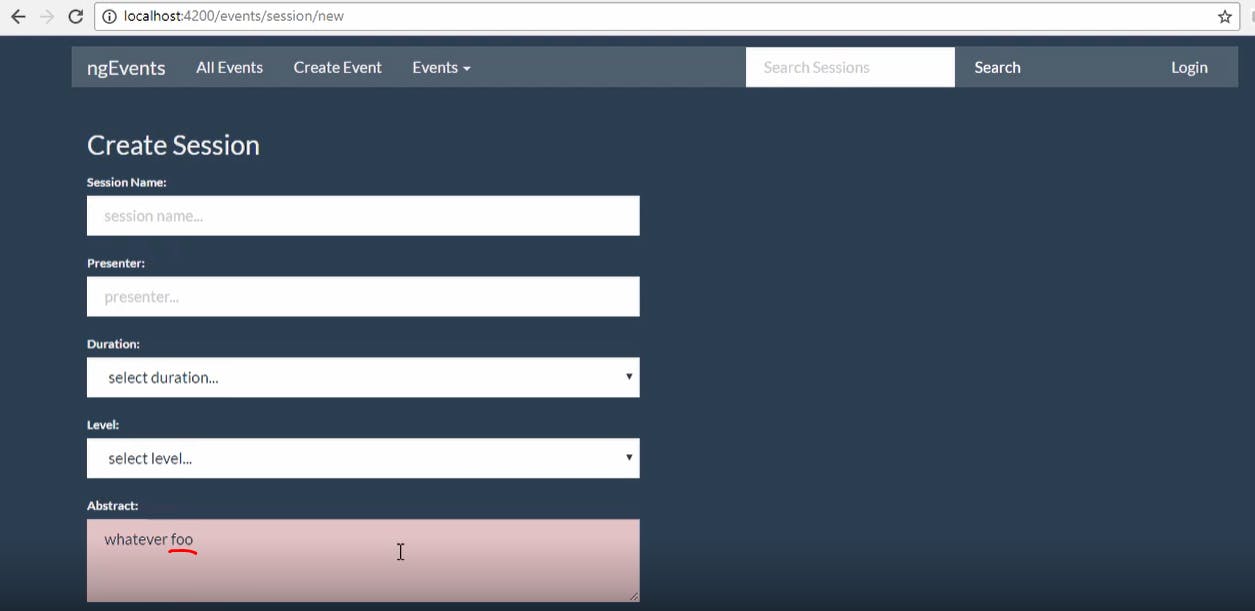
The Html for create session file is as shown below ```
Create Session
Session Name:
Presenter:
Duration: select duration... Half Hour 1 Hour Half Day Full Day
Level: select level... Beginner Intermediate Advanced
Abstract:
Save Cancel
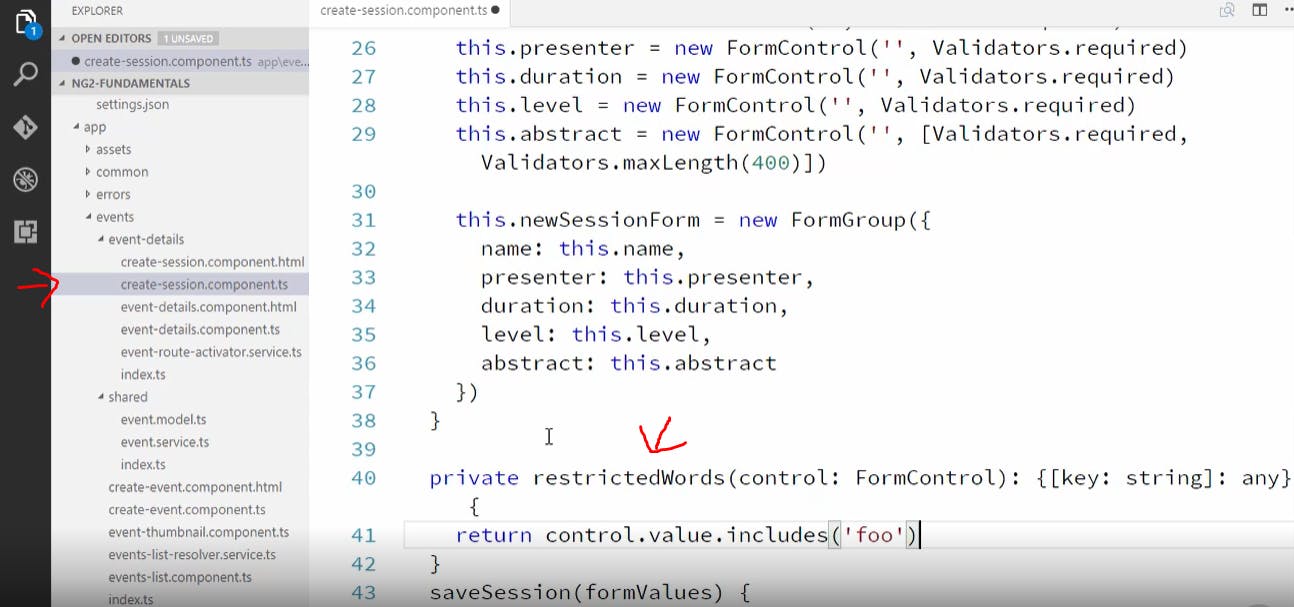
now let's create a method which checks if the controls value contains restricted words as shown below. We are using this method to check if there are any restricted words in the abstract filed as shown below
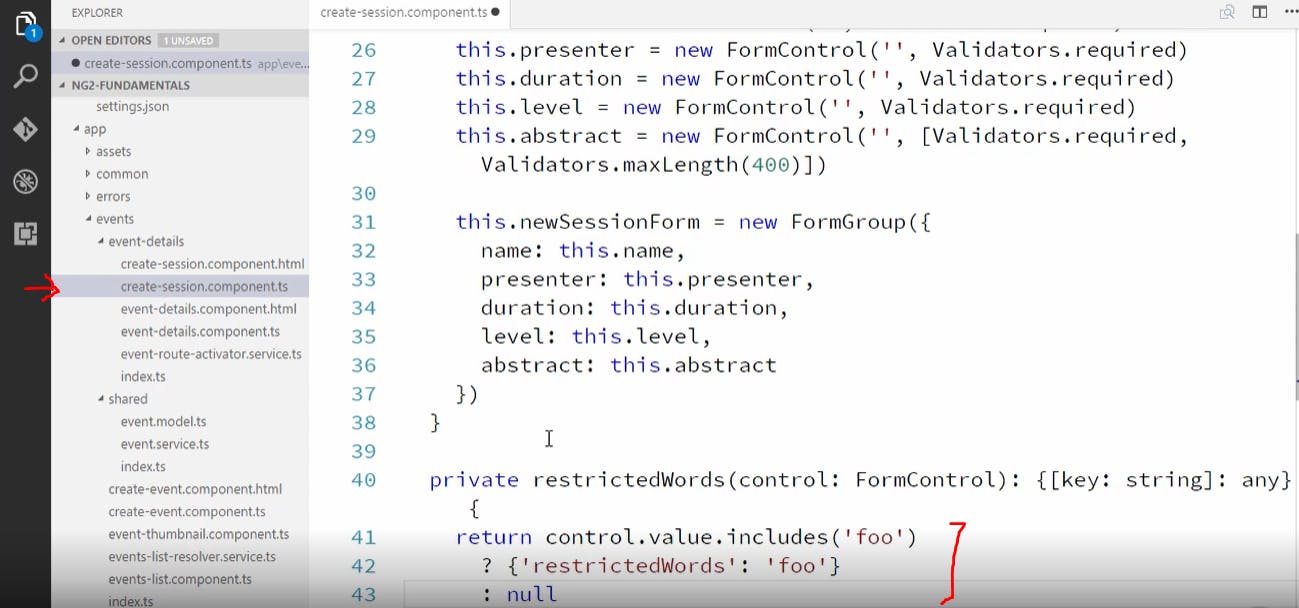
if it does contain restricted word mentioned in the above function then it is invalid else we will return null(shown below).
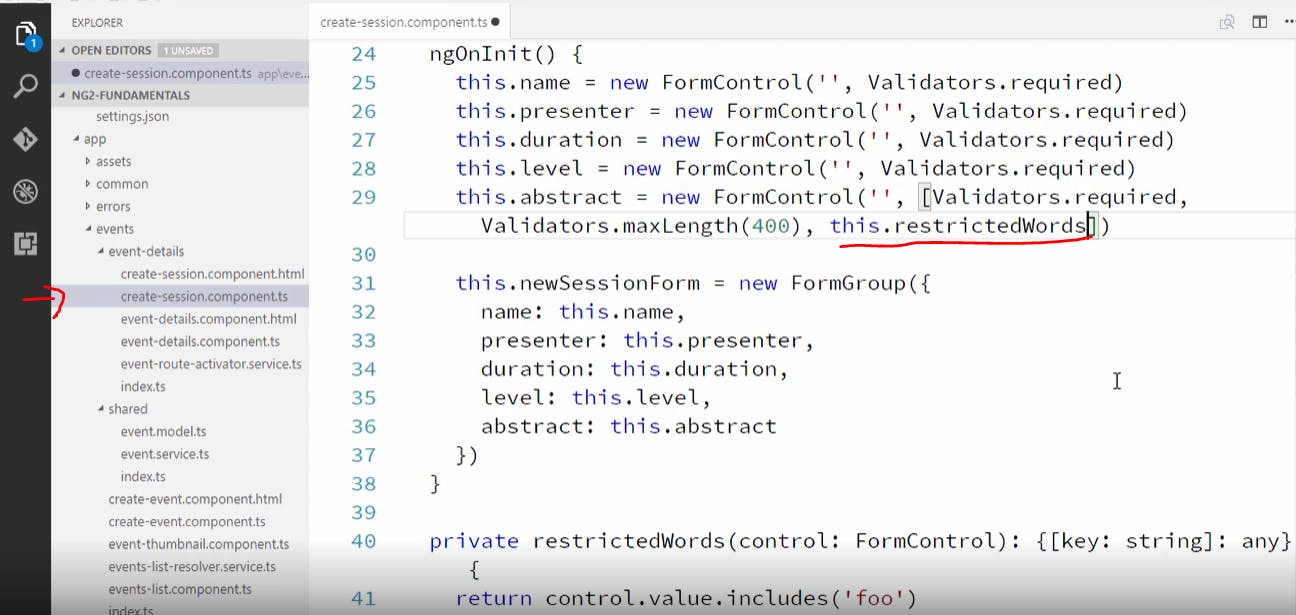
now let's add this as a validator to our abstract field as shown below
now as we can see in the browser we will get invalid error when we try to put in the restricted word in our abstract field as shown below
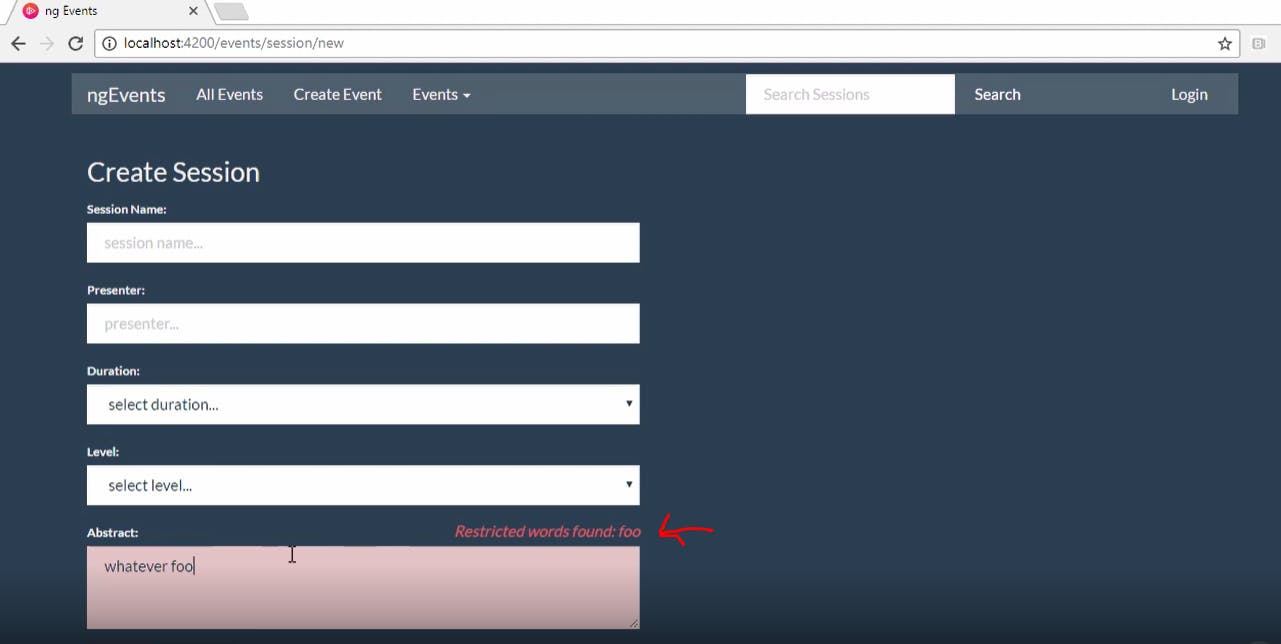
but we are missing an error message so let's go add the error message
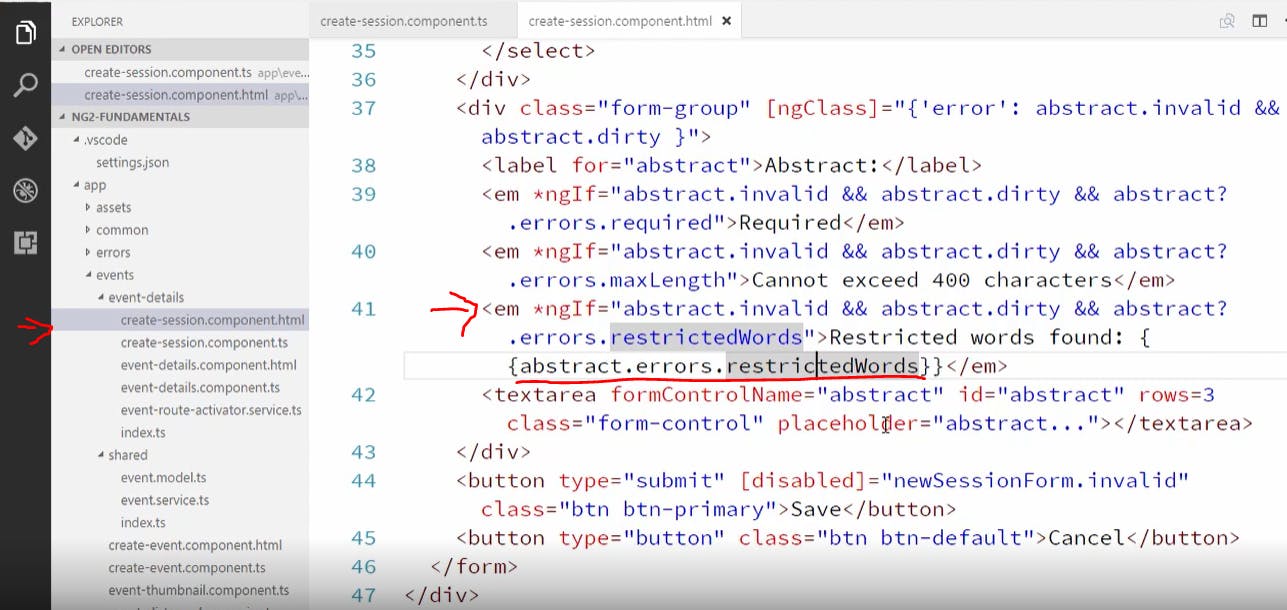
the underlined part is where we are accessing the restricted words i.e foo in this example. Now if we go check in the browser this is how the error message shows up (shown below).
find the source code on my GitHub https://github.com/kishore2008/Angular11EventsApplication